User Manual
Page 10
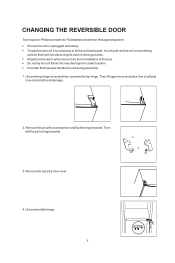
... solid so that 2 people handle the unit during the door reversing process. Remove the top left screw cover. 4. You should rest the unit on a soft pad to tilt the unit backwards. All parts removed must be saved to hinge bracket. 3. It's better that it is unplugged and empty.... Unscrew middle hinge. 9 Unscrew top hinge cover and then unscrew the top hinge. Ensure the unit is necessary to avoid scratch and damage. 2. Remove the pin ...
... solid so that 2 people handle the unit during the door reversing process. Remove the top left screw cover. 4. You should rest the unit on a soft pad to tilt the unit backwards. All parts removed must be saved to hinge bracket. 3. It's better that it is unplugged and empty.... Unscrew middle hinge. 9 Unscrew top hinge cover and then unscrew the top hinge. Ensure the unit is necessary to avoid scratch and damage. 2. Remove the pin ...
User Manual
Page 12
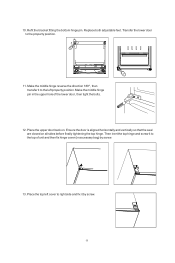
...the seal are closed on . 10. Make the middle hinge reverse the direction 180º, then transfer it to right side and fix it to the property position. 11. Place the upper door back on all sides before finally tightening the top hinge. Place the top left cover to the left property position.... Make the middle hinge pin in the upper hole of unit and then fix hinge cover (in accessary bag) by screw. 11 Replace both...
...the seal are closed on . 10. Make the middle hinge reverse the direction 180º, then transfer it to right side and fix it to the property position. 11. Place the upper door back on all sides before finally tightening the top hinge. Place the top left cover to the left property position.... Make the middle hinge pin in the upper hole of unit and then fix hinge cover (in accessary bag) by screw. 11 Replace both...


