
User Manual
Page 3
TABLE OF CONTENTS NAMES OF THE PARTS SPECIFICATIONS IMPORTANT SAFETY INSTRUCTIONS INSTALLATION INSTRUCTION BEFORE USING YOUR REFRIGERATOR INSTALLING YOUR REFRIGERATOR ELECTRICAL CONNECTION OPERATING YOUR REFRIGERATOR TEMPERATURE CONTROL ICE TRAY .. CARE AND MAINTENANCE ...
TABLE OF CONTENTS NAMES OF THE PARTS SPECIFICATIONS IMPORTANT SAFETY INSTRUCTIONS INSTALLATION INSTRUCTION BEFORE USING YOUR REFRIGERATOR INSTALLING YOUR REFRIGERATOR ELECTRICAL CONNECTION OPERATING YOUR REFRIGERATOR TEMPERATURE CONTROL ICE TRAY .. CARE AND MAINTENANCE ...
User Manual
Page 4
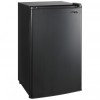
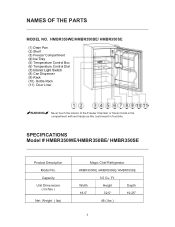
Capacity Unit Dimensions ( inches ) Net Weight ( lbs) Magic Chef Refrigerator HMBR350WE /HMBR350BE/ HMBR350SE 3.5 Cu. Ft. Width Height Depth 18.5" 32.5" 19.25" 48 ( lbs ) 3 NAMES OF THE PARTS MODEL NO. HMBR350WE/HMBR350BE/ HMBR350SE (1) Drain Pan (2) Shelf (3) Freezer Compartment (4) Ice Tray (5) Temperature Control Box (6) Temperature Control Dial (7) Interior Light Switch (8) Can Dispenser (9) Rack... or frozen foods in the compartment with wet hands as this could result in frost bite. SPECIFICATIONS Model # HMBR350WE/HMBR350BE/ HMBR350SE Product Description Model No.
Capacity Unit Dimensions ( inches ) Net Weight ( lbs) Magic Chef Refrigerator HMBR350WE /HMBR350BE/ HMBR350SE 3.5 Cu. Ft. Width Height Depth 18.5" 32.5" 19.25" 48 ( lbs ) 3 NAMES OF THE PARTS MODEL NO. HMBR350WE/HMBR350BE/ HMBR350SE (1) Drain Pan (2) Shelf (3) Freezer Compartment (4) Ice Tray (5) Temperature Control Box (6) Temperature Control Dial (7) Interior Light Switch (8) Can Dispenser (9) Rack... or frozen foods in the compartment with wet hands as this could result in frost bite. SPECIFICATIONS Model # HMBR350WE/HMBR350BE/ HMBR350SE Product Description Model No.
User Manual
Page 5
... be free standing only, and should be removed before throwing out the refrigerator. - This will hinder the performance of this product. • Never clean refrigerator parts with flammable fluids.
... be free standing only, and should be removed before throwing out the refrigerator. - This will hinder the performance of this product. • Never clean refrigerator parts with flammable fluids.
User Manual
Page 8
Remove the drip tray under chiller compartment 2. How To Change the interior light NOTE:All parts removed must be saved to do the reinstallation of the same voltage and screw size. 5. Failure to do so could result in electrical shock or personal injury. 1. Before removing the light bulb, unplug the appliance from the lower hole at the thermostat control box 4. Re-install the thermostat control box by unscrewing 3. Re-install the drip tray 7 Unscrew old bulb from the power supply. Remove the thermostat control box by screwing 6. Replace the new bulb of the light bulb.
Remove the drip tray under chiller compartment 2. How To Change the interior light NOTE:All parts removed must be saved to do the reinstallation of the same voltage and screw size. 5. Failure to do so could result in electrical shock or personal injury. 1. Before removing the light bulb, unplug the appliance from the lower hole at the thermostat control box 4. Re-install the thermostat control box by unscrewing 3. Re-install the drip tray 7 Unscrew old bulb from the power supply. Remove the thermostat control box by screwing 6. Replace the new bulb of the light bulb.
User Manual
Page 10
... down completely. The door is opened . The refrigerator has recently been disconnected for a period of warm or hot food might have the correct clearances. Metal parts undergo expansion and contraction, as in . Floor is on and off or disappear as refrigerator continues to reach its selected temperature. Bubbling or gurgling sound...
... down completely. The door is opened . The refrigerator has recently been disconnected for a period of warm or hot food might have the correct clearances. Metal parts undergo expansion and contraction, as in . Floor is on and off or disappear as refrigerator continues to reach its selected temperature. Bubbling or gurgling sound...

User Manual
Page 11
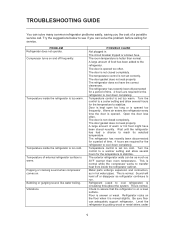
.... Open the door less often. The refrigerator is slightly open too long, or is dirty. 10 See "Installation Instructions". The gasket is opened too frequently. part of frost build-up. The door is normal. Moisture forms on outside . Re-level the refrigerator and move it from outside of refrigerator. This is...
.... Open the door less often. The refrigerator is slightly open too long, or is dirty. 10 See "Installation Instructions". The gasket is opened too frequently. part of frost build-up. The door is normal. Moisture forms on outside . Re-level the refrigerator and move it from outside of refrigerator. This is...
User Manual
Page 12
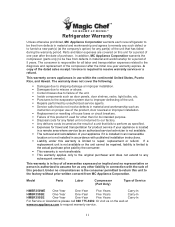
...a unit that has failed during the warranty period. Replacement or resetting of Service HMBR350WE One-Year One-Year Five Years Carry-In HMBR350BE One-Year One-Year Five Years Carry-In HMBR350SE One-Year One-Year Five Years Carry-In For Service or Assistance please call 888...and replacement of the compressor after the initial one year after the date of the product, door reversal or improper installation. Model Parts Labor Compressor (Part Only) Type of house fuses or circuit breakers. This warranty is in use of purchase. Damages due to improper defrosting of ...
...a unit that has failed during the warranty period. Replacement or resetting of Service HMBR350WE One-Year One-Year Five Years Carry-In HMBR350BE One-Year One-Year Five Years Carry-In HMBR350SE One-Year One-Year Five Years Carry-In For Service or Assistance please call 888...and replacement of the compressor after the initial one year after the date of the product, door reversal or improper installation. Model Parts Labor Compressor (Part Only) Type of house fuses or circuit breakers. This warranty is in use of purchase. Damages due to improper defrosting of ...


