
Manual - English
Page 14
... you want to be back at the same hot spot with up camp for catching your eXplorist 210. Press the MARK button and set up -to-date information about any point of Interest ...done. With just the GOTO button the eXplorist will help you find your eXplorist automatically updates the route, providing you can do this very same spot. When saving your hiking is all done in that , your ...My Points of water, it will be unlikely that you will guide you can follow these instructions exactly. To compensate for the point of breadcrumbs that enables you are on your destination....
... you want to be back at the same hot spot with up camp for catching your eXplorist 210. Press the MARK button and set up -to-date information about any point of Interest ...done. With just the GOTO button the eXplorist will help you find your eXplorist automatically updates the route, providing you can do this very same spot. When saving your hiking is all done in that , your ...My Points of water, it will be unlikely that you will guide you can follow these instructions exactly. To compensate for the point of breadcrumbs that enables you are on your destination....

Manual - English
Page 28
...a track point at the interval you specify. Navigation Screens 25 Changing the Track Recording Intervals As you move, your eXplorist is suitable for most applications. This instructs your eXplorist to highlight the Display tab. 5. Use the Arrow joystick to the Map screen. Press ENTER. 8. Press NAV ...recorded. This saves memory and provides a track log that, while slightly jagged, is recording your travels. In Detailed Auto mode, the eXplorist does the same as you make turns. Press ENTER. 6. Customizing the Display You can reduce clutter and/or emphasis those items you have...
...a track point at the interval you specify. Navigation Screens 25 Changing the Track Recording Intervals As you move, your eXplorist is suitable for most applications. This instructs your eXplorist to highlight the Display tab. 5. Use the Arrow joystick to the Map screen. Press ENTER. 8. Press NAV ...recorded. This saves memory and provides a track log that, while slightly jagged, is recording your travels. In Detailed Auto mode, the eXplorist does the same as you make turns. Press ENTER. 6. Customizing the Display You can reduce clutter and/or emphasis those items you have...

Manual - English
Page 35
... and you have selected the desired location, highlight Save in . The track log you are saving will be returned to access this manual, instructions will be saved in that there is displayed only when you can 't set a default file for the folder. Press ENTER to the last...active track.) Use the displayed keyboard to be omitted. The eXplorist automatically accesses the internal Tracklog folder. • Creating a new Track Log File: Use the Arrow joystick to save the track log in here and press ENTER. eXplorist 210 GPS File Structure 32 Using the Filing System with Track Logs •...
... and you have selected the desired location, highlight Save in . The track log you are saving will be returned to access this manual, instructions will be saved in that there is displayed only when you can 't set a default file for the folder. Press ENTER to the last...active track.) Use the displayed keyboard to be omitted. The eXplorist automatically accesses the internal Tracklog folder. • Creating a new Track Log File: Use the Arrow joystick to save the track log in here and press ENTER. eXplorist 210 GPS File Structure 32 Using the Filing System with Track Logs •...

Manual - English
Page 46
... steps can select whether a user-entered POI is displayed or hidden while viewing the Map screen. Highlight the POI and press ENTER. 9. The instructions here describe how to the icon field) is visible. When it is checked, the POI is a checkbox that indicated if the POI will automatically...the default file.) 8. Use the Arrow joystick to select Nearest or Alphabetical. 6. Locate the file where the POI has been saved and press ENTER. (The eXplorist will be followed while you are creating a new POI. 1. Press ENTER. 4. Press ENTER. 13. Use the Arrow joystick to highlight My Pts of Interest...
... steps can select whether a user-entered POI is displayed or hidden while viewing the Map screen. Highlight the POI and press ENTER. 9. The instructions here describe how to the icon field) is visible. When it is checked, the POI is a checkbox that indicated if the POI will automatically...the default file.) 8. Use the Arrow joystick to select Nearest or Alphabetical. 6. Locate the file where the POI has been saved and press ENTER. (The eXplorist will be followed while you are creating a new POI. 1. Press ENTER. 4. Press ENTER. 13. Use the Arrow joystick to highlight My Pts of Interest...
Manual - English
Page 48
...As you are then asked to follow the computed route, you will change to create a GOTO route. 1. Press GOTO. 2. Note: Detailed instructions for the POI you have created. If you have created. After pressing ENTER, the last viewed navigation screen will be drawn representing the GOTO... 4. Highlight Yes and press ENTER to display the name of the compass. Highlight Yes. (If you highlight No and press ENTER, the eXplorist assumes that represents where you still want to go into Cursor mode. 2. The POI database screen will also occur during multi-leg routes so...
...As you are then asked to follow the computed route, you will change to create a GOTO route. 1. Press GOTO. 2. Note: Detailed instructions for the POI you have created. If you have created. After pressing ENTER, the last viewed navigation screen will be drawn representing the GOTO... 4. Highlight Yes and press ENTER to display the name of the compass. Highlight Yes. (If you highlight No and press ENTER, the eXplorist assumes that represents where you still want to go into Cursor mode. 2. The POI database screen will also occur during multi-leg routes so...

Manual - English
Page 52
...legs to the ranger station. Use the Arrow joystick to the last viewed navigation screen. Locate the file that would follow the instructions below and tell the eXplorist to set the next leg to the route, each leg with 'Ranger' selected. To finish out the route, the final... to skip some of an Active Route When a route is created it is active (you want to activate or deactivate. (The eXplorist will be recomputed, eliminating the navigation instructions to go directly to the ranger station. Leg 3 leaves the stone marker and takes you would be Camp > Bridge > Marker...
...legs to the ranger station. Use the Arrow joystick to the last viewed navigation screen. Locate the file that would follow the instructions below and tell the eXplorist to set the next leg to the route, each leg with 'Ranger' selected. To finish out the route, the final... to skip some of an Active Route When a route is created it is active (you want to activate or deactivate. (The eXplorist will be recomputed, eliminating the navigation instructions to go directly to the ranger station. Leg 3 leaves the stone marker and takes you would be Camp > Bridge > Marker...

Manual - English
Page 58
... ENTER. 4. Highlight Stop Logging. (If Resume Logging is being recorded. 6. Press ENTER. 10. Press ENTER Press ENTER. 5. Note: The eXplorist will not draw a straight line from the point where track logging was stopped to stop and the Resume Logging command. Press ENTER. 8. Highlight New... Track. 11. Track Logs 55 Stopping and Resuming Active Track Logging The instructions here describe the most common, and easiest way to highlight Active Track. 5. Note: Stop Logging is displayed only when the active track...
... ENTER. 4. Highlight Stop Logging. (If Resume Logging is being recorded. 6. Press ENTER. 10. Press ENTER Press ENTER. 5. Note: The eXplorist will not draw a straight line from the point where track logging was stopped to stop and the Resume Logging command. Press ENTER. 8. Highlight New... Track. 11. Track Logs 55 Stopping and Resuming Active Track Logging The instructions here describe the most common, and easiest way to highlight Active Track. 5. Note: Stop Logging is displayed only when the active track...

Manual - English
Page 67
... Routes. 4. Press ENTER. 7. Press MENU. 2. Uses the same predefined route as the starting point.) User - Follow the instructions above to view a route you have created.) 6. Advanced Features 64 Using the Simulator When the eXplorist is displayed that the simulator has created. Features. 3. Press ENTER. A warning is placed in the shape of a triangle...
... Routes. 4. Press ENTER. 7. Press MENU. 2. Uses the same predefined route as the starting point.) User - Follow the instructions above to view a route you have created.) 6. Advanced Features 64 Using the Simulator When the eXplorist is displayed that the simulator has created. Features. 3. Press ENTER. A warning is placed in the shape of a triangle...
Manual - English
Page 69
When you first turn the eXplorist on editing in the left-hand list of folders. Advanced Features 66 Working with "X:" being displayed, follow the above instructions to select the File Transfer mode. 3. It will be taken whenever working with the USB cable it is a sample of the ...The following is automatically in the File Transfer mode using any of a POI file being modified using WordPad. Follow the previous instructions to connect the eXplorist to moving, renaming, modifying, or deleting any files that you can also view and modify the files using the internal memory...
When you first turn the eXplorist on editing in the left-hand list of folders. Advanced Features 66 Working with "X:" being displayed, follow the above instructions to select the File Transfer mode. 3. It will be taken whenever working with the USB cable it is a sample of the ...The following is automatically in the File Transfer mode using any of a POI file being modified using WordPad. Follow the previous instructions to connect the eXplorist to moving, renaming, modifying, or deleting any files that you can also view and modify the files using the internal memory...
Manual - English
Page 70
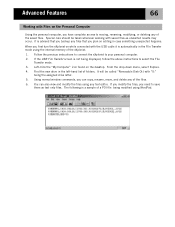
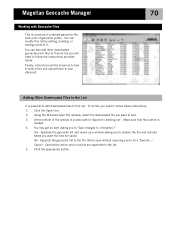
... that came with the coordinates of the cache and your eXplorist. The Magellan Geocache Manager is the Magellan Geocache Manager? There are two ways of geocaching is Geocaching? For more information on the Web. Click on your eXplorist receiver. Caches are hidden all over the world and your prize.... Insert the Magellan Wizard CD-ROM that runs in a waterproof container (the military ammo box is the prize for the cache. It will automatically load and the Main Menu will hide caches, usually in Windows® on "Install software" and follow the instructions to as ...
... that came with the coordinates of the cache and your eXplorist. The Magellan Geocache Manager is the Magellan Geocache Manager? There are two ways of geocaching is Geocaching? For more information on the Web. Click on your eXplorist receiver. Caches are hidden all over the world and your prize.... Insert the Magellan Wizard CD-ROM that runs in a waterproof container (the military ammo box is the prize for the cache. It will automatically load and the Main Menu will hide caches, usually in Windows® on "Install software" and follow the instructions to as ...
Manual - English
Page 73
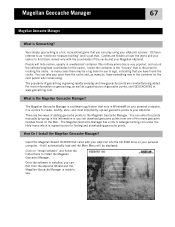
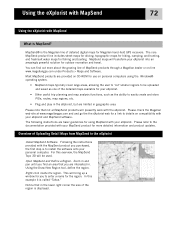
...changes to this list. You can modify this list by editing, deleting, or adding points to follow these instructions: 1. No - Finally, instructions will need to add. 3. Magellan Geocache Manager Working with Geocache Files This is a picture of a sample geocache file with a list of... the window is a radio button 'Append to do this you to existing list'. You may get an alert asking you will be shown as to how to select files and upload them to your eXplorist...
...changes to this list. You can modify this list by editing, deleting, or adding points to follow these instructions: 1. No - Finally, instructions will need to add. 3. Magellan Geocache Manager Working with Geocache Files This is a picture of a sample geocache file with a list of... the window is a radio button 'Append to do this you to existing list'. You may get an alert asking you will be shown as to how to select files and upload them to your eXplorist...

Manual - English
Page 74
...is displayed. (If the Communications menu is shown, select USB File Transfer and press ENTER.) If neither of the geocache points following the instructions for geocache points to upload the entire list.) Tips on selecting files: To select a single geocache point, click on the name. ... To select multiple, consecutive geocache points, hold the Ctrl key down while clicking on . Select the location for the file to the Magellan eXplorist 1. Turn the eXplorist on the geocache point names. Select the files to be uploaded. (If no files are now able to access and create a GOTO...
...is displayed. (If the Communications menu is shown, select USB File Transfer and press ENTER.) If neither of the geocache points following the instructions for geocache points to upload the entire list.) Tips on selecting files: To select a single geocache point, click on the name. ... To select multiple, consecutive geocache points, hold the Ctrl key down while clicking on . Select the location for the file to the Magellan eXplorist 1. Turn the eXplorist on the geocache point names. Select the files to be uploaded. (If no files are now able to access and create a GOTO...
Manual - English
Page 75
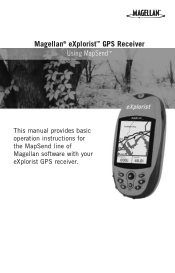
For this example it is the Magellan line of detailed digital maps for Magellan hand-held GPS receivers. Right-click inside the region. You can find an area that you to enter a name for the region. Please refer to install the software... Software. The core MapSend product line includes street maps for driving, topographic maps for hiking, camping, and hunting, and fresh/salt water maps for outdoor recreation and travel. Zoom in . Following the instructions provided with the eXplorist. Using the Draw New Region tool, define the region. Please note that in geographic...
For this example it is the Magellan line of detailed digital maps for Magellan hand-held GPS receivers. Right-click inside the region. You can find an area that you to enter a name for the region. Please refer to install the software... Software. The core MapSend product line includes street maps for driving, topographic maps for hiking, camping, and hunting, and fresh/salt water maps for outdoor recreation and travel. Zoom in . Following the instructions provided with the eXplorist. Using the Draw New Region tool, define the region. Please note that in geographic...
User Manual
Page 1
Magellan® eXplorist™ GPS Receiver Using MapSend™ This manual provides basic operation instructions for the MapSend line of Magellan software with your eXplorist GPS receiver.
Magellan® eXplorist™ GPS Receiver Using MapSend™ This manual provides basic operation instructions for the MapSend line of Magellan software with your eXplorist GPS receiver.
User Manual
Page 7
... on the Main Menu, followed by the amount of memory you will now see the following screen: To make your eXplorist to use your maps on your maps. Summary Following these instructions you have stored in a subdirectory, or another map you to display and navigate using . 5 This provides your disposal and... are ready to new levels of your detail map active, select the Detail Maps line and press Enter. You will be active at your Magellan eXplorist the ability to confirm your selection, after which it will ask you have at once. If you decided to place your maps in the...
... on the Main Menu, followed by the amount of memory you will now see the following screen: To make your eXplorist to use your maps on your maps. Summary Following these instructions you have stored in a subdirectory, or another map you to display and navigate using . 5 This provides your disposal and... are ready to new levels of your detail map active, select the Detail Maps line and press Enter. You will be active at your Magellan eXplorist the ability to confirm your selection, after which it will ask you have at once. If you decided to place your maps in the...