
Manual - English
Page 2
... permission of position fixes can be affected by the periodic adjustments to change any settings on one device for the accuracy and maintenance of the GPS network.The accuracy of Thales. * * * The SOFTWARE is the property of Thales and/or its suppliers. * * * No part of ...or transfer this guide may severely degrade performance or damage the receiver, and will void the warranty. Never rely solely on the Magellan eXplorist while driving. Taking your eyes off the road is with the terms of non-Magellan cables and antennas may be reproduced or transmitted in which is protected...
... permission of position fixes can be affected by the periodic adjustments to change any settings on one device for the accuracy and maintenance of the GPS network.The accuracy of Thales. * * * The SOFTWARE is the property of Thales and/or its suppliers. * * * No part of ...or transfer this guide may severely degrade performance or damage the receiver, and will void the warranty. Never rely solely on the Magellan eXplorist while driving. Taking your eyes off the road is with the terms of non-Magellan cables and antennas may be reproduced or transmitted in which is protected...

Manual - English
Page 12
... are alignment tabs on the desktop of your eXplorist. Right click the "My Computer" icon on the connector to make sure that you connect the eXplorist to external power using the external AC power adapter. eXplorist 210 GPS Receiver 9 Connecting to a Personal Computer (requires optional USB cable) Turn your eXplorist off and connect the round connector of the...
... are alignment tabs on the desktop of your eXplorist. Right click the "My Computer" icon on the connector to make sure that you connect the eXplorist to external power using the external AC power adapter. eXplorist 210 GPS Receiver 9 Connecting to a Personal Computer (requires optional USB cable) Turn your eXplorist off and connect the round connector of the...
Manual - English
Page 64
...operate as if it is displayed with the position and date set up file transfers, transferring NMEA data, or just using the USB cable to set your eXplorist into a simulate mode. The Fish/Hunt screen is connected to a personal computer through the USB port. Accessing Hunting and Fishing Times... 1. Use the Arrow joystick to highlight Fish/Hunt. 5. Press ENTER. 6. Advanced Features 61 Advanced Features The eXplorist has a set of advanced features that provides you with the means to view the good and excellent fishing and hunting times for any position ...
...operate as if it is displayed with the position and date set up file transfers, transferring NMEA data, or just using the USB cable to set your eXplorist into a simulate mode. The Fish/Hunt screen is connected to a personal computer through the USB port. Accessing Hunting and Fishing Times... 1. Use the Arrow joystick to highlight Fish/Hunt. 5. Press ENTER. 6. Advanced Features 61 Advanced Features The eXplorist has a set of advanced features that provides you with the means to view the good and excellent fishing and hunting times for any position ...
Manual - English
Page 68
First connect the PC interface cable to the connector on your eXplorist connected to a personal computer through 6. 2. Highlight Communications. 6. Press ENTER. 7. Changing Modes When you are connected to a personal computer you must have three modes that the eXplorist can be in. Power Only mode turns off . ...in NMEA format for use with external software. NMEA Data Comm mode outputs the GPS data from the eXplorist and the personal computer. Insert the USB connector on the PC interface cable to highlight Adv. Skip steps 2 through the computer USB port Connecting to a...
First connect the PC interface cable to the connector on your eXplorist connected to a personal computer through 6. 2. Highlight Communications. 6. Press ENTER. 7. Changing Modes When you are connected to a personal computer you must have three modes that the eXplorist can be in. Power Only mode turns off . ...in NMEA format for use with external software. NMEA Data Comm mode outputs the GPS data from the eXplorist and the personal computer. Insert the USB connector on the PC interface cable to highlight Adv. Skip steps 2 through the computer USB port Connecting to a...
Manual - English
Page 69
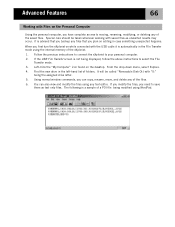
Follow the previous instructions to connect the eXplorist to moving, renaming, modifying, or deleting any text editor. The following is not being displayed, follow the above instructions to save them as unwanted results ... need to select the File Transfer mode. 3. Advanced Features 66 Working with Files on the Personal Computer Using the personal computer, you first turn the eXplorist on while connected with the USB cable it is automatically in the File Transfer mode using the internal memory of the...
Follow the previous instructions to connect the eXplorist to moving, renaming, modifying, or deleting any text editor. The following is not being displayed, follow the above instructions to save them as unwanted results ... need to select the File Transfer mode. 3. Advanced Features 66 Working with Files on the Personal Computer Using the personal computer, you first turn the eXplorist on while connected with the USB cable it is automatically in the File Transfer mode using the internal memory of the...
Manual - English
Page 76
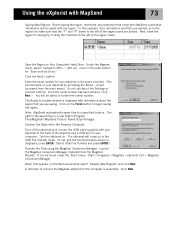
...any of the region name are bolded. Start > Programs > Magellan > eXplorist 210 > Magellan Conversion Manager. Using the eXplorist with information about the region that you are saving. Note: MapSend... connect the Magellan eXplorist to GPS..." (Ctrl+U). screen (accessed from the Magellan Wizard). The eXplorist will be found under the 'Start' menu - Click Next. Connect the eXplorist to the back... eXplorist to the Personal Computer: Turn off the eXplorist and connect the USB cable supplied with the region. Next, mark the region for "Save on your eXplorist ...
...any of the region name are bolded. Start > Programs > Magellan > eXplorist 210 > Magellan Conversion Manager. Using the eXplorist with information about the region that you are saving. Note: MapSend... connect the Magellan eXplorist to GPS..." (Ctrl+U). screen (accessed from the Magellan Wizard). The eXplorist will be found under the 'Start' menu - Click Next. Connect the eXplorist to the back... eXplorist to the Personal Computer: Turn off the eXplorist and connect the USB cable supplied with the region. Next, mark the region for "Save on your eXplorist ...
Manual - English
Page 78
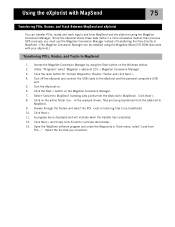
...of transferring the files directly in a more accessible manner than previous GPS receivers, you converted. Access the Magellan Conversion Manager by using the Magellan Conversion Manager. Turn the eXplorist on the Magellan Conversion Manager. 7. Click Next >. 11. In the example shown,.... Under "Programs" select 'Magellan > eXplorist 210 > Magellan Conversion Manager'. 3. Select 'Convert to MapSend 1. Select the file that came with your eXplorist.) Transferring POIs, Routes, and Tracks to MapSend' (sending data points from MapSend and the eXplorist using the Start button on ...
...of transferring the files directly in a more accessible manner than previous GPS receivers, you converted. Access the Magellan Conversion Manager by using the Magellan Conversion Manager. Turn the eXplorist on the Magellan Conversion Manager. 7. Click Next >. 11. In the example shown,.... Under "Programs" select 'Magellan > eXplorist 210 > Magellan Conversion Manager'. 3. Select 'Convert to MapSend 1. Select the file that came with your eXplorist.) Transferring POIs, Routes, and Tracks to MapSend' (sending data points from MapSend and the eXplorist using the Start button on ...
Manual - English
Page 79
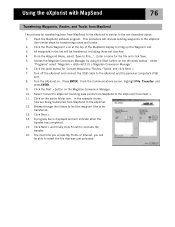
...the Next > button on . Click on the Windows toolbar. Click Next > and finally click Finish to the eXplorist. Under "Programs" select 'Magellan > eXplorist 210 > Magellan Conversion Manager'. 6. From the Communications screen, highlight File Transfer and press ENTER. 9. Browse through the folders to ...be transferred. 13. Turn off the eXplorist and connect the USB cable to the eXplorist. 12. Using the eXplorist with MapSend 76 Transferring Waypoints, Routes, and Tracks from MapSend The process for transferring from from MapSend to the eXplorist) Click Next >. 11. Use similar ...
...the Next > button on . Click on the Windows toolbar. Click Next > and finally click Finish to the eXplorist. Under "Programs" select 'Magellan > eXplorist 210 > Magellan Conversion Manager'. 6. From the Communications screen, highlight File Transfer and press ENTER. 9. Browse through the folders to ...be transferred. 13. Turn off the eXplorist and connect the USB cable to the eXplorist. 12. Using the eXplorist with MapSend 76 Transferring Waypoints, Routes, and Tracks from MapSend The process for transferring from from MapSend to the eXplorist) Click Next >. 11. Use similar ...
