
User Manual
Page 3
... View...2-18 Bottom Side View ...2-19 Getting Started Power Management ...3-2 Connecting the AC Power ...3-2 Using the Battery Power...3-4 ECO Power Saving Function...3-9 Power Management in Windows OS 3-10 Energy Saving Tips...3-12 Basic Operations ...3-13 Safety and Comfort Tips...3-13 Having a Good Work Habit...3-14 Knowing the Keyboard ...3-15 Knowing the...
... View...2-18 Bottom Side View ...2-19 Getting Started Power Management ...3-2 Connecting the AC Power ...3-2 Using the Battery Power...3-4 ECO Power Saving Function...3-9 Power Management in Windows OS 3-10 Energy Saving Tips...3-12 Basic Operations ...3-13 Safety and Comfort Tips...3-13 Having a Good Work Habit...3-14 Knowing the Keyboard ...3-15 Knowing the...
User Manual
Page 51
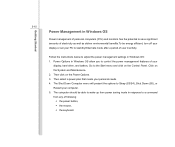
...4. Then click on the System and Maintenance. 2. Getting Started 3-10 Power Management in response to a command from power saving mode in Windows OS Power management of personal computers (PCs) and monitors has the potential to save significant amounts of electricity as well as deliver environmental benefits...following: Š the power button, Š the mouse, Š the keyboard. Power Options in Windows OS: 1. Follow the instructions below to adjust the power management settings in Windows OS allow you to control the power management features of your PC to the Start menu and click on...
...4. Then click on the System and Maintenance. 2. Getting Started 3-10 Power Management in response to a command from power saving mode in Windows OS Power management of personal computers (PCs) and monitors has the potential to save significant amounts of electricity as well as deliver environmental benefits...following: Š the power button, Š the mouse, Š the keyboard. Power Options in Windows OS: 1. Follow the instructions below to adjust the power management settings in Windows OS allow you to control the power management features of your PC to the Start menu and click on...
User Manual
Page 53
Getting Started 3-12 Energy Saving Tips Š Activate the ECO power saving function to manage the computer's energy consumption. Š Turn off the monitor after a period of user inactivity. Š Utilize the Fn and F12 sleep mode keys to turn into power saving mode. Š Tune the settings in Power Options under Windows OS to optimize the computer's power management. Š Always disconnect the AC power cord or uninstall the battery pack or switch off the wall socket if the computer would be left unused for a certain time to achieve zero energy consumption.
Getting Started 3-12 Energy Saving Tips Š Activate the ECO power saving function to manage the computer's energy consumption. Š Turn off the monitor after a period of user inactivity. Š Utilize the Fn and F12 sleep mode keys to turn into power saving mode. Š Tune the settings in Power Options under Windows OS to optimize the computer's power management. Š Always disconnect the AC power cord or uninstall the battery pack or switch off the wall socket if the computer would be left unused for a certain time to achieve zero energy consumption.
User Manual
Page 60
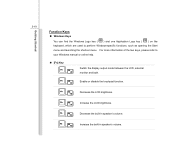
Getting Started 3-19 Function Keys „ Windows Keys You can find the Windows Logo key ( ) and one Application Logo key ( ) on the keyboard, which are used to your Windows manual or online help. „ [Fn] Key + Switch the display output mode between the LCD, external monitor and both.... For more information of the two keys, please refer to perform Windows-specific functions, such as opening the Start menu and launching the shortcut menu. Enable or disable the touchpad function. + Decrease the LCD brightness....
Getting Started 3-19 Function Keys „ Windows Keys You can find the Windows Logo key ( ) and one Application Logo key ( ) on the keyboard, which are used to your Windows manual or online help. „ [Fn] Key + Switch the display output mode between the LCD, external monitor and both.... For more information of the two keys, please refer to perform Windows-specific functions, such as opening the Start menu and launching the shortcut menu. Enable or disable the touchpad function. + Decrease the LCD brightness....
User Manual
Page 63
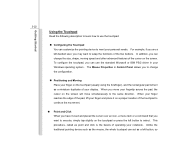
... Properties in your personal needs. In addition, you can use the touchpad: „ Configuring the Touchpad You can customize the pointing device to meet your Windows operating system. Unlike the traditional pointing device such as the mouse, the whole touchpad can act as a miniature duplicate of operating your display. Getting Started...
... Properties in your personal needs. In addition, you can use the touchpad: „ Configuring the Touchpad You can customize the pointing device to meet your Windows operating system. Unlike the traditional pointing device such as the mouse, the whole touchpad can act as a miniature duplicate of operating your display. Getting Started...
User Manual
Page 68
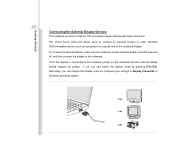
..., you can change the display mode by default. Getting Started 3-27 Connecting the External Display Devices This notebook provides a VGA port for a great view of Windows operating system. If not, you can switch the display mode by pressing [Fn]+[F2]. Once the display is connected to the notebook, power on the...
..., you can change the display mode by default. Getting Started 3-27 Connecting the External Display Devices This notebook provides a VGA port for a great view of Windows operating system. If not, you can switch the display mode by pressing [Fn]+[F2]. Once the display is connected to the notebook, power on the...
User Manual
Page 72
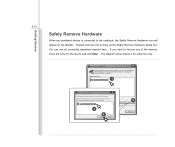
... Mass Storage Device Stop a Hardware device Confirm devices to be removed safely. Double-click the icon to bring up the Safely Remove Hardware dialog box. Windows will appear on the taskbar. Safely Remove Hardware Select the device you want to unplug or eject, and then click Stop. When... Windows notifies you that it is for reference only. Choose OK To continue. Getting Started 3-31 Safely Remove Hardware When any of the devices, move the ...
... Mass Storage Device Stop a Hardware device Confirm devices to be removed safely. Double-click the icon to bring up the Safely Remove Hardware dialog box. Windows will appear on the taskbar. Safely Remove Hardware Select the device you want to unplug or eject, and then click Stop. When... Windows notifies you that it is for reference only. Choose OK To continue. Getting Started 3-31 Safely Remove Hardware When any of the devices, move the ...
User Manual
Page 80
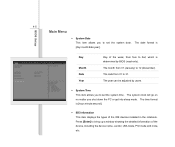
... clock will go on no matter you to set the system date. The time format is [day:month:date:year]. Press [Enter] to bring up a window showing the detailed information of the IDE devices installed in the notebook. The month from Sun to Sat, which is determined by users. Š System...
... clock will go on no matter you to set the system date. The time format is [day:month:date:year]. Press [Enter] to bring up a window showing the detailed information of the IDE devices installed in the notebook. The month from Sun to Sat, which is determined by users. Š System...


