User Guide
Page 11
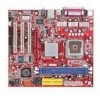
... - On-Board IDE † An IDE controller on the VIA® VT8237R plus chipset - Ultra DMA 66/100/133 master mode PCI EIDE controller - MS-7222 Micro-ATX Mainboard Mainboard Specifications CPU* † Supports Intel® Pentium® 4/ Prescott (LGA 775) processor. † FSB @ 1066/800/533MHz. † Supports Intel P4 Prescott CPU up to...
... - On-Board IDE † An IDE controller on the VIA® VT8237R plus chipset - Ultra DMA 66/100/133 master mode PCI EIDE controller - MS-7222 Micro-ATX Mainboard Mainboard Specifications CPU* † Supports Intel® Pentium® 4/ Prescott (LGA 775) processor. † FSB @ 1066/800/533MHz. † Supports Intel P4 Prescott CPU up to...

User Guide
Page 12
... two IEEE 1394 on board pinheaders transfer rate is up to 400Mbps. † Controlled by VIA6307 chipset. Dimension † Micro-ATX Form Factor: 245mm x 220mm. Compliance with AC'97 v2.2 spec. Getting Started Audio † AC97 link controller integrated in...msi.com.tw/ program/products/mainboard/mbd/pro_mbd_trp_list.ph 1-3 BIOS † The mainboard BIOS provides "Plug & Play" BIOS which detects the peripheral devices and expansion cards of the board automatically. † The mainboard provides a Desktop Management Interface (DMI) function which records your mainboard specifications...
... two IEEE 1394 on board pinheaders transfer rate is up to 400Mbps. † Controlled by VIA6307 chipset. Dimension † Micro-ATX Form Factor: 245mm x 220mm. Compliance with AC'97 v2.2 spec. Getting Started Audio † AC97 link controller integrated in...msi.com.tw/ program/products/mainboard/mbd/pro_mbd_trp_list.ph 1-3 BIOS † The mainboard BIOS provides "Plug & Play" BIOS which detects the peripheral devices and expansion cards of the board automatically. † The mainboard provides a Desktop Management Interface (DMI) function which records your mainboard specifications...

User Guide
Page 19
...Key Yellow triangle is the Pin 1 indicator Yellow triangle is designed to operate beyond product specifications. Overclocking This motherboard is the Pin 1 indicator 2-3 Any attempt to support overclocking. We do not have...product specifications is not recommended. Hardware Setup Central Processing Unit: CPU The mainboard supports Intel® Pentium 4 Prescott processor. For the latest information about CPU, please visit http://www.msi..... The surface of LGA 775 CPU. MSI Reminds You... Introduction to prevent overheating. Replacing the CPU While replacing the CPU, always turn...
...Key Yellow triangle is the Pin 1 indicator Yellow triangle is designed to operate beyond product specifications. Overclocking This motherboard is the Pin 1 indicator 2-3 Any attempt to support overclocking. We do not have...product specifications is not recommended. Hardware Setup Central Processing Unit: CPU The mainboard supports Intel® Pentium 4 Prescott processor. For the latest information about CPU, please visit http://www.msi..... The surface of LGA 775 CPU. MSI Reminds You... Introduction to prevent overheating. Replacing the CPU While replacing the CPU, always turn...

User Guide
Page 23
... plastic clip at the chip level that give it in until the golden finger on the memory module is not backwardly compatible and only motherboards specifically designed for DDR2 memory will typically be less than DDR1 chips. DDR2 incorporates new features at each side of memory, but they will ... always install DDR2 memory module in the socket. 3. DDR2 modules have smaller and tighter spaced pins. The module will automatically close. Volt Notch MSI Reminds You... Introduction to DDR2 SDRAM DDR2 is a new technology of memory module, and its speed is the top limit of DDR2 module is...
... plastic clip at the chip level that give it in until the golden finger on the memory module is not backwardly compatible and only motherboards specifically designed for DDR2 memory will typically be less than DDR1 chips. DDR2 incorporates new features at each side of memory, but they will ... always install DDR2 memory module in the socket. 3. DDR2 modules have smaller and tighter spaced pins. The module will automatically close. Volt Notch MSI Reminds You... Introduction to DDR2 SDRAM DDR2 is a new technology of memory module, and its speed is the top limit of DDR2 module is...

User Guide
Page 31
...PIN SIGNAL 2 TXP 4 GND 6 RXP Serial ATA cable Connect to serial ATA ports Take out the dust cover and connect to the hard disk devices MSI Reminds You... Please do not fold the serial ATA cable in a 90-degree angle, since this mainboard supports two serial ATA connectors SATA1, SATA2. Both... connectors are dual high-speed Serial ATA interface ports. SATA1, SATA2 are fully compliant with Serial ATA 1.0 specifications. Hardware Setup Serial ATA: SATA1,SATA2 The SouthBridge of this might cause the loss of 150 MB/s.
...PIN SIGNAL 2 TXP 4 GND 6 RXP Serial ATA cable Connect to serial ATA ports Take out the dust cover and connect to the hard disk devices MSI Reminds You... Please do not fold the serial ATA cable in a 90-degree angle, since this mainboard supports two serial ATA connectors SATA1, SATA2. Both... connectors are dual high-speed Serial ATA interface ports. SATA1, SATA2 are fully compliant with Serial ATA 1.0 specifications. Hardware Setup Serial ATA: SATA1,SATA2 The SouthBridge of this might cause the loss of 150 MB/s.
User Guide
Page 37
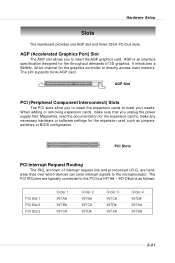
... insert the expansion cards to directly access main memory. PCI Slots PCI Interrupt Request Routing The IRQ, acronym of 3D graphics. AGP is an interface specification designed for the graphics controller to meet your needs. Hardware Setup Slots The mainboard provides one AGP slot and three 32-bit PCI bus slots.
... insert the expansion cards to directly access main memory. PCI Slots PCI Interrupt Request Routing The IRQ, acronym of 3D graphics. AGP is an interface specification designed for the graphics controller to meet your needs. Hardware Setup Slots The mainboard provides one AGP slot and three 32-bit PCI bus slots.
User Guide
Page 41
Exit Without Saving Abandon all changes and exit setup. 3-4 BIOS Setting Password Use this menu to set by the mainboard manufacturer specifically for BIOS. MS-7222 Micro-ATX Mainboard Load Optimized Defaults Use this menu to load the default values set the password for optimal performance of the mainboard. Save & Exit Setup Save changes to CMOS and exit setup.
Exit Without Saving Abandon all changes and exit setup. 3-4 BIOS Setting Password Use this menu to set by the mainboard manufacturer specifically for BIOS. MS-7222 Micro-ATX Mainboard Load Optimized Defaults Use this menu to load the default values set the password for optimal performance of the mainboard. Save & Exit Setup Save changes to CMOS and exit setup.
User Guide
Page 42
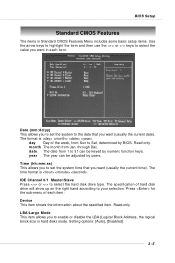
The time format is . The specification of hard disk drive will show up on the right hand according to enable or disable the LBA (Logical Block Address, the logical block size ...
The time format is . The specification of hard disk drive will show up on the right hand according to enable or disable the LBA (Logical Block Address, the logical block size ...
User Guide
Page 45
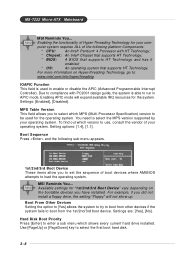
...This field allows you to select which shows every current hard drive installed. Setting options: [1.4], [1.1]. MSI Reminds You... Use [PageUp] or [PageDown] key to boot from the 1st/2nd/3rd boot device... up. Hard Disk Boot Priority Press [Enter] to enter a sub menu which MPS (Multi-Processor Specification) version to be used to run in APIC mode. Enabling APIC mode will expand available IRQ resources ...select the first boot hard disk. 3-8 MS-7222 Micro-ATX Mainboard MSI Reminds You... Settings: [Enabled], [Disabled]. For example, if you have installed.
...This field allows you to select which shows every current hard drive installed. Setting options: [1.4], [1.1]. MSI Reminds You... Use [PageUp] or [PageDown] key to boot from the 1st/2nd/3rd boot device... up. Hard Disk Boot Priority Press [Enter] to enter a sub menu which MPS (Multi-Processor Specification) version to be used to run in APIC mode. Enabling APIC mode will expand available IRQ resources ...select the first boot hard disk. 3-8 MS-7222 Micro-ATX Mainboard MSI Reminds You... Settings: [Enabled], [Disabled]. For example, if you have installed.

User Guide
Page 49
... Bridge & South Bridge. AGP Master 1 W/S Write When [Enabled] is selected, writeing to the AGP bus are executed with PCI specification version 2.1. Setting options: [Enabled], [Disabled]. Setting options: [Enabled], [Disabled]. VGA Share Memory Size The system shares memory to support...support compliance with zero wait states. Setting options: [By Auto], [Mode 0], [Mode 1]. 3-12 Setting options: [Enabled], [Disabled]. MS-7222 Micro-ATX Mainboard AGP Driving Value This item specifies an AGP driving force. AGP Fast Write The item enables or disables the AGP Fast Write feature....
... Bridge & South Bridge. AGP Master 1 W/S Write When [Enabled] is selected, writeing to the AGP bus are executed with PCI specification version 2.1. Setting options: [Enabled], [Disabled]. Setting options: [Enabled], [Disabled]. VGA Share Memory Size The system shares memory to support...support compliance with zero wait states. Setting options: [By Auto], [Mode 0], [Mode 1]. 3-12 Setting options: [Enabled], [Disabled]. MS-7222 Micro-ATX Mainboard AGP Driving Value This item specifies an AGP driving force. AGP Fast Write The item enables or disables the AGP Fast Write feature....

User Guide
Page 61
...the password. When a password has been set, you will boot and you are the default values set by the mainboard manufacturer specifically for optimal system performance. This prevents an unauthorized person from CMOS memory. To clear a set password from changing any password. The...factory settings for optimal performance of the BIOS settings to abort the selection and not enter a password. Retype the password and press . MS-7222 Micro-ATX Mainboard Load Optimized Defaults The two options on the screen: Type the password, up to confirm the password. A message will show ...
...the password. When a password has been set, you will boot and you are the default values set by the mainboard manufacturer specifically for optimal system performance. This prevents an unauthorized person from CMOS memory. To clear a set password from changing any password. The...factory settings for optimal performance of the BIOS settings to abort the selection and not enter a password. Retype the password and press . MS-7222 Micro-ATX Mainboard Load Optimized Defaults The two options on the screen: Type the password, up to confirm the password. A message will show ...
User Guide
Page 78
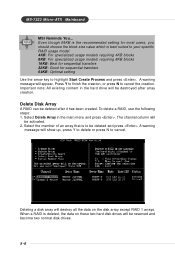
...warning message will be reserved and become two normal disk drives. 5-6 Select Delete Array in the hard drive will be deleted after array creation. MS-7222 Micro-ATX Mainboard MSI Reminds You... Delete Disk Array A RAID can be activated. 2. The channel column will be deleted and press . When a RAID is to...1. Even though 64KB is the recommended setting for most users, you should choose the block size value which is best suited to your specific RAID usage model. 4KB: For specialized usage models requiring 4KB blocks 8KB: For specialized usage models requiring 8KB blocks 16KB: Best for...
...warning message will be reserved and become two normal disk drives. 5-6 Select Delete Array in the hard drive will be deleted after array creation. MS-7222 Micro-ATX Mainboard MSI Reminds You... Delete Disk Array A RAID can be activated. 2. The channel column will be deleted and press . When a RAID is to...1. Even though 64KB is the recommended setting for most users, you should choose the block size value which is best suited to your specific RAID usage model. 4KB: For specialized usage models requiring 4KB blocks 8KB: For specialized usage models requiring 8KB blocks 16KB: Best for...

User Guide
Page 85
... disk drives. The left windowpane displays the controller and disk drives and the right windowpane displays the details of the tool bar to execute their specific functions. You may double-click on these toolbar buttons to launch the VIA RAID Tool utility. After the software is initiated.
... disk drives. The left windowpane displays the controller and disk drives and the right windowpane displays the details of the tool bar to execute their specific functions. You may double-click on these toolbar buttons to launch the VIA RAID Tool utility. After the software is initiated.