User Manual
Page 18
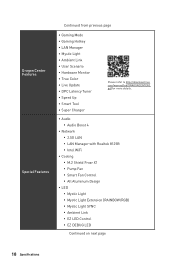
com/manual/mb/DRAGONCENTER2. Dragon Center Features Special Features Continued from previous page ∙∙Gaming Mode ∙∙Gaming Hotkey ∙∙LAN Manager &#...8729;∙Speed Up ∙∙Smart Tool ∙∙Super Charger Please refer to http://download.msi. pdf for more details. ∙∙ Audio ▪▪Audio Boost 4 ∙∙... Network ▪▪2.5G LAN ▪▪LAN Manager with Realtek 8125B ▪▪Intel WiFi ∙∙ Cooling ▪▪M.2 Shield Frozr X1 ▪▪Pump Fan ▪▪Smart Fan...
com/manual/mb/DRAGONCENTER2. Dragon Center Features Special Features Continued from previous page ∙∙Gaming Mode ∙∙Gaming Hotkey ∙∙LAN Manager &#...8729;∙Speed Up ∙∙Smart Tool ∙∙Super Charger Please refer to http://download.msi. pdf for more details. ∙∙ Audio ▪▪Audio Boost 4 ∙∙... Network ▪▪2.5G LAN ▪▪LAN Manager with Realtek 8125B ▪▪Intel WiFi ∙∙ Cooling ▪▪M.2 Shield Frozr X1 ▪▪Pump Fan ▪▪Smart Fan...
User Manual
Page 20
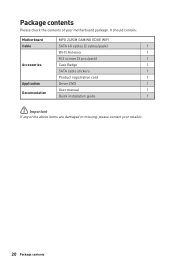
Package contents Please check the contents of the above items are damaged or missing, please contact your motherboard package. It should contain: Motherboard MPG Z490M GAMING EDGE WIFI Cable SATA 6G cables (2 cables/pack) 1 Wi-Fi Antenna 1 M.2 screws (3 pcs./pack) 1 Accessories Case Badge 1 SATA cable stickers 1 Product registration card 1 Application Driver DVD 1 User manual 1 Documentation Quick installation guide 1 ⚠⚠Important If any of your retailer. 20 Package contents
Package contents Please check the contents of the above items are damaged or missing, please contact your motherboard package. It should contain: Motherboard MPG Z490M GAMING EDGE WIFI Cable SATA 6G cables (2 cables/pack) 1 Wi-Fi Antenna 1 M.2 screws (3 pcs./pack) 1 Accessories Case Badge 1 SATA cable stickers 1 Product registration card 1 Application Driver DVD 1 User manual 1 Documentation Quick installation guide 1 ⚠⚠Important If any of your retailer. 20 Package contents

User Manual
Page 37
Please refer to recharge your iPad,iPhone and iPod through USB ports, please install MSI® DRAGON CENTER utility. JUSB1~2: USB 2.0 Connectors These connectors allow you to connect USB 2.0 ports on the front panel. 2 10 1 9 1 VCC 2 3 USB0- 4 5 USB0+ 6 7 Ground 8...;∙Note that the VCC and Ground pins must be connected correctly to avoid possible damage. ∙∙In order to the TPM security platform manual for TPM (Trusted Platform Module). JTPM1: TPM Module Connector This connector is for more details and usages. 2 12 1 11 1 SPI Power 2 SPI Chip ...
Please refer to recharge your iPad,iPhone and iPod through USB ports, please install MSI® DRAGON CENTER utility. JUSB1~2: USB 2.0 Connectors These connectors allow you to connect USB 2.0 ports on the front panel. 2 10 1 9 1 VCC 2 3 USB0- 4 5 USB0+ 6 7 Ground 8...;∙Note that the VCC and Ground pins must be connected correctly to avoid possible damage. ∙∙In order to the TPM security platform manual for TPM (Trusted Platform Module). JTPM1: TPM Module Connector This connector is for more details and usages. 2 12 1 11 1 SPI Power 2 SPI Chip ...

User Manual
Page 38
... 4 NC 38 Overview of the fan speed that allow you can follow the instruction below to adjust the fan connector to PWM or DC Mode manually. 1 CPU_FAN1 (Auto mode) 1 PUMP_FAN1 (PWM mode) 1 SYS_FAN3 (DC mode) 1 SYS_FAN1 & 2 (DC mode) Switching fan mode and adjusting fan speed You can switch between PWM mode...
... 4 NC 38 Overview of the fan speed that allow you can follow the instruction below to adjust the fan connector to PWM or DC Mode manually. 1 CPU_FAN1 (Auto mode) 1 PUMP_FAN1 (PWM mode) 1 SYS_FAN3 (DC mode) 1 SYS_FAN1 & 2 (DC mode) Switching fan mode and adjusting fan speed You can switch between PWM mode...

User Manual
Page 43
...when screen shows Press any key to finish. 7. If you turn off the AutoPlay feature from the Windows Control Panel, you can still manually execute the DVDSetup.exe from the root path of the window. 5. Installing Utilities Before you install utilities, you to open the installer. Click ...the Install button in the lower-right corner of the MSI Drive Disc. 4. Click OK button to boot from the Boot Menu. 6. Installing OS, Drivers & Utilities 43 Insert the Windows® 10 installation...
...when screen shows Press any key to finish. 7. If you turn off the AutoPlay feature from the Windows Control Panel, you can still manually execute the DVDSetup.exe from the root path of the window. 5. Installing Utilities Before you install utilities, you to open the installer. Click ...the Install button in the lower-right corner of the MSI Drive Disc. 4. Click OK button to boot from the Boot Menu. 6. Installing OS, Drivers & Utilities 43 Insert the Windows® 10 installation...
User Manual
Page 49
... F3 key to select language of connected component. ∙∙ Function buttons - click on this button to enter the M-Flash menu that allows you to manually control the fan speed by clicking on the CPU, Memory, Storage, Fan Info and Help buttons to right. ∙∙ Component Information - ∙∙ Language...
... F3 key to select language of connected component. ∙∙ Function buttons - click on this button to enter the M-Flash menu that allows you to manually control the fan speed by clicking on the CPU, Memory, Storage, Fan Info and Help buttons to right. ∙∙ Component Information - ∙∙ Language...
User Manual
Page 54
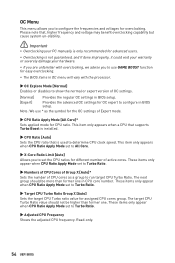
...CPU ratio that , higher frequency and voltage may benefit overclocking capability but cause system un-stability. ⚠⚠Important ∙∙Overclocking your PC manually is only recommended for advanced users. ∙∙Overclocking is used to Turbo Ratio. ▶▶Target CPU Turbo Ratio Group X [Auto]... than former one . OC Menu This menu allows you to set the CPU ratios for different number of active cores. Note: We use GAME BOOST function for easy overclocking. ∙∙The BIOS items in OC menu will vary with overclocking, we advise you to use * as...
...CPU ratio that , higher frequency and voltage may benefit overclocking capability but cause system un-stability. ⚠⚠Important ∙∙Overclocking your PC manually is only recommended for advanced users. ∙∙Overclocking is used to Turbo Ratio. ▶▶Target CPU Turbo Ratio Group X [Auto]... than former one . OC Menu This menu allows you to set the CPU ratios for different number of active cores. Note: We use GAME BOOST function for easy overclocking. ∙∙The BIOS items in OC menu will vary with overclocking, we advise you to use * as...
User Manual
Page 55
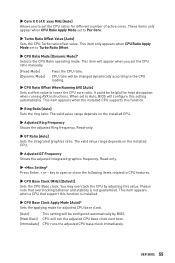
... or close the following items related to lower the CPU core ratio. This item only appears when CPU Ratio Apply Mode set the CPU ratio manually. [Fixed Mode] [Dynamic Mode] Fixes the CPU ratio. This item appears when a CPU that overclocking behavior and stability is installed. ▶▶CPU Base Clock...
... or close the following items related to lower the CPU core ratio. This item only appears when CPU Ratio Apply Mode set the CPU ratio manually. [Fixed Mode] [Dynamic Mode] Fixes the CPU ratio. This item appears when a CPU that overclocking behavior and stability is installed. ▶▶CPU Base Clock...
User Manual
Page 56
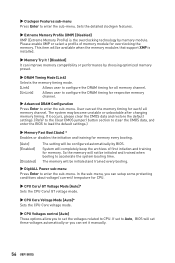
Please enable XMP or select a profile of first intiation and training for memory. If it manually. 56 UEFI BIOS So the memory will not be configured automatically by BIOS. System will completely keep the archives of memory module for memory every ...
Please enable XMP or select a profile of first intiation and training for memory. If it manually. 56 UEFI BIOS So the memory will not be configured automatically by BIOS. System will completely keep the archives of memory module for memory every ...
User Manual
Page 57
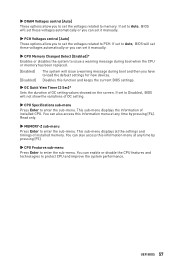
.... This sub-menu displays the information of installed memory. If set to Auto, BIOS will set these voltages automatically or you can set it manually. ▶▶CPU Memory Changed Detect [Enabled]* Enables or disables the system to issue a warning message during boot when the CPU or memory... will issue a warning message during boot and then you to set to Disabled, BIOS will set these voltages automatically or you can set it manually. ▶▶PCH Voltages control [Auto] These options allow you have to load the default settings for new devices. UEFI BIOS 57 Read ...
.... This sub-menu displays the information of installed memory. If set to Auto, BIOS will set these voltages automatically or you can set it manually. ▶▶CPU Memory Changed Detect [Enabled]* Enables or disables the system to issue a warning message during boot when the CPU or memory... will issue a warning message during boot and then you to set to Disabled, BIOS will set these voltages automatically or you can set it manually. ▶▶PCH Voltages control [Auto] These options allow you have to load the default settings for new devices. UEFI BIOS 57 Read ...
User Manual
Page 60
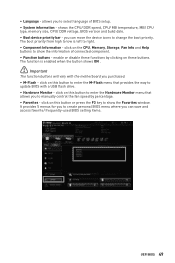
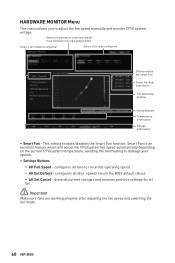
... feature which will adjust the CPU/system fan speed automatically depending on the current CPU/system temperature, avoiding the overheating to adjust the fan speed manually and monitor CPU/ system voltage. HARDWARE MONITOR Menu This menu allows you to damage your system. ∙∙ Settings Buttons ▪▪All Full Speed...
... feature which will adjust the CPU/system fan speed automatically depending on the current CPU/system temperature, avoiding the overheating to adjust the fan speed manually and monitor CPU/ system voltage. HARDWARE MONITOR Menu This menu allows you to damage your system. ∙∙ Settings Buttons ▪▪All Full Speed...
User Manual
Page 67
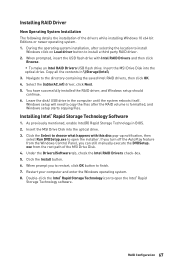
.... You have successfully installed the RAID driver, and Windows setup should continue. 6. exe from the Windows Control Panel, you can still manually execute the DVDSetup. Double-click the Intel® Rapid Storage Technology icon to open the Intel® Rapid Storage Technology software. As ...previously mentioned, enable Intel(R) Rapid Storage Technology in the computer until the system reboots itself. Insert the MSI Drive Disk into the optical drive. RAID Configuration 67 Insert the MSI Drive Disk into the optical drive. 3. Leave the disk/ USB drive in BIOS. 2. Copy all ...
.... You have successfully installed the RAID driver, and Windows setup should continue. 6. exe from the Windows Control Panel, you can still manually execute the DVDSetup. Double-click the Intel® Rapid Storage Technology icon to open the Intel® Rapid Storage Technology software. As ...previously mentioned, enable Intel(R) Rapid Storage Technology in the computer until the system reboots itself. Insert the MSI Drive Disk into the optical drive. RAID Configuration 67 Insert the MSI Drive Disk into the optical drive. 3. Leave the disk/ USB drive in BIOS. 2. Copy all ...
User Manual
Page 68
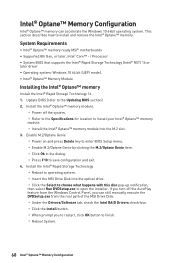
...8482; memory. Install the Intel® Optane™ memory module. ▫▫Power off the AutoPlay feature from the root path of the MSI Drive Disk. ▫▫Under the Drivers/Software tab, check the Intel RAID Drivers check-box. ▫▫Click the Install button. &#... Rapid Storage Technology ▫▫Reboot to operating system. ▫▫Insert the MSI Drive Disk into the M.2 slot. 3. Intel® Optane™ Memory Configuration Intel® Optane™ memory can still manually execute the DVDSetup.exe from the Windows Control Panel, you to restart, click OK...
...8482; memory. Install the Intel® Optane™ memory module. ▫▫Power off the AutoPlay feature from the root path of the MSI Drive Disk. ▫▫Under the Drivers/Software tab, check the Intel RAID Drivers check-box. ▫▫Click the Install button. &#... Rapid Storage Technology ▫▫Reboot to operating system. ▫▫Insert the MSI Drive Disk into the M.2 slot. 3. Intel® Optane™ Memory Configuration Intel® Optane™ memory can still manually execute the DVDSetup.exe from the Windows Control Panel, you to restart, click OK...


