User Manual
Page 18
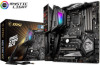
... Dragon Center Features Special Features Continued from previous page y GAME OPTIMIZATION y OC Performance y Hardware Monitor y Eyerest y LAN Manager y Live Update Please refer to http://download.msi. com/manual/mb/DRAGONCENTER2.
... Dragon Center Features Special Features Continued from previous page y GAME OPTIMIZATION y OC Performance y Hardware Monitor y Eyerest y LAN Manager y Live Update Please refer to http://download.msi. com/manual/mb/DRAGONCENTER2.
User Manual
Page 20
Package contents Please check the contents of the above items are damaged or missing, please contact your motherboard package. It should contain: Motherboard MEG Z390 ACE SATA 6Gb/s Cables 4 LED Y Cable 1 Cable LED JCORSAIR Cable 1 LED JRAINBOW Cable 1 Antenna Set 1 SLI HB BRIDGE M 1 M.2 Screw 3 Accessories Case Badge 1 SATA Cable Lables 1 Product Registration Card 1 Application DVD Driver DVD 1 User Manual 1 Documentation Quick Installation Guide 1 Important If any of your retailer. 20 Package contents
Package contents Please check the contents of the above items are damaged or missing, please contact your motherboard package. It should contain: Motherboard MEG Z390 ACE SATA 6Gb/s Cables 4 LED Y Cable 1 Cable LED JCORSAIR Cable 1 LED JRAINBOW Cable 1 Antenna Set 1 SLI HB BRIDGE M 1 M.2 Screw 3 Accessories Case Badge 1 SATA Cable Lables 1 Product Registration Card 1 Application DVD Driver DVD 1 User Manual 1 Documentation Quick Installation Guide 1 Important If any of your retailer. 20 Package contents
User Manual
Page 35
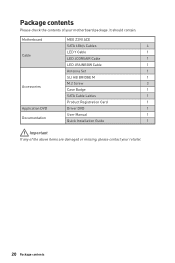
... + OC1: GAME BOOST Knob This knob allows you power on the front panel. The processor's voltage and frequency will be automatically adjusted after you to manually select a stage from number 0 (default) to the switches and LEDs on your computer. GAME BOOST knob 0 1 8 10 1 2 1 6 4 Overview of Components 35 JFP1, JFP2: Front Panel...
... + OC1: GAME BOOST Knob This knob allows you power on the front panel. The processor's voltage and frequency will be automatically adjusted after you to manually select a stage from number 0 (default) to the switches and LEDs on your computer. GAME BOOST knob 0 1 8 10 1 2 1 6 4 Overview of Components 35 JFP1, JFP2: Front Panel...
User Manual
Page 38
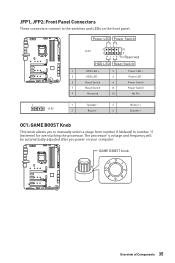
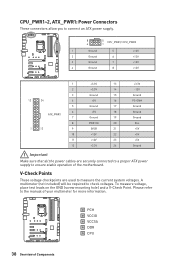
... the GND (screw mounting hole) and a V-Check Point. PCH VCCIO VCCSA DDR CPU 38 Overview of your multimeter for more information. Please refer to the manual of Components A multimeter (not included) will be required to check voltages. V-Check Points These voltage checkpoints are securely connected to a proper ATX power supply to...
... the GND (screw mounting hole) and a V-Check Point. PCH VCCIO VCCSA DDR CPU 38 Overview of your multimeter for more information. Please refer to the manual of Components A multimeter (not included) will be required to check voltages. V-Check Points These voltage checkpoints are securely connected to a proper ATX power supply to...
User Manual
Page 41
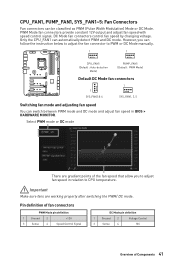
... 3 Sense 4 NC Overview of the fan speed that allow you can follow the instruction below to adjust the fan connector to PWM or DC Mode manually. 1 1 CPU_FAN1 (Default : Auto-detection Mode) PUMP_FAN1 (Default : PWM Mode) Default DC Mode fan connectors 1 SYS_FAN2 & 4 1 SYS_FAN1, 3, 5 Switching fan mode and adjusting fan speed You can...
... 3 Sense 4 NC Overview of the fan speed that allow you can follow the instruction below to adjust the fan connector to PWM or DC Mode manually. 1 1 CPU_FAN1 (Default : Auto-detection Mode) PUMP_FAN1 (Default : PWM Mode) Default DC Mode fan connectors 1 SYS_FAN2 & 4 1 SYS_FAN1, 3, 5 Switching fan mode and adjusting fan speed You can...

User Manual
Page 53
...7. Installing Drivers 1. Start up notification, then select Run DVDSetup.exe to install Windows® 10. The installer will prompt you can still manually execute the DVDSetup.exe from the Windows Control Panel, you to restart. 6. Restart your optical drive. 3. Click OK button to finish. 8..... Installing OS, Drivers & Utilities 53 Press F11 key during the computer POST (Power-On Self Test) to install. 4. Insert MSI® Driver Disc into your computer. Installing Utilities Before you install utilities, you must complete drivers installation. 1. Click the Install button...
...7. Installing Drivers 1. Start up notification, then select Run DVDSetup.exe to install Windows® 10. The installer will prompt you can still manually execute the DVDSetup.exe from the Windows Control Panel, you to restart. 6. Restart your optical drive. 3. Click OK button to finish. 8..... Installing OS, Drivers & Utilities 53 Press F11 key during the computer POST (Power-On Self Test) to install. 4. Insert MSI® Driver Disc into your computer. Installing Utilities Before you install utilities, you must complete drivers installation. 1. Click the Install button...
User Manual
Page 64
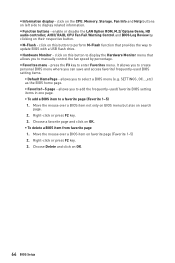
... page. ƒ To add a BIOS item to a favorite page (Favorite 1~5) 1. Choose Delete and click on this button to perform M-Flash function that allows you to manually control the fan speed by clicking on OK. ƒ To delete a BIOS item from favorite page 1. Choose a favorite page and click on their respective button...
... page. ƒ To add a BIOS item to a favorite page (Favorite 1~5) 1. Choose Delete and click on this button to perform M-Flash function that allows you to manually control the fan speed by clicking on OK. ƒ To delete a BIOS item from favorite page 1. Choose a favorite page and click on their respective button...

User Manual
Page 70
... Boot is the fastest way to set wake up events of Fast Boot. [Enabled] Enables the MSI Fast Boot function to configure the secure boot settings and manually load the secure keys. fFast Boot [Enabled] Enables or disables the fast boot feature for details. This sub-menu ... configuration. fSecure Boot Support [Disabled] Enables or disables secure boot support. [Enabled] Enables the secure boot function and allow you can use MSI FAST BOOT application to prevent the unauthorized accessing. f Wake Up Event Setup Sets system wake up events will only be loaded. fSecure Boot ...
... Boot is the fastest way to set wake up events of Fast Boot. [Enabled] Enables the MSI Fast Boot function to configure the secure boot settings and manually load the secure keys. fFast Boot [Enabled] Enables or disables the fast boot feature for details. This sub-menu ... configuration. fSecure Boot Support [Disabled] Enables or disables secure boot support. [Enabled] Enables the secure boot function and allow you can use MSI FAST BOOT application to prevent the unauthorized accessing. f Wake Up Event Setup Sets system wake up events will only be loaded. fSecure Boot ...
User Manual
Page 74
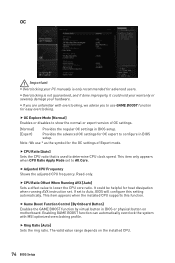
Read-only. The valid value range depends on motherboard. y If you are unfamiliar with MSI optimized overclocking profile. f CPU Ratio [Auto] Sets the CPU ratio that is used to use * as the symbol for the OC settings of OC settings. [... in BIOS setup. y Overclocking is only recommended for heat dissipation when running AVX instruction set. It could void your warranty or severely damage your PC manually is not guaranteed, and if done improperly, it could be helpful for advanced users. f OC Explore Mode [Normal] Enables or disables to show the normal...
Read-only. The valid value range depends on motherboard. y If you are unfamiliar with MSI optimized overclocking profile. f CPU Ratio [Auto] Sets the CPU ratio that is used to use * as the symbol for the OC settings of OC settings. [... in BIOS setup. y Overclocking is only recommended for heat dissipation when running AVX instruction set. It could void your warranty or severely damage your PC manually is not guaranteed, and if done improperly, it could be helpful for advanced users. f OC Explore Mode [Normal] Enables or disables to show the normal...
User Manual
Page 77
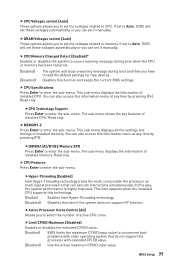
... you to set the voltages related to enter the sub-menu. If set to load the default settings for new devices. You can set it manually. This item appears when the installed CPU supports this technology. [Enable] Enables Intel Hyper-Threading technology. [Disabled] Disables this function and keeps the current BIOS.... f CPU Voltages control [Auto] These options allows you to set the voltages related to circumvent boot problems with older operating system that can set it manually.
... you to set the voltages related to enter the sub-menu. If set to load the default settings for new devices. You can set it manually. This item appears when the installed CPU supports this technology. [Enable] Enables Intel Hyper-Threading technology. [Disabled] Disables this function and keeps the current BIOS.... f CPU Voltages control [Auto] These options allows you to set the voltages related to circumvent boot problems with older operating system that can set it manually.
User Manual
Page 88
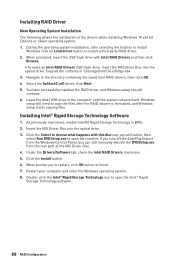
..., after the RAID volume is formatted, and Windows setup starts copying files. Insert the MSI Driver Disc into the optical drive. 3. Installing Intel® Rapid Storage Technology Software 1. Insert the MSI Driver Disc into the optical drive. Click the Install button. 6. When prompted, insert ...Intel\16.x\f6flpy-x64 3. Installing RAID Driver New Operating System Installation The following details the installation of the MSI Driver Disc. 4. When prompt you can still manually execute the DVDSetup.exe from the root path of the drivers while installing Windows 10 x64 bit Editions or...
..., after the RAID volume is formatted, and Windows setup starts copying files. Insert the MSI Driver Disc into the optical drive. 3. Installing Intel® Rapid Storage Technology Software 1. Insert the MSI Driver Disc into the optical drive. Click the Install button. 6. When prompted, insert ...Intel\16.x\f6flpy-x64 3. Installing RAID Driver New Operating System Installation The following details the installation of the MSI Driver Disc. 4. When prompt you can still manually execute the DVDSetup.exe from the root path of the drivers while installing Windows 10 x64 bit Editions or...
User Manual
Page 89
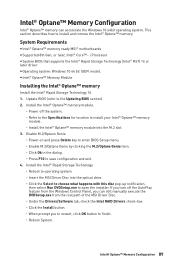
... into the M.2 slot. 3. Intel® Optane™ Memory Configuration Intel® Optane™ memory can still manually execute the DVDSetup.exe from the root path of the MSI Driver Disc. ˜ Under the Drivers/Software tab, check the Intel RAID Drivers check-box. ˜ Click the... F10 to finish. ˜ Reboot System. Intel® Optane™ Memory Configuration 89 System Requirements y Intel® Optane™ memory ready MSI® motherboards y Supported 8th Gen, or later, Intel® Core™ - i Processor y System BIOS that supports the Intel® Rapid Storage ...
... into the M.2 slot. 3. Intel® Optane™ Memory Configuration Intel® Optane™ memory can still manually execute the DVDSetup.exe from the root path of the MSI Driver Disc. ˜ Under the Drivers/Software tab, check the Intel RAID Drivers check-box. ˜ Click the... F10 to finish. ˜ Reboot System. Intel® Optane™ Memory Configuration 89 System Requirements y Intel® Optane™ memory ready MSI® motherboards y Supported 8th Gen, or later, Intel® Core™ - i Processor y System BIOS that supports the Intel® Rapid Storage ...


