User Manual
Page 20
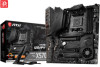
... jacks y 1x Optical S/PDIF Out connector y 1x 256 Mb flash y UEFI AMI BIOS y ACPI 6.1, SM BIOS 2.8 y Multi-language y Drivers y DRAGON CENTER y Nahimic Audio y CPU-Z MSI GAMING y MSI App Player (BlueStacks) y Google Chrome™ ,Google Toolbar, Google Drive y Norton™ Internet Security Solution y Gaming Optimization y Gaming Hotkey y Mystic Light y Hardware Monitor y True Color...
... jacks y 1x Optical S/PDIF Out connector y 1x 256 Mb flash y UEFI AMI BIOS y ACPI 6.1, SM BIOS 2.8 y Multi-language y Drivers y DRAGON CENTER y Nahimic Audio y CPU-Z MSI GAMING y MSI App Player (BlueStacks) y Google Chrome™ ,Google Toolbar, Google Drive y Norton™ Internet Security Solution y Gaming Optimization y Gaming Hotkey y Mystic Light y Hardware Monitor y True Color...
User Manual
Page 23
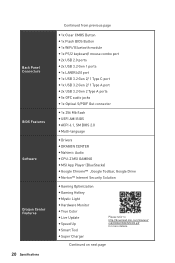
...;cations 23 It should contain: Motherboard MEG X570 UNIFY SATA 6Gb/s Cables 4 Cable 1 to 2 RGB LED Extension Y Cable 80cm 1 CORSAIR RGB LED Extension Cable 50cm 1 RAINBOW RGB LED Extension Cable 80cm 1 Antenna Set 1 M.2 screw 3 Accessories Case Badge 1 SATA Cable Labels 1 Product Registration Card 1 Application DVD Driver DVD 1 User Manual 1 Documentation Quick Installation Guide 1 Important...
...;cations 23 It should contain: Motherboard MEG X570 UNIFY SATA 6Gb/s Cables 4 Cable 1 to 2 RGB LED Extension Y Cable 80cm 1 CORSAIR RGB LED Extension Cable 50cm 1 RAINBOW RGB LED Extension Cable 80cm 1 Antenna Set 1 M.2 screw 3 Accessories Case Badge 1 SATA Cable Labels 1 Product Registration Card 1 Application DVD Driver DVD 1 User Manual 1 Documentation Quick Installation Guide 1 Important...

User Manual
Page 41
Please refer to recharge your iPad,iPhone and iPod through USB ports, please install MSI® DRAGON CENTER utility. JTPM1: TPM Module Connector This connector is for more details and usages. 2 14 1 13 1 LPC Clock 2 3V Standby power 3 LPC ... No Pin 11 LPC address & data pin3 12 Ground 13 LPC Frame 14 Ground Overview of Components 41 yyIn order to the TPM security platform manual for TPM (Trusted Platform Module). JUSB4~5: USB 2.0 Connectors These connectors allow you to connect USB 2.0 ports on the front panel. 2 10 1 9 1 VCC 2 3 USB0- 4 5 USB0+ 6...
Please refer to recharge your iPad,iPhone and iPod through USB ports, please install MSI® DRAGON CENTER utility. JTPM1: TPM Module Connector This connector is for more details and usages. 2 14 1 13 1 LPC Clock 2 3V Standby power 3 LPC ... No Pin 11 LPC address & data pin3 12 Ground 13 LPC Frame 14 Ground Overview of Components 41 yyIn order to the TPM security platform manual for TPM (Trusted Platform Module). JUSB4~5: USB 2.0 Connectors These connectors allow you to connect USB 2.0 ports on the front panel. 2 10 1 9 1 VCC 2 3 USB0- 4 5 USB0+ 6...
User Manual
Page 54
... 3. Installing Drivers 1. Click OK button to finish. 7. Click the Utilities tab. 3. Click the Install button in the lower-right corner of the MSI Driver Disc. 4. Click the Select to get into your optical drive. 3. Select the utilities you must complete drivers installation. 1. Click OK button to... finish. 8. If you turn off the AutoPlay feature from the Windows Control Panel, you can still manually execute the DVDSetup.exe from the root path of the window. 5. Click the Install button in Windows® 10. 2. Press the ...
... 3. Installing Drivers 1. Click OK button to finish. 7. Click the Utilities tab. 3. Click the Install button in the lower-right corner of the MSI Driver Disc. 4. Click the Select to get into your optical drive. 3. Select the utilities you must complete drivers installation. 1. Click OK button to... finish. 8. If you turn off the AutoPlay feature from the Windows Control Panel, you can still manually execute the DVDSetup.exe from the root path of the window. 5. Click the Install button in Windows® 10. 2. Press the ...
User Manual
Page 59
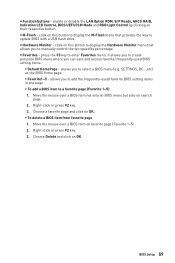
... - allows you to add the frequently-used BIOS setting items. ƒƒDefault HomePage - It allows you to create personal BIOS menu where you to manually control the fan speed by clicking on this button to display the M-Flash menu that allows you can save and access favorite/ frequently-used / favorite...
... - allows you to add the frequently-used BIOS setting items. ƒƒDefault HomePage - It allows you to create personal BIOS menu where you to manually control the fan speed by clicking on this button to display the M-Flash menu that allows you can save and access favorite/ frequently-used / favorite...
User Manual
Page 69
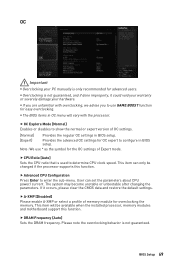
... use * as the symbol for the OC settings of memory module for advanced users. If it could void your warranty or severely damage your PC manually is not guaranteed, and if done improperly, it occurs, please clear the CMOS data and restore the default settings. ffDRAM Frequency [Auto] Sets the DRAM...
... use * as the symbol for the OC settings of memory module for advanced users. If it could void your warranty or severely damage your PC manually is not guaranteed, and if done improperly, it occurs, please clear the CMOS data and restore the default settings. ffDRAM Frequency [Auto] Sets the DRAM...
User Manual
Page 71
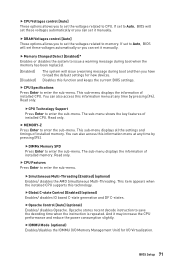
...for new devices. Disables this technology. Read only. If set to Auto, BIOS will set these voltages automatically or you can set it manually. Read only. ffCPU Voltages control [Auto] These options allows you to set the voltages related to memory. ffCPU Specifications Press Enter to ...BIOS Setup 71 ffCPU Technology Support Press Enter to enter the sub-menu. ffOpcache Control [Auto] (optional) Enables/ disables Opcache. And it manually. The sub-menu shows the key features of installed CPU. You can also access this information menu at any time by pressing [F4]. ...
...for new devices. Disables this technology. Read only. If set to Auto, BIOS will set these voltages automatically or you can set it manually. Read only. ffCPU Voltages control [Auto] These options allows you to set the voltages related to memory. ffCPU Specifications Press Enter to ...BIOS Setup 71 ffCPU Technology Support Press Enter to enter the sub-menu. ffOpcache Control [Auto] (optional) Enables/ disables Opcache. And it manually. The sub-menu shows the key features of installed CPU. You can also access this information menu at any time by pressing [F4]. ...
User Manual
Page 84
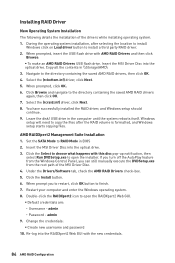
...the root path of the drivers while installing operating system. 1. Installing RAID Driver New Operating System Installation The following details the installation of the MSI Driver Disc. 4. Copy all the contents in the computer until the system reboots itself. Select the (rcbottom.inf) driver, click Next. ...with this disc pop-up notification, then select Run DVDSetup.exe to finish. 7. Click the Install button. 6. When prompt you can still manually execute the DVDSetup.exe from the Windows Control Panel, you to restart, click OK button to open the RAIDXpert2 Web GUI. ƒ ...
...the root path of the drivers while installing operating system. 1. Installing RAID Driver New Operating System Installation The following details the installation of the MSI Driver Disc. 4. Copy all the contents in the computer until the system reboots itself. Select the (rcbottom.inf) driver, click Next. ...with this disc pop-up notification, then select Run DVDSetup.exe to finish. 7. Click the Install button. 6. When prompt you can still manually execute the DVDSetup.exe from the Windows Control Panel, you to restart, click OK button to open the RAIDXpert2 Web GUI. ƒ ...


