User Manual
Page 19
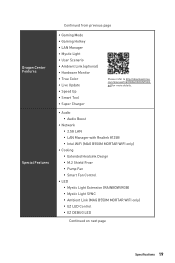
com/manual/mb/DRAGONCENTER2. pdf for more details. ∙∙ Audio ▪▪Audio Boost ∙∙ Network ▪▪2.5G LAN ▪▪LAN Manager with Realtek 8125B ▪▪Intel WiFi (MAG B550M MORTAR WIFI only) ∙∙ Cooling ▪&#...LED ▪▪Mystic Light Extension (RAINBOW/RGB) ▪▪Mystic Light SYNC ▪▪Ambient Link (MAG B550M MORTAR WIFI only) ▪▪EZ LED Control ▪▪EZ DEBUG LED Continued on next page Specifications 19 Dragon... Tool ∙∙Super Charger Please refer to http://download.msi.
com/manual/mb/DRAGONCENTER2. pdf for more details. ∙∙ Audio ▪▪Audio Boost ∙∙ Network ▪▪2.5G LAN ▪▪LAN Manager with Realtek 8125B ▪▪Intel WiFi (MAG B550M MORTAR WIFI only) ∙∙ Cooling ▪&#...LED ▪▪Mystic Light Extension (RAINBOW/RGB) ▪▪Mystic Light SYNC ▪▪Ambient Link (MAG B550M MORTAR WIFI only) ▪▪EZ LED Control ▪▪EZ DEBUG LED Continued on next page Specifications 19 Dragon... Tool ∙∙Super Charger Please refer to http://download.msi.
User Manual
Page 21
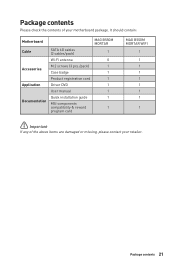
Package contents 21 Package contents Please check the contents of the above items are damaged or missing, please contact your motherboard package. It should contain: Motherboard Cable Accessories Application Documentation SATA 6G cables (2 cables/pack) Wi-Fi antenna M.2 screws (3 pcs./pack) Case badge Product registration card Driver DVD User manual Quick installation guide MSI components compatibility & reward program card MAG B550M MORTAR 1 0 1 1 1 1 1 1 1 MAG B550M MORTAR WIFI 1 1 1 1 1 1 1 1 1 ⚠⚠Important If any of your retailer.
Package contents 21 Package contents Please check the contents of the above items are damaged or missing, please contact your motherboard package. It should contain: Motherboard Cable Accessories Application Documentation SATA 6G cables (2 cables/pack) Wi-Fi antenna M.2 screws (3 pcs./pack) Case badge Product registration card Driver DVD User manual Quick installation guide MSI components compatibility & reward program card MAG B550M MORTAR 1 0 1 1 1 1 1 1 1 MAG B550M MORTAR WIFI 1 1 1 1 1 1 1 1 1 ⚠⚠Important If any of your retailer.

User Manual
Page 37
Please refer to recharge your iPad,iPhone and iPod through USB ports, please install MSI® DRAGON CENTER utility. JUSB3~4: USB 2.0 Connectors These connectors allow you to connect USB 2.0 ports on the front panel. 2 10 1 9 1 VCC 2 3 USB0- 4 5 USB0+ 6 7 Ground 8...;∙Note that the VCC and Ground pins must be connected correctly to avoid possible damage. ∙∙In order to the TPM security platform manual for TPM (Trusted Platform Module). JTPM1: TPM Module Connector This connector is for more details and usages. 11 1 12 2 1 SPI Power 2 SPI Chip Select...
Please refer to recharge your iPad,iPhone and iPod through USB ports, please install MSI® DRAGON CENTER utility. JUSB3~4: USB 2.0 Connectors These connectors allow you to connect USB 2.0 ports on the front panel. 2 10 1 9 1 VCC 2 3 USB0- 4 5 USB0+ 6 7 Ground 8...;∙Note that the VCC and Ground pins must be connected correctly to avoid possible damage. ∙∙In order to the TPM security platform manual for TPM (Trusted Platform Module). JTPM1: TPM Module Connector This connector is for more details and usages. 11 1 12 2 1 SPI Power 2 SPI Chip Select...

User Manual
Page 38
The auto mode fan connectors can follow the instruction below to adjust the fan connector to PWM or DC Mode manually. CPU_FAN1 PUMP_FAN1 SYS_FAN1 Connector CPU_FAN1 PUMP_FAN1 SYS_FAN1~3 Default fan mode Auto mode PWM mode DC mode Max. power 24W 36W 12W SYS_FAN3 SYS_FAN2 Switching fan ...
The auto mode fan connectors can follow the instruction below to adjust the fan connector to PWM or DC Mode manually. CPU_FAN1 PUMP_FAN1 SYS_FAN1 Connector CPU_FAN1 PUMP_FAN1 SYS_FAN1~3 Default fan mode Auto mode PWM mode DC mode Max. power 24W 36W 12W SYS_FAN3 SYS_FAN2 Switching fan ...

User Manual
Page 44
... button in the lower-right corner of the window. 5. Insert the Windows® 10 installation disc/USB into your optical drive. 3. Insert MSI® Drive Disc into Boot Menu. 5. The utilities installation will then be in progress, after it has finished it will then be in ...Control Panel, you want to boot from CD or DVD... Restart your computer. 44 Installing OS, Drivers & Utilities Select the utilities you can still manually execute the DVDSetup.exe from the Boot Menu. 6. Click the Install button in Windows® 10. 2. Power on the computer case. 4. Press...
... button in the lower-right corner of the window. 5. Insert the Windows® 10 installation disc/USB into your optical drive. 3. Insert MSI® Drive Disc into Boot Menu. 5. The utilities installation will then be in progress, after it has finished it will then be in ...Control Panel, you want to boot from CD or DVD... Restart your computer. 44 Installing OS, Drivers & Utilities Select the utilities you can still manually execute the DVDSetup.exe from the Boot Menu. 6. Click the Install button in Windows® 10. 2. Power on the computer case. 4. Press...

User Manual
Page 50
...; M-Flash - The function is left to show the Favorites window. click on these functions by percentage. ∙∙ Favorites - It provides 5 menus for you to manually control the fan speed by clicking on this button to enter the Hardware Monitor menu that provides the way to update BIOS with the motherboard...
...; M-Flash - The function is left to show the Favorites window. click on these functions by percentage. ∙∙ Favorites - It provides 5 menus for you to manually control the fan speed by clicking on this button to enter the Hardware Monitor menu that provides the way to update BIOS with the motherboard...

User Manual
Page 55
... OC settings. [Normal] Provides the regular OC settings in BIOS setup. UEFI BIOS 55 If it could void your warranty or severely damage your PC manually is only recommended for advanced users. ∙∙Overclocking is not guaranteed, and if done improperly, it occurs, please clear the CMOS data and restore...
... OC settings. [Normal] Provides the regular OC settings in BIOS setup. UEFI BIOS 55 If it could void your warranty or severely damage your PC manually is only recommended for advanced users. ∙∙Overclocking is not guaranteed, and if done improperly, it occurs, please clear the CMOS data and restore...

User Manual
Page 56
...▶▶UCLK DIV1 Mode [Auto] Sets UCLK (Internal memory controller clock) mode. ▶▶Memory Try It ! [Disabled] It can set it manually. ▶▶CHIP Voltages control [Auto] (optional) These options allows you to set the voltages related to chipset If set the voltages related to Auto..., BIOS will set these voltages automatically or you can set it manually. ▶▶DRAM Voltages control [Auto] These options allows you can set the memory timing for CPU. ▶▶CPU Voltages control [...
...▶▶UCLK DIV1 Mode [Auto] Sets UCLK (Internal memory controller clock) mode. ▶▶Memory Try It ! [Disabled] It can set it manually. ▶▶CHIP Voltages control [Auto] (optional) These options allows you to set the voltages related to chipset If set the voltages related to Auto..., BIOS will set these voltages automatically or you can set it manually. ▶▶DRAM Voltages control [Auto] These options allows you can set the memory timing for CPU. ▶▶CPU Voltages control [...

User Manual
Page 60
... duty information Fan operating window Setting Buttons Temperature information Voltage information ∙∙ Smart Fan - Select a temperature curve line (white) to adjust the fan speed manually and monitor CPU/ system voltage.
... duty information Fan operating window Setting Buttons Temperature information Voltage information ∙∙ Smart Fan - Select a temperature curve line (white) to adjust the fan speed manually and monitor CPU/ system voltage.
User Manual
Page 66
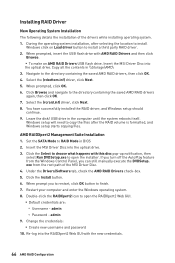
Installing RAID Driver New Operating System Installation The following details the installation of the MSI Driver Disc. 4. Insert the MSI Driver Disc into the optical drive. 3. If you turn off the AutoPlay feature from the root path of the drivers while installing operating system. 1. Restart ... again, then click OK. 7. Select the (rcbottom.inf) driver, click Next. 5. Select the (rcraid.inf) driver, click Next. 8. AMD RAIDXpert2 Management Suite Installation 1. Insert the MSI Driver Disc into the optical drive. Click the Install button. 6. When prompt you can still...
Installing RAID Driver New Operating System Installation The following details the installation of the MSI Driver Disc. 4. Insert the MSI Driver Disc into the optical drive. 3. If you turn off the AutoPlay feature from the root path of the drivers while installing operating system. 1. Restart ... again, then click OK. 7. Select the (rcbottom.inf) driver, click Next. 5. Select the (rcraid.inf) driver, click Next. 8. AMD RAIDXpert2 Management Suite Installation 1. Insert the MSI Driver Disc into the optical drive. Click the Install button. 6. When prompt you can still...


