
User Manual
Page 1
... link to install your phone or tablet. Quick Start Thank you for purchasing the MSI® MAG B460 TOMAHAWK motherboard. This Quick Start section provides demonstration diagrams about how to the URL by scanning the QR code. Preparing Tools and Components Intel® LGA 1200 CPU CPU Fan DDR4 Memory Power Supply Unit Chassis Graphics...
... link to install your phone or tablet. Quick Start Thank you for purchasing the MSI® MAG B460 TOMAHAWK motherboard. This Quick Start section provides demonstration diagrams about how to the URL by scanning the QR code. Preparing Tools and Components Intel® LGA 1200 CPU CPU Fan DDR4 Memory Power Supply Unit Chassis Graphics...

User Manual
Page 13
......49 SETTINGS Menu...50 OC Menu...52 M-FLASH Menu...55 OC PROFILE Menu 56 HARDWARE MONITOR Menu 57 RAID Configuration 59 Enabling Intel® Rapid Storage Technology 59 Creating RAID Volume 60 Removing a RAID Volume 61 Resetting Disks to Non-RAID 62 Rebuilding RAID ...Array 63 Installing RAID Driver 64 Installing Intel® Rapid Storage Technology Software 64 Intel® Optane™ Memory Configuration 65 System Requirements 65 Installing the Intel® Optane™ memory 65 Removing the Intel® Optane™ memory 67 Troubleshooting 68 Contents 13
......49 SETTINGS Menu...50 OC Menu...52 M-FLASH Menu...55 OC PROFILE Menu 56 HARDWARE MONITOR Menu 57 RAID Configuration 59 Enabling Intel® Rapid Storage Technology 59 Creating RAID Volume 60 Removing a RAID Volume 61 Resetting Disks to Non-RAID 62 Rebuilding RAID ...Array 63 Installing RAID Driver 64 Installing Intel® Rapid Storage Technology Software 64 Intel® Optane™ Memory Configuration 65 System Requirements 65 Installing the Intel® Optane™ memory 65 Removing the Intel® Optane™ memory 67 Troubleshooting 68 Contents 13
User Manual
Page 14
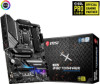
...2666 MHz ∙∙Supports Dual-Channel mode ∙∙Supports non-ECC, un-buffered memory ∙∙Supports Intel® Extreme Memory Profile (XMP) * Please refer www.msi.com for more information on compatible memory. ∙∙1x PCIe 3.0 x16 slot (From CPU, PCI_E1), supports ...1x Realtek® RTL8125B 2.5Gbps LAN controller ∙∙1x Intel® I219V 1Gbps LAN controller Continued on next page 14 Specifications Intel® B460 Chipset ∙∙4x DDR4 memory slots, support up to 128GB* ∙∙Intel® Core™ i7/ i9 ▪▪Supports up...
...2666 MHz ∙∙Supports Dual-Channel mode ∙∙Supports non-ECC, un-buffered memory ∙∙Supports Intel® Extreme Memory Profile (XMP) * Please refer www.msi.com for more information on compatible memory. ∙∙1x PCIe 3.0 x16 slot (From CPU, PCI_E1), supports ...1x Realtek® RTL8125B 2.5Gbps LAN controller ∙∙1x Intel® I219V 1Gbps LAN controller Continued on next page 14 Specifications Intel® B460 Chipset ∙∙4x DDR4 memory slots, support up to 128GB* ∙∙Intel® Core™ i7/ i9 ▪▪Supports up...

User Manual
Page 15
...unavailable when installing M.2 SSD in the M2_2 slot. *** Before using Intel® Optane™ memory modules, please ensure that you have updated the drivers and BIOS to the latest version from MSI website. ∙∙Intel® B460 Chipset ▪▪Supports RAID 0, RAID 1, RAID 5 and RAID ...10 for SATA storage devices ∙∙Intel® B460 Chipset ▪▪6x USB 3.2 Gen 1 5Gbps ports (4 Type-A...
...unavailable when installing M.2 SSD in the M2_2 slot. *** Before using Intel® Optane™ memory modules, please ensure that you have updated the drivers and BIOS to the latest version from MSI website. ∙∙Intel® B460 Chipset ▪▪Supports RAID 0, RAID 1, RAID 5 and RAID ...10 for SATA storage devices ∙∙Intel® B460 Chipset ▪▪6x USB 3.2 Gen 1 5Gbps ports (4 Type-A...

User Manual
Page 17
... ∙∙ACPI 6.2, SMBIOS 3.2 ∙∙ Multi-language ∙∙ Drivers ∙∙DRAGON CENTER ∙∙MSI APP Player (BlueStacks) ∙∙Open Broadcaster Software (OBS) ∙∙CPU-Z MSI GAMING ∙∙Intel® Extreme Tuning Utility ∙∙Google Chrome™, Google Toolbar, Google Drive ∙∙Norton™ Internet...;∙Live Update ∙∙DPC Latency Tuner ∙∙Speed Up ∙∙Smart Tool ∙∙Super Charger Please refer to http://download.msi.
... ∙∙ACPI 6.2, SMBIOS 3.2 ∙∙ Multi-language ∙∙ Drivers ∙∙DRAGON CENTER ∙∙MSI APP Player (BlueStacks) ∙∙Open Broadcaster Software (OBS) ∙∙CPU-Z MSI GAMING ∙∙Intel® Extreme Tuning Utility ∙∙Google Chrome™, Google Toolbar, Google Drive ∙∙Norton™ Internet...;∙Live Update ∙∙DPC Latency Tuner ∙∙Speed Up ∙∙Smart Tool ∙∙Super Charger Please refer to http://download.msi.

User Manual
Page 25
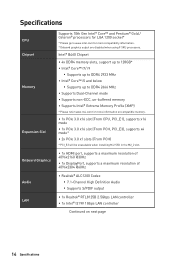
... JBAT1 Clear CMOS (Reset BIOS) Jumper JCI1 Chassis Intrusion Connector JFP1, JFP2 Front Panel Connectors JRAINBOW1~2 Addressable RGB LED connectors JRGB1~2 RGB LED connector JRTD3 Intel RTD3 Connector JTBT1 Thunderbolt Add-on Card Connector JTPM1 TPM Module Connector JUSB1 USB 3.2 Gen 1 5Gbps Type-C Connector JUSB2 USB 3.2 Gen 1 5Gbps Connector JUSB3~4 USB...
... JBAT1 Clear CMOS (Reset BIOS) Jumper JCI1 Chassis Intrusion Connector JFP1, JFP2 Front Panel Connectors JRAINBOW1~2 Addressable RGB LED connectors JRGB1~2 RGB LED connector JRTD3 Intel RTD3 Connector JTBT1 Thunderbolt Add-on Card Connector JTPM1 TPM Module Connector JUSB1 USB 3.2 Gen 1 5Gbps Type-C Connector JUSB2 USB 3.2 Gen 1 5Gbps Connector JUSB3~4 USB...

User Manual
Page 29
Loosen the screws of Components 29 M2_1 slot installation 1. Remove the M.2 SHIELD FROZR and remove the protective films from the thermal pads. 2 1 1 Overview of M.2 SHIELD FROZR heatsink. 2. http://youtu.be/JCTFABytrYA M2_1 M2_2 ⚠⚠Important ∙∙Intel® RST only supports PCIe M.2 SSD with UEFI ROM (M2_2 slot only). ∙∙Intel® Optane™ Memory Ready for M2_2 slot. M2_1~2: M.2 Slots (Key M) ⚽⚽Video Demonstration Watch the video to learn how to Install M.2 module.
Loosen the screws of Components 29 M2_1 slot installation 1. Remove the M.2 SHIELD FROZR and remove the protective films from the thermal pads. 2 1 1 Overview of M.2 SHIELD FROZR heatsink. 2. http://youtu.be/JCTFABytrYA M2_1 M2_2 ⚠⚠Important ∙∙Intel® RST only supports PCIe M.2 SSD with UEFI ROM (M2_2 slot only). ∙∙Intel® Optane™ Memory Ready for M2_2 slot. M2_1~2: M.2 Slots (Key M) ⚽⚽Video Demonstration Watch the video to learn how to Install M.2 module.
User Manual
Page 37
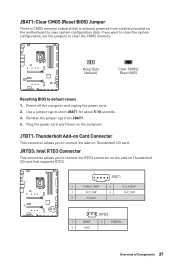
... the jumper cap from a battery located on the computer. JTBT1: Thunderbolt Add-on Card Connector This connector allows you to clear the CMOS memory. JRTD3: Intel RTD3 Connector This connector allows you want to clear the system configuration, set the jumpers to connect the add-on Thunderbolt I /O card. Power off the...
... the jumper cap from a battery located on the computer. JTBT1: Thunderbolt Add-on Card Connector This connector allows you to clear the CMOS memory. JRTD3: Intel RTD3 Connector This connector allows you want to clear the system configuration, set the jumpers to connect the add-on Thunderbolt I /O card. Power off the...
User Manual
Page 59
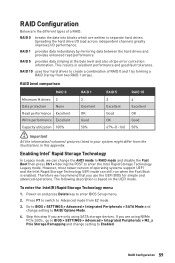
.../ volumes/ pictures listed in your system might differ from the illustrations in excellent performance and good fault tolerance. Power on the UEFI mode. Enabling Intel® Rapid Storage Technology In Legacy mode, we recommend that you are only using NVMe PCIe SSDs, go to BIOS > SETTINGS > Advanced >...during the POST to Advanced mode from two RAID 1 arrays. RAID Configuration Below are the different types of operating systems support UEFI and the Intel Rapid Storage Technology UEFI mode can change the AHCI mode to RAID mode and disable the Fast Boot then press Ctrl + I /O performance....
.../ volumes/ pictures listed in your system might differ from the illustrations in excellent performance and good fault tolerance. Power on the UEFI mode. Enabling Intel® Rapid Storage Technology In Legacy mode, we recommend that you are only using NVMe PCIe SSDs, go to BIOS > SETTINGS > Advanced >...during the POST to Advanced mode from two RAID 1 arrays. RAID Configuration Below are the different types of operating systems support UEFI and the Intel Rapid Storage Technology UEFI mode can change the AHCI mode to RAID mode and disable the Fast Boot then press Ctrl + I /O performance....
User Manual
Page 60
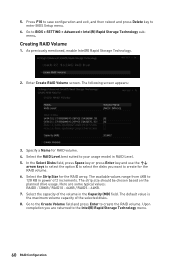
... be chosen based on the planned drive usage. Go to the Create Volume field and press Enter to BIOS > SETTING > Advanced > Intel(R) Rapid Storage Technology submenu. Press F10 to save configuration and exit, and then reboot and press Delete key to create for the RAID ... the RAID array. Select the capacity of the selected disks. 8. As previously mentioned, enable Intel(R) Rapid Storage Technology. 2. Select the Strip Size for RAID volume. 4. Here are returned to the Intel(R) Rapid Storage Technology menu. 60 RAID Configuration Upon completion you want to enter BIOS Setup menu...
... be chosen based on the planned drive usage. Go to the Create Volume field and press Enter to BIOS > SETTING > Advanced > Intel(R) Rapid Storage Technology submenu. Press F10 to save configuration and exit, and then reboot and press Delete key to create for the RAID ... the RAID array. Select the capacity of the selected disks. 8. As previously mentioned, enable Intel(R) Rapid Storage Technology. 2. Select the Strip Size for RAID volume. 4. Here are returned to the Intel(R) Rapid Storage Technology menu. 60 RAID Configuration Upon completion you want to enter BIOS Setup menu...

User Manual
Page 61
...please be noted that all data on RAID drives will be lost. ⚠⚠Important If your system currently boots to BIOS > SETTING > Advanced > Intel(R) Rapid Storage Technology. 2. Go to RAID and you delete the RAID volume, your system will become unbootable. 1. Select the Yes item and press Enter... key to enter the RAID VOLUME INFO screen. 3. Select the RAID volume from the Intel(R) Rapid Storage Technology screen to accept the volume deletion. Select the Delete item and press Enter key to delete the selected RAID volume. The ...
...please be noted that all data on RAID drives will be lost. ⚠⚠Important If your system currently boots to BIOS > SETTING > Advanced > Intel(R) Rapid Storage Technology. 2. Go to RAID and you delete the RAID volume, your system will become unbootable. 1. Select the Yes item and press Enter... key to enter the RAID VOLUME INFO screen. 3. Select the RAID volume from the Intel(R) Rapid Storage Technology screen to accept the volume deletion. Select the Delete item and press Enter key to delete the selected RAID volume. The ...

User Manual
Page 62
... to accept the disk reseting. ⚠⚠Important ∙∙You will lose all data on the RAID drives and any RAID structures from the Intel(R) Rapid Storage Technology screen to enter PHYSICAL DISK INFO screen. 4. Select the RAID volume from the drives. The following screen appears: 5. Resetting Disks to BIOS...
... to accept the disk reseting. ⚠⚠Important ∙∙You will lose all data on the RAID drives and any RAID structures from the Intel(R) Rapid Storage Technology screen to enter PHYSICAL DISK INFO screen. 4. Select the RAID volume from the drives. The following screen appears: 5. Resetting Disks to BIOS...

User Manual
Page 63
... to rebuild the new hard drive. Select the Rebuild item and press Enter key to BIOS > SETTING > Advanced > Intel(R) Rapid Storage Technology. 4. RAID Configuration 63 Select the Degraded RAID volume from the Intel(R) Rapid Storage Technology screen to the procedure below that is lost. As a result, the system can only utilize the...
... to rebuild the new hard drive. Select the Rebuild item and press Enter key to BIOS > SETTING > Advanced > Intel(R) Rapid Storage Technology. 4. RAID Configuration 63 Select the Degraded RAID volume from the Intel(R) Rapid Storage Technology screen to the procedure below that is lost. As a result, the system can only utilize the...
User Manual
Page 64
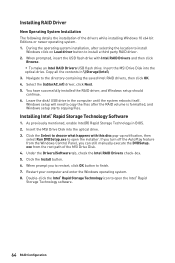
... operating system. 1. Installing RAID Driver New Operating System Installation The following details the installation of the MSI Drive Disk. 4. Navigate to open the Intel® Rapid Storage Technology software. 64 RAID Configuration Under the Drivers/Software tab, check the... Intel RAID Drivers check-box. 5. Insert the MSI Drive Disk into the optical drive. 3. Insert the MSI Drive Disk into the optical drive. Restart your computer and enter the Windows operating system. 8. As previously mentioned, enable Intel(R) Rapid Storage Technology in...
... operating system. 1. Installing RAID Driver New Operating System Installation The following details the installation of the MSI Drive Disk. 4. Navigate to open the Intel® Rapid Storage Technology software. 64 RAID Configuration Under the Drivers/Software tab, check the... Intel RAID Drivers check-box. 5. Insert the MSI Drive Disk into the optical drive. 3. Insert the MSI Drive Disk into the optical drive. Restart your computer and enter the Windows operating system. 8. As previously mentioned, enable Intel(R) Rapid Storage Technology in...
User Manual
Page 65
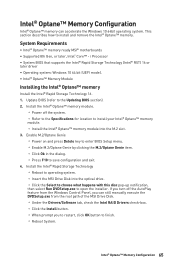
...to choose what happens with this disc pop-up notification, then select Run DVDSetup.exe to operating system. ▫▫Insert the MSI Drive Disk into the M.2 slot. 3. Intel® Optane™ Memory Configuration 65 Update BIOS (refer to finish. ▫▫Reboot System. Enable M.2/Optane Genie ▫...; Optane™ memory can still manually execute the DVDSetup.exe from the root path of the MSI Drive Disk. ▫▫Under the Drivers/Software tab, check the Intel RAID Drivers check-box. ▫▫Click the Install button. ▫▫When prompt you to restart, click ...
...to choose what happens with this disc pop-up notification, then select Run DVDSetup.exe to operating system. ▫▫Insert the MSI Drive Disk into the M.2 slot. 3. Intel® Optane™ Memory Configuration 65 Update BIOS (refer to finish. ▫▫Reboot System. Enable M.2/Optane Genie ▫...; Optane™ memory can still manually execute the DVDSetup.exe from the root path of the MSI Drive Disk. ▫▫Under the Drivers/Software tab, check the Intel RAID Drivers check-box. ▫▫Click the Install button. ▫▫When prompt you to restart, click ...

User Manual
Page 66
... ∙∙ DO NOT set the SATA mode back to AHCI in the dialog. 6. Enable Intel® Optane™ Memory. ▫▫Run the Intel® Rapid Storage Technology software. ▫▫Click Intel® Optane™ Memory tab and click Enable. ▫▫Click Yes in BIOS. ∙&#...8729; DO NOT revert back to older version of the BIOS. ∙∙ DO NOT remove the Intel® Optane™ ...
... ∙∙ DO NOT set the SATA mode back to AHCI in the dialog. 6. Enable Intel® Optane™ Memory. ▫▫Run the Intel® Rapid Storage Technology software. ▫▫Click Intel® Optane™ Memory tab and click Enable. ▫▫Click Yes in BIOS. ∙&#...8729; DO NOT revert back to older version of the BIOS. ∙∙ DO NOT remove the Intel® Optane™ ...

User Manual
Page 67
...;▫Click Yes in the dialog. ▫▫Press F10 to save configuration and exit. 3. Remove the Intel® Optane™ memory module. ▫▫Power off the system. ▫▫Remove the Intel® Optane™ memory module. Please follow the steps below to avoid operating system damage. Disable M.2/Optane Genie...
...;▫Click Yes in the dialog. ▫▫Press F10 to save configuration and exit. 3. Remove the Intel® Optane™ memory module. ▫▫Power off the system. ▫▫Remove the Intel® Optane™ memory module. Please follow the steps below to avoid operating system damage. Disable M.2/Optane Genie...

