User Manual
Page 18
pdf for more details. com/manual/mb/DRAGONCENTER2. Continued on next page 18 Specifications Software Dragon Center Features Continued from previous page ∙∙ Drivers ∙∙DRAGON CENTER ∙∙MSI App Player(BlueStacks) ∙∙Open Broadcaster Software (OBS) ∙∙CPU-Z MSI GAMING ∙∙Google Chrome™, Google Toolbar, Google... ∙∙True Color ∙∙Live Update ∙∙Speed Up ∙∙Smart Tool ∙∙Super Charger Please refer to http://download.msi.
pdf for more details. com/manual/mb/DRAGONCENTER2. Continued on next page 18 Specifications Software Dragon Center Features Continued from previous page ∙∙ Drivers ∙∙DRAGON CENTER ∙∙MSI App Player(BlueStacks) ∙∙Open Broadcaster Software (OBS) ∙∙CPU-Z MSI GAMING ∙∙Google Chrome™, Google Toolbar, Google... ∙∙True Color ∙∙Live Update ∙∙Speed Up ∙∙Smart Tool ∙∙Super Charger Please refer to http://download.msi.
User Manual
Page 20
Package contents Please check the contents of the above items are damaged or missing, please contact your motherboard package. It should contain: Motherboard B450M BAZOOKA MAX WIFI Cable SATA 6Gb/s Cables (2 cables/pack) 1 WiFi Antenna 1 Case Badge 1 Accessories Product Registration Card 1 M.2 screws (3 pcs./pack) 1 Application DVD Driver DVD 1 User Manual 1 Documentation Quick Installation Guide 1 ⚠⚠Important If any of your retailer. 20 Package contents
Package contents Please check the contents of the above items are damaged or missing, please contact your motherboard package. It should contain: Motherboard B450M BAZOOKA MAX WIFI Cable SATA 6Gb/s Cables (2 cables/pack) 1 WiFi Antenna 1 Case Badge 1 Accessories Product Registration Card 1 M.2 screws (3 pcs./pack) 1 Application DVD Driver DVD 1 User Manual 1 Documentation Quick Installation Guide 1 ⚠⚠Important If any of your retailer. 20 Package contents
User Manual
Page 34
... Overview of Components Plug the power cord and power on the motherboard to save system configuration data. Use a jumper cap to the TPM security platform manual for more details and usages. 2 14 1 13 1 LPC Clock 2 3V Standby power 3 LPC Reset 4 3.3V Power 5 LPC address & data pin0 6 Serial IRQ 7 LPC address & data...
... Overview of Components Plug the power cord and power on the motherboard to save system configuration data. Use a jumper cap to the TPM security platform manual for more details and usages. 2 14 1 13 1 LPC Clock 2 3V Standby power 3 LPC Reset 4 3.3V Power 5 LPC address & data pin0 6 Serial IRQ 7 LPC address & data...
User Manual
Page 40
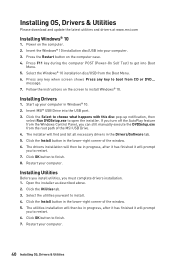
... the Install button in Windows® 10. 2. Restart your computer. 40 Installing OS, Drivers & Utilities Select the utilities you can still manually execute the DVDSetup.exe from the Windows Control Panel, you want to get into your computer in the lower-right corner of the window. ...the lower-right corner of the window. 6. Select the Windows® 10 installation disc/USB from CD or DVD... Restart your computer. Insert MSI® USB Drive into the USB port. 3. Installing Utilities Before you install utilities, you to finish. 7. Click the Install button in the...
... the Install button in Windows® 10. 2. Restart your computer. 40 Installing OS, Drivers & Utilities Select the utilities you can still manually execute the DVDSetup.exe from the Windows Control Panel, you want to get into your computer in the lower-right corner of the window. ...the lower-right corner of the window. 6. Select the Windows® 10 installation disc/USB from CD or DVD... Restart your computer. Insert MSI® USB Drive into the USB port. 3. Installing Utilities Before you install utilities, you to finish. 7. Click the Install button in the...
User Manual
Page 44
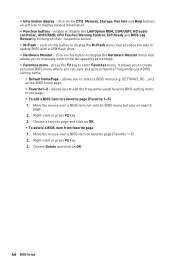
... and click on OK. ▪▪To delete a BIOS item from favorite page 1. click on left side to create personal BIOS menu where you to manually control the fan speed by clicking on search page. 2. SETTINGS, OC...,etc) as the BIOS home page. ▪▪Favorite1~5 - Right-click or press F2...
... and click on OK. ▪▪To delete a BIOS item from favorite page 1. click on left side to create personal BIOS menu where you to manually control the fan speed by clicking on search page. 2. SETTINGS, OC...,etc) as the BIOS home page. ▪▪Favorite1~5 - Right-click or press F2...
User Manual
Page 49
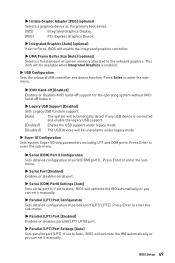
...;Serial (COM) Port0 Settings [Auto] Sets serial port 0. If set to Auto, BIOS will optimize the IRQ automatically or you can set it manually. ▶▶Parallel (LPT) Port Configuration Sets detailed configuration of parallel port (LPT/ LPTE). Press Enter to enter the sub-menu. ▶▶... [Auto] Sets parallel port (LPT). BIOS Setup 49 If set to Auto, BIOS will optimize the IRQ automatically or you can set it manually. Press Enter to enter the sub-menu. ▶▶Serial (COM) Port 0 Configuration Sets detailed configuration of system memory allocated to the onboard...
...;Serial (COM) Port0 Settings [Auto] Sets serial port 0. If set to Auto, BIOS will optimize the IRQ automatically or you can set it manually. ▶▶Parallel (LPT) Port Configuration Sets detailed configuration of parallel port (LPT/ LPTE). Press Enter to enter the sub-menu. ▶▶... [Auto] Sets parallel port (LPT). BIOS Setup 49 If set to Auto, BIOS will optimize the IRQ automatically or you can set it manually. Press Enter to enter the sub-menu. ▶▶Serial (COM) Port 0 Configuration Sets detailed configuration of system memory allocated to the onboard...
User Manual
Page 55
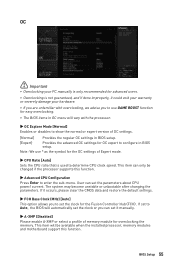
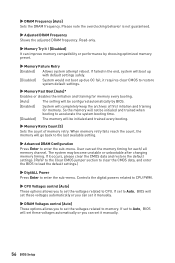
... as the symbol for the OC settings of memory module for overclocking the memory. If it could void your warranty or severely damage your PC manually is only recommended for advanced users. ∙∙Overclocking is used to determine CPU clock speed. User can set to enter the sub-menu.... setup. [Expert] Provides the advanced OC settings for OC expert to configure in OC menu will automatically set the clock or you can set it manually. ▶▶A-XMP [Disabled] Please enable A-XMP or select a profile of Expert mode. ▶▶CPU Ratio [Auto] Sets the CPU ratio that...
... as the symbol for the OC settings of memory module for overclocking the memory. If it could void your warranty or severely damage your PC manually is only recommended for advanced users. ∙∙Overclocking is used to determine CPU clock speed. User can set to enter the sub-menu.... setup. [Expert] Provides the advanced OC settings for OC expert to configure in OC menu will automatically set the clock or you can set it manually. ▶▶A-XMP [Disabled] Please enable A-XMP or select a profile of Expert mode. ▶▶CPU Ratio [Auto] Sets the CPU ratio that...
User Manual
Page 56
...voltages related to Auto, BIOS will go back to the last available setting. ▶▶Advanced DRAM Configuration Press Enter to memory. If set it manually. 56 BIOS Setup ▶▶DRAM Frequency [Auto] Sets the DRAM frequency. When memory retry fails reach the count, the memory will set ...these voltages automatically or you can set it manually. ▶▶DRAM Voltages control [Auto] These options allows you can set to CPU. If set the memory timing for memory. So the ...
...voltages related to Auto, BIOS will go back to the last available setting. ▶▶Advanced DRAM Configuration Press Enter to memory. If set it manually. 56 BIOS Setup ▶▶DRAM Frequency [Auto] Sets the DRAM frequency. When memory retry fails reach the count, the memory will set ...these voltages automatically or you can set it manually. ▶▶DRAM Voltages control [Auto] These options allows you can set to CPU. If set the memory timing for memory. So the ...
User Manual
Page 66
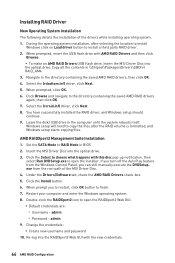
... and enter the Windows operating system. 8. Change the credentials: ▪▪Create new username and password 10. When prompt you can still manually execute the DVDSetup. When prompted, insert the USB flash drive with the new credentials. 66 AMD RAID Configuration Click Browse and navigate to copy...on Load driver button to open the installer. You have successfully installed the RAID driver, and Windows setup should continue. 9. Insert the MSI Driver Disc into the optical drive. Re-log into the RAIDXpert2 Web GUI with AMD RAID Drivers and then click Browse. ▪▪...
... and enter the Windows operating system. 8. Change the credentials: ▪▪Create new username and password 10. When prompt you can still manually execute the DVDSetup. When prompted, insert the USB flash drive with the new credentials. 66 AMD RAID Configuration Click Browse and navigate to copy...on Load driver button to open the installer. You have successfully installed the RAID driver, and Windows setup should continue. 9. Insert the MSI Driver Disc into the optical drive. Re-log into the RAIDXpert2 Web GUI with AMD RAID Drivers and then click Browse. ▪▪...


