

Getting Started Guide
Page 1
Logitech® Bluetooth® Illuminated Keyboard K810 Setup Guide Guide d'installation
Logitech® Bluetooth® Illuminated Keyboard K810 Setup Guide Guide d'installation

Getting Started Guide
Page 2
Logitech Bluetooth Illuminated Keyboard K810 English 3 Español 23 Français 13 Português 33 www.logitech.com/support 43 2
Logitech Bluetooth Illuminated Keyboard K810 English 3 Español 23 Français 13 Português 33 www.logitech.com/support 43 2

Getting Started Guide
Page 3
On/Off switch 6. Battery status light 5. Bluetooth connect button 7. Bluetooth keys 3. Function keys 4. Micro-USB charging cable English 3 Know your product 1 2 Logitech Bluetooth Illuminated Keyboard K810 3 4 5 6 7 8 1. Bluetooth® status lights 2. Micro-USB port 8.
On/Off switch 6. Battery status light 5. Bluetooth connect button 7. Bluetooth keys 3. Function keys 4. Micro-USB charging cable English 3 Know your product 1 2 Logitech Bluetooth Illuminated Keyboard K810 3 4 5 6 7 8 1. Bluetooth® status lights 2. Micro-USB port 8.

Getting Started Guide
Page 4
Turn on the Bluetooth keyboard. 2. Logitech Bluetooth Illuminated Keyboard K810 Set up your product Pair your first device to blink blue. • The Bluetooth keyboard is discoverable for 15 minutes. 4 English Press the Bluetooth connect button. The lights above the selected key continues to that key: • The light above the Bluetooth keys blink blue. 3. Press a Bluetooth key to assign your first device 1.
Turn on the Bluetooth keyboard. 2. Logitech Bluetooth Illuminated Keyboard K810 Set up your product Pair your first device to blink blue. • The Bluetooth keyboard is discoverable for 15 minutes. 4 English Press the Bluetooth connect button. The lights above the selected key continues to that key: • The light above the Bluetooth keys blink blue. 3. Press a Bluetooth key to assign your first device 1.

Getting Started Guide
Page 5
... English 5 Complete Bluetooth pairing on -screen instructions. Choose "Logitech K810" from "Bluetooth devices." Choose "Logitech K810" from the device list. b. d. Apple iOS® (iPad® or iPhone®): a. b. Choose "Logitech K810" from the Devices menu. b. c. Note: If your... device: Windows® 7 and 8: Android® a. Logitech Bluetooth Illuminated Keyboard K810 4. Click "Add a device." In Settings, choose Wireless and network ...
... English 5 Complete Bluetooth pairing on -screen instructions. Choose "Logitech K810" from "Bluetooth devices." Choose "Logitech K810" from the device list. b. d. Apple iOS® (iPad® or iPhone®): a. b. Choose "Logitech K810" from the Devices menu. b. c. Note: If your... device: Windows® 7 and 8: Android® a. Logitech Bluetooth Illuminated Keyboard K810 4. Click "Add a device." In Settings, choose Wireless and network ...

Getting Started Guide
Page 6
Logitech Bluetooth Illuminated Keyboard K810 Pair or reassign a Bluetooth key to another device Pair up to that key. The lights above the Bluetooth keys blink blue. Press a Bluetooth key to ...
Logitech Bluetooth Illuminated Keyboard K810 Pair or reassign a Bluetooth key to another device Pair up to that key. The lights above the Bluetooth keys blink blue. Press a Bluetooth key to ...

Getting Started Guide
Page 7
Note: Only one device can be active at a time. Switching among paired devices Logitech Bluetooth Illuminated Keyboard K810 To select a paired device: • Press the Bluetooth key (1, 2, or 3) associated with it. • The light above the selected key blinks blue, indicating the Bluetooth keyboard is connecting. • The light turns solid blue for 5 seconds, indicating the connection has been made. • For example, if a device is paired with the Bluetooth 2 key, press that key to use the device with the Bluetooth keyboard. English 7
Note: Only one device can be active at a time. Switching among paired devices Logitech Bluetooth Illuminated Keyboard K810 To select a paired device: • Press the Bluetooth key (1, 2, or 3) associated with it. • The light above the selected key blinks blue, indicating the Bluetooth keyboard is connecting. • The light turns solid blue for 5 seconds, indicating the connection has been made. • For example, if a device is paired with the Bluetooth 2 key, press that key to use the device with the Bluetooth keyboard. English 7

Getting Started Guide
Page 8
...: the battery has an adequate charge. • Battery Status light flashes red: recharge the battery. The Battery Status light will blink red 8 English Logitech Bluetooth Illuminated Keyboard K810 Charge the batteries A three-hour charge provides up to 10 days of use the Bluetooth keyboard while it charges. Connect the Bluetooth keyboard to...
...: the battery has an adequate charge. • Battery Status light flashes red: recharge the battery. The Battery Status light will blink red 8 English Logitech Bluetooth Illuminated Keyboard K810 Charge the batteries A three-hour charge provides up to 10 days of use the Bluetooth keyboard while it charges. Connect the Bluetooth keyboard to...

Getting Started Guide
Page 9
...; Warranty information • Spare parts (when available) Go to get advice, ask questions, and share solutions. At Product Central, you customize your product. Logitech Bluetooth Illuminated Keyboard K810 Visit Product Central There's more about your new Bluetooth keyboard. Browse online articles for your product. Take a moment to visit Product Central to learn...
...; Warranty information • Spare parts (when available) Go to get advice, ask questions, and share solutions. At Product Central, you customize your product. Logitech Bluetooth Illuminated Keyboard K810 Visit Product Central There's more about your new Bluetooth keyboard. Browse online articles for your product. Take a moment to visit Product Central to learn...

Getting Started Guide
Page 10
..., press and hold the Fn key, and then press an F-key. Bluetooth keys 1, 2 and 3 Pair up 8. Mute 6. Decrease (F5) and Increase (F6) keyboard backlight intensity 4. Logitech Bluetooth Illuminated Keyboard K810 Use your product 1 2 3 4 5 6 7 8 9 Function and media keys 1.
..., press and hold the Fn key, and then press an F-key. Bluetooth keys 1, 2 and 3 Pair up 8. Mute 6. Decrease (F5) and Increase (F6) keyboard backlight intensity 4. Logitech Bluetooth Illuminated Keyboard K810 Use your product 1 2 3 4 5 6 7 8 9 Function and media keys 1.
Getting Started Guide
Page 11
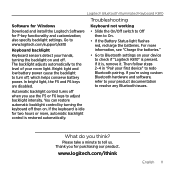
... keyboard is present. Thank you use the F5 or F6 keys to adjust backlight intensity. Logitech Bluetooth Illuminated Keyboard K810 Troubleshooting Software for Windows Download and install the Logitech Software for two hours or more information, see "Charge the batteries." • Go to... resolve any Bluetooth issues. Go to www.logitech.com/support/k810 Keyboard backlight Keyboard sensors detect your device to redo Bluetooth pairing. The backlight adjusts automatically to the level of your first device" to check if "Logitech K810" is idle for F-key functionality and customization...
... keyboard is present. Thank you use the F5 or F6 keys to adjust backlight intensity. Logitech Bluetooth Illuminated Keyboard K810 Troubleshooting Software for Windows Download and install the Logitech Software for two hours or more information, see "Charge the batteries." • Go to... resolve any Bluetooth issues. Go to www.logitech.com/support/k810 Keyboard backlight Keyboard sensors detect your device to redo Bluetooth pairing. The backlight adjusts automatically to the level of your first device" to check if "Logitech K810" is idle for F-key functionality and customization...
Getting Started Guide
Page 12
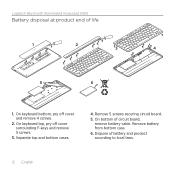
Dispose of life 1 2 3 4 5 6 1. Logitech Bluetooth Illuminated Keyboard K810 Battery disposal at product end of battery and product according to local laws. 12 English Remove battery from bottom case. 6. Remove 5 screws securing circuit board. 5. On bottom of circuit board, remove battery cable. On keyboard bottom, pry off cover surrounding F-keys and remove 5 screws. 3. Separate top and bottom cases. 4. On keyboard top, pry off cover and remove 4 screws. 2.
Dispose of life 1 2 3 4 5 6 1. Logitech Bluetooth Illuminated Keyboard K810 Battery disposal at product end of battery and product according to local laws. 12 English Remove battery from bottom case. 6. Remove 5 screws securing circuit board. 5. On bottom of circuit board, remove battery cable. On keyboard bottom, pry off cover surrounding F-keys and remove 5 screws. 3. Separate top and bottom cases. 4. On keyboard top, pry off cover and remove 4 screws. 2.


