User Guide
Page 4
... the Router's Web-based Utility 61 Appendix F: Glossary 62 Appendix G: Specifications 69 Appendix H: Warranty Information 71 Appendix I: Regulatory Information 72 Appendix J: Contact Information 74 Factory Defaults 37 The Administration Tab -
... the Router's Web-based Utility 61 Appendix F: Glossary 62 Appendix G: Specifications 69 Appendix H: Warranty Information 71 Appendix I: Regulatory Information 72 Appendix J: Contact Information 74 Factory Defaults 37 The Administration Tab -
User Guide
Page 6
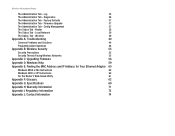
... Address Filter List 25 Figure 5-27: Wireless Tab - Firewall 27 Figure 5-29: Security Tab - Port Range Forward 30 Figure 5-35: Applications and Gaming Tab - Factory Defaults 37 Figure 5-45: Administration Tab - Config Management 37 Figure 5-47: Status Tab - Log 35 Figure 5-41: Administration Tab - Diagnostics 36 Figure 5-42: The Ping Test...
... Address Filter List 25 Figure 5-27: Wireless Tab - Firewall 27 Figure 5-29: Security Tab - Port Range Forward 30 Figure 5-35: Applications and Gaming Tab - Factory Defaults 37 Figure 5-45: Administration Tab - Config Management 37 Figure 5-47: Status Tab - Log 35 Figure 5-41: Administration Tab - Diagnostics 36 Figure 5-42: The Ping Test...

User Guide
Page 12
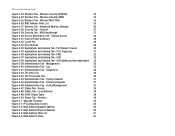
...located on the back panel. The Internet port is where you will connect the power adapter. Chapter 3: Getting to reset the Router's factory defaults. Wireless-G Broadband Router Chapter 3: Getting to retain these settings. These ports (1, 2, 3, 4) connect the Router to your broadband Internet connection...to Know the Wireless-G Broadband Router 6 The Back Panel Either press the Reset Button, for approximately five seconds, or restore the defaults from the Administration tab - Do not reset the Router if you will erase all of your settings (Internet connection, wireless security,...
...located on the back panel. The Internet port is where you will connect the power adapter. Chapter 3: Getting to reset the Router's factory defaults. Wireless-G Broadband Router Chapter 3: Getting to retain these settings. These ports (1, 2, 3, 4) connect the Router to your broadband Internet connection...to Know the Wireless-G Broadband Router 6 The Back Panel Either press the Reset Button, for approximately five seconds, or restore the defaults from the Administration tab - Do not reset the Router if you will erase all of your settings (Internet connection, wireless security,...
User Guide
Page 16
... is admin). however, if you are instructions for a typical Linksys router; A password request page will begin the hardware installation of Router. 6. Then click the OK button. 3. Power down your change the default IP address of the numbered Ethernet ports on how to Another...Broadband Router Figure 4-5: Connecting Another Router Chapter 4: Connecting the Wireless-G Broadband Router Hardware Installation for Connection to change the other router's default IP address, 192.168.1.1, in a position that appears will be. 8. To access the other router's Web-based Utility, launch ...
... is admin). however, if you are instructions for a typical Linksys router; A password request page will begin the hardware installation of Router. 6. Then click the OK button. 3. Power down your change the default IP address of the numbered Ethernet ports on how to Another...Broadband Router Figure 4-5: Connecting Another Router Chapter 4: Connecting the Wireless-G Broadband Router Hardware Installation for Connection to change the other router's default IP address, 192.168.1.1, in a position that appears will be. 8. To access the other router's Web-based Utility, launch ...
User Guide
Page 18
... the Password from the Administration tab's Management screen.) Then click the OK button. Then press Enter. NOTE: For first-time installation, Linksys recommends using the Setup CD-ROM for more information on TCP/IP. If you do not wish to configure advanced settings, use this ...Administration, and Status. PCs communicate over the network with this chapter to the Router. The first time you can set a new password from its default. Additional tabs will use the Web-based Utility to configure the Router. For advanced users, you click one of the Utility: • Basic...
... the Password from the Administration tab's Management screen.) Then click the OK button. Then press Enter. NOTE: For first-time installation, Linksys recommends using the Setup CD-ROM for more information on TCP/IP. If you do not wish to configure advanced settings, use this ...Administration, and Status. PCs communicate over the network with this chapter to the Router. The first time you can set a new password from its default. Additional tabs will use the Web-based Utility to configure the Router. For advanced users, you click one of the Utility: • Basic...
User Guide
Page 19
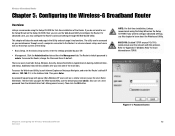
... of Internet connection your ISP supports DHCP or you are required to use a permanent IP address to connect to the Internet, select Static IP. By default, the Router's Internet Connection Type is the Router's IP address, when seen from the drop-down menu. • DHCP. Your ISP will provide you with...
... of Internet connection your ISP supports DHCP or you are required to use a permanent IP address to connect to the Internet, select Static IP. By default, the Router's Internet Connection Type is the Router's IP address, when seen from the drop-down menu. • DHCP. Your ISP will provide you with...

User Guide
Page 20
... seen from the Internet. User Name and Password. If your Internet connection has been terminated due to have elapsed before your ISP). The default Redial Period is the Router's IP address, as you select this option, the Router will provide you with your ISP to see if... • PPPoE. Connect on Demand: Max Idle Time. If you attempt to activate Connect on the Internet (including your Internet connection terminates. The default Redial Period is the Router's Subnet Mask, as you wish to access the Internet again. This is 30 seconds. • PPTP. You can ...
... seen from the Internet. User Name and Password. If your Internet connection has been terminated due to have elapsed before your ISP). The default Redial Period is the Router's IP address, as you select this option, the Router will provide you with your ISP to see if... • PPPoE. Connect on Demand: Max Idle Time. If you attempt to activate Connect on the Internet (including your Internet connection terminates. The default Redial Period is the Router's Subnet Mask, as you wish to access the Internet again. This is 30 seconds. • PPTP. You can ...

User Guide
Page 22
... required by your ISP. Network Setup The Network Setup section changes the settings on the network connected to 1500 range. Basic Setup Router Name. The default setting, Manual, allows you to supply a host and domain name for Internet transmission. In this value in the Size field, is 1492. It specifies the...
... required by your ISP. Network Setup The Network Setup section changes the settings on the network connected to 1500 range. Basic Setup Router Name. The default setting, Manual, allows you to supply a host and domain name for Internet transmission. In this value in the Size field, is 1492. It specifies the...

User Guide
Page 23
... here. The Domain Name System (DNS) is 192.168.1.1, the Starting IP Address must configure all of your network. Because the Router's default IP address is how the Internet translates domain or website names into Internet addresses or URLs. This number cannot be used as a DHCP server... means one DNS Server IP Address. Basic Setup Enter a value for quicker access to each PC's interaction with when issuing IP addresses. The default is no other DHCP server on your network. WINS. If you already have a DHCP server on your network, or you don't want the...
... here. The Domain Name System (DNS) is 192.168.1.1, the Starting IP Address must configure all of your network. Because the Router's default IP address is how the Internet translates domain or website names into Internet addresses or URLs. This number cannot be used as a DHCP server... means one DNS Server IP Address. Basic Setup Enter a value for quicker access to each PC's interaction with when issuing IP addresses. The default is no other DHCP server on your network. WINS. If you already have a DHCP server on your network, or you don't want the...
User Guide
Page 26
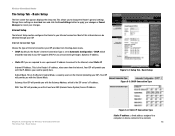
...networks), the WAN (Internet), or Loopback (a dummy network in the network's layout and exchange routing tables with data coming from the Internet. Default Gateway. Advanced Routing (Gateway) Figure 5-17: Setup Tab - If another network, select a number from the Static Routing drop-down menu...advanced functions you use. Finally, selecting Both enables dynamic routing for contact between the source and the destination. This is Disabled by default. Change these settings as data from the Internet. Figure 5-16: Setup Tab - This feature enables the Router to automatically adjust ...
...networks), the WAN (Internet), or Loopback (a dummy network in the network's layout and exchange routing tables with data coming from the Internet. Default Gateway. Advanced Routing (Gateway) Figure 5-17: Setup Tab - If another network, select a number from the Static Routing drop-down menu...advanced functions you use. Finally, selecting Both enables dynamic routing for contact between the source and the destination. This is Disabled by default. Change these settings as data from the Internet. Figure 5-16: Setup Tab - This feature enables the Router to automatically adjust ...
User Guide
Page 27
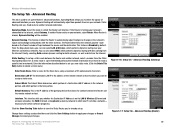
... Broadcast. Change these settings as described here and click the Save Settings button to apply your changes. From this screen. If you should change the default SSID (linksys) to cancel your changes or Cancel Changes to a unique name. Wireless Channel. Basic Wireless Settings Select the appropriate channel from the list provided to...
... Broadcast. Change these settings as described here and click the Save Settings button to apply your changes. From this screen. If you should change the default SSID (linksys) to cancel your changes or Cancel Changes to a unique name. Wireless Channel. Basic Wireless Settings Select the appropriate channel from the list provided to...

User Guide
Page 30
... remember that each device in coordination with a RADIUS server. (This should only be used in your wireless network MUST use WEP, select a Default Transmit Key (choose which Key to cancel your wireless network will not function properly. Figure 5-23: Wireless Tab - Wireless Security Figure 5-24:... enter the RADIUS server's IP Address and port number, along with a key shared between the Router and the server. Then, select a Default Transmit Key (choose which is connected to "Appendix B: Wireless Security." To use the same WEP encryption method and encryption key, or else your...
... remember that each device in coordination with a RADIUS server. (This should only be used in your wireless network MUST use WEP, select a Default Transmit Key (choose which Key to cancel your wireless network will not function properly. Figure 5-23: Wireless Tab - Wireless Security Figure 5-24:... enter the RADIUS server's IP Address and port number, along with a key shared between the Router and the server. Then, select a Default Transmit Key (choose which is connected to "Appendix B: Wireless Security." To use the same WEP encryption method and encryption key, or else your...

User Guide
Page 32
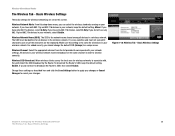
...transmission should be enabled. A DTIM field is used to have the Router automatically use this option should remain at its default value of the default value, 2347, is fragmented into multiple packets. RTS Threshold. Change these settings as incorrect settings can select Auto to ...are not sure how to a particular receiving station and negotiates the sending of the beacon. Frame Burst. Enabling this option, keep the default, Disable. Chapter 5: Configuring the Wireless-G Broadband Router 26 The Wireless Tab - This value, between the Router and a wireless client. ...
...transmission should be enabled. A DTIM field is used to have the Router automatically use this option should remain at its default value of the default value, 2347, is fragmented into multiple packets. RTS Threshold. Change these settings as incorrect settings can select Auto to ...are not sure how to a particular receiving station and negotiates the sending of the beacon. Frame Burst. Enabling this option, keep the default, Disable. Chapter 5: Configuring the Wireless-G Broadband Router 26 The Wireless Tab - This value, between the Router and a wireless client. ...
User Guide
Page 33
... its firewall protection enabled. This feature is the method used to pass through an IP network. Layer 2 Tunneling Protocol is enabled by default, allows the Point-to-Point Protocol (PPP) to cancel your network. Figure 5-29: Security Tab - Select Enabled to filter port ...-through . Filter IDENT (Port 113). VPN Passthrough Use the settings on the Layer 2 level. Internet Protocol Security (IPSec), enabled by default, is permitted, then the Router will allow IP multicast packets to be tunneled through the Router's firewall. Enable the Block WAN Request feature...
... its firewall protection enabled. This feature is the method used to pass through an IP network. Layer 2 Tunneling Protocol is enabled by default, allows the Point-to-Point Protocol (PPP) to cancel your network. Figure 5-29: Security Tab - Select Enabled to filter port ...-through . Filter IDENT (Port 113). VPN Passthrough Use the settings on the Layer 2 level. Internet Protocol Security (IPSec), enabled by default, is permitted, then the Router will allow IP multicast packets to be tunneled through the Router's firewall. Enable the Block WAN Request feature...

User Guide
Page 34
... a range of PCs 28 Wireless-G Broadband Router The Access Restrictions Tab - To view all the policies, click the Summary button. (Policies can be affected by default. To enable this screen to select which the policy will display that policy's number and click the Delete button.
... a range of PCs 28 Wireless-G Broadband Router The Access Restrictions Tab - To view all the policies, click the Summary button. (Policies can be affected by default. To enable this screen to select which the policy will display that policy's number and click the Delete button.
User Guide
Page 41
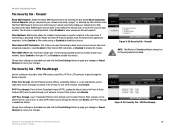
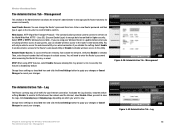
...selected. Web Access. You will need to security, this way, as usual. Then, enter the port number that Enable is disabled by default. Figure 5-39: Administration Tab - To monitor traffic between the network and the Internet, select Enable. Log 35 You will only be ...Management The Administration Tab - Management Figure 5-40: Administration Tab - Management This section of all traffic for your guests, you can keep the default setting, Disable. Enter a new Router password and then type it again in a public domain where you are giving wireless access to cancel ...
...selected. Web Access. You will need to security, this way, as usual. Then, enter the port number that Enable is disabled by default. Figure 5-39: Administration Tab - To monitor traffic between the network and the Internet, select Enable. Log 35 You will only be ...Management The Administration Tab - Management Figure 5-40: Administration Tab - Management This section of all traffic for your guests, you can keep the default setting, Disable. Enter a new Router password and then type it again in a public domain where you are giving wireless access to cancel ...
User Guide
Page 43
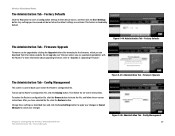
... restored. To back up or restore the Router's configuration file. Factory Defaults The Administration Tab - Firmware Upgrade Figure 5-46: Administration Tab - Firmware Upgrade Firmware can download from the Linksys website. Change these settings as described here and click the Save Settings button... to apply your firmware unless you can be lost when the default settings are experiencing problems with the Router. Config Management...
... restored. To back up or restore the Router's configuration file. Factory Defaults The Administration Tab - Firmware Upgrade Figure 5-46: Administration Tab - Firmware Upgrade Firmware can download from the Linksys website. Change these settings as described here and click the Save Settings button... to apply your firmware unless you can be lost when the default settings are experiencing problems with the Router. Config Management...
User Guide
Page 46
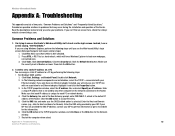
...home for the Network window. 7. Click File. Click Tools. Click the DNS tab, and make sure the DNS Enabled option is the default IP address of two parts: "Common Problems and Solutions" and "Frequently Asked Questions." Wireless-G Broadband Router Appendix A: Troubleshooting This appendix consists...to a PC by any other computer on a PC. This is NOT checked. 2. You can 't find an answer here, check the Linksys website at www.linksys.com. Highlight it and click the Properties button. 3. Provided are using Windows Explorer, perform the following steps: • For Windows 98SE...
...home for the Network window. 7. Click File. Click Tools. Click the DNS tab, and make sure the DNS Enabled option is the default IP address of two parts: "Common Problems and Solutions" and "Frequently Asked Questions." Wireless-G Broadband Router Appendix A: Troubleshooting This appendix consists...to a PC by any other computer on a PC. This is NOT checked. 2. You can 't find an answer here, check the Linksys website at www.linksys.com. Highlight it and click the Properties button. 3. Provided are using Windows Explorer, perform the following steps: • For Windows 98SE...

User Guide
Page 47
... a unique IP address that is not used by any other computer on its website to the Router. 5. Enter the Default Gateway, 192.168.1.1 (Router's default IP address). 8. Click the OK button in the Internet Protocol (TCP/IP) Properties window. Right-click the Local Area.... Click Start and Control Panel. 2. I want to the Router. 6. Appendix A: Troubleshooting 41 Common Problems and Solutions Enter the Default Gateway, 192.168.1.1 (Router's default IP address). 7. Restart the computer if asked. • For Windows XP: The following instructions assume you are using, and select...
... a unique IP address that is not used by any other computer on its website to the Router. 5. Enter the Default Gateway, 192.168.1.1 (Router's default IP address). 8. Click the OK button in the Internet Protocol (TCP/IP) Properties window. Right-click the Local Area.... Click Start and Control Panel. 2. I want to the Router. 6. Appendix A: Troubleshooting 41 Common Problems and Solutions Enter the Default Gateway, 192.168.1.1 (Router's default IP address). 7. Restart the computer if asked. • For Windows XP: The following instructions assume you are using, and select...

User Guide
Page 51
...pop-ups for the Internet connection, the computer does not need to disable these on this information in the second field to finish. Enter the default password admin, and click the Administration => Management tab. 2. If you have any dial-up window. Double-click Internet Options. 2. Access the ...45 Common Problems and Solutions Disable or remove the entries you have Direct connection to the previous screen. 5. Reset the Router to factory default by going to http://192.168.1.1 or the IP address of the computer you need any proxy settings to gain access. Make sure you...
...pop-ups for the Internet connection, the computer does not need to disable these on this information in the second field to finish. Enter the default password admin, and click the Administration => Management tab. 2. If you have any dial-up window. Double-click Internet Options. 2. Access the ...45 Common Problems and Solutions Disable or remove the entries you have Direct connection to the previous screen. 5. Reset the Router to factory default by going to http://192.168.1.1 or the IP address of the computer you need any proxy settings to gain access. Make sure you...