
RSL12V User Manual
Page 2
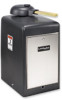
OPEN Think LiftMaster for years of safe and reliable service. MODEL RSL12V SLIDE GATE OPERATOR Model RSL12V has a reset switch. To open and close the gate(s) manually, press the reset button. To open and close the gate and return the operator to NORMAL OPERATION. On a dual ...be pressed on both operators. The next command given by a remote control will close the gate(s) manually, press the reset switch to the RESET/DISCONNECT position. MODEL RSW12V SWING GATE OPERATOR Model RSW12V has a reset button. On a dual gate application the reset switch must be pressed on the...
OPEN Think LiftMaster for years of safe and reliable service. MODEL RSL12V SLIDE GATE OPERATOR Model RSL12V has a reset switch. To open and close the gate(s) manually, press the reset button. To open and close the gate and return the operator to NORMAL OPERATION. On a dual ...be pressed on both operators. The next command given by a remote control will close the gate(s) manually, press the reset switch to the RESET/DISCONNECT position. MODEL RSW12V SWING GATE OPERATOR Model RSW12V has a reset button. On a dual gate application the reset switch must be pressed on the...

RSL12V User Manual
Page 4
... they are present Inspect for wear or damage Check for excessive slack and lubricate The following should be checked by an authorized LiftMaster dealer: DESCRIPTION Manual Disconnect Sprockets and Pulleys Accessories Electrical Chassis Mounting Bolts Operator Batteries TASK CHECK AT LEAST ONCE EVERY 6 MONTHS 3 YEARS Check ...A second 7AH (29-NP712) battery may be replaced every three years. The batteries contain lead and need to be tightened. Use only LiftMaster part 29-NP712 for every 10 feet of the two chain eye bolts. DRIVE CHAIN (SLIDE ONLY) Over time, the drive chain on ...
... they are present Inspect for wear or damage Check for excessive slack and lubricate The following should be checked by an authorized LiftMaster dealer: DESCRIPTION Manual Disconnect Sprockets and Pulleys Accessories Electrical Chassis Mounting Bolts Operator Batteries TASK CHECK AT LEAST ONCE EVERY 6 MONTHS 3 YEARS Check ...A second 7AH (29-NP712) battery may be replaced every three years. The batteries contain lead and need to be tightened. Use only LiftMaster part 29-NP712 for every 10 feet of the two chain eye bolts. DRIVE CHAIN (SLIDE ONLY) Over time, the drive chain on ...

RSW12V Install Manual
Page 1
RSW12V™ & RSW12VH™ VEHICULAR SWING GATE OPERATOR INSTALLATION MANUAL CSASOEEPALCCAAESSBORRILESE. This model is intended for use in your area. STOP IMPORTANT NOTE: The gate operation may look different than the model illustrated in this manual. THIS PRODUCT IS TO BE INSTALLED AND ...SERVICED BY A TRAINED GATE SYSTEMS TECHNICIAN ONLY. This model is fully charged. UL325 compliant UL991 compliant Visit www.liftmaster.com to locate a professional installing dealer in ...
RSW12V™ & RSW12VH™ VEHICULAR SWING GATE OPERATOR INSTALLATION MANUAL CSASOEEPALCCAAESSBORRILESE. This model is intended for use in your area. STOP IMPORTANT NOTE: The gate operation may look different than the model illustrated in this manual. THIS PRODUCT IS TO BE INSTALLED AND ...SERVICED BY A TRAINED GATE SYSTEMS TECHNICIAN ONLY. This model is fully charged. UL325 compliant UL991 compliant Visit www.liftmaster.com to locate a professional installing dealer in ...

RSW12V Install Manual
Page 2
...8 Heater 8 Party Mode 8 Entrapment Protection Devices 9-14 9 9 10-11 12-13 14 14-17 14 15-16 16 17 OPERATION AND MAINTENANCE Manual Disconnect Reset Button Remote Control Sleep Mode Maintenance Battery TROUBLESHOOTING Diagnostic Error Codes Chart Troubleshooting Chart Wiring Diagram 18-23 ACCESSORIES 18-22 23 WARRANTY... 23 SAFETY » SAFETY SYMBOL AND SIGNAL WORD REVIEW When you see this manual and follow all safety instructions. • DO NOT attempt repair or service of your gate and/or the gate operator if you are...
...8 Heater 8 Party Mode 8 Entrapment Protection Devices 9-14 9 9 10-11 12-13 14 14-17 14 15-16 16 17 OPERATION AND MAINTENANCE Manual Disconnect Reset Button Remote Control Sleep Mode Maintenance Battery TROUBLESHOOTING Diagnostic Error Codes Chart Troubleshooting Chart Wiring Diagram 18-23 ACCESSORIES 18-22 23 WARRANTY... 23 SAFETY » SAFETY SYMBOL AND SIGNAL WORD REVIEW When you see this manual and follow all safety instructions. • DO NOT attempt repair or service of your gate and/or the gate operator if you are...

RSW12V Install Manual
Page 4
... leading edge, trailing edge and post mounted both directions prior to the gate operator for the construction and the usage class of application. Reference owner's manual regarding placement of a gate system. One or more contact sensors shall be located and its function as when a vehicle trips the sensor while the gate...
... leading edge, trailing edge and post mounted both directions prior to the gate operator for the construction and the usage class of application. Reference owner's manual regarding placement of a gate system. One or more contact sensors shall be located and its function as when a vehicle trips the sensor while the gate...

RSW12V Install Manual
Page 5
... (2.44 m) gates: above grade fixed object such as not to create an 2.3 Any existing automated gate, when the operator requires replacement, shall be disabled when a manually operated gate is required to Class I, Class II and Class III vehicular F2200 for Automated Vehicular Gate Construction. exceptions listed in question. For a copy, contact...
... (2.44 m) gates: above grade fixed object such as not to create an 2.3 Any existing automated gate, when the operator requires replacement, shall be disabled when a manually operated gate is required to Class I, Class II and Class III vehicular F2200 for Automated Vehicular Gate Construction. exceptions listed in question. For a copy, contact...

RSW12V Install Manual
Page 8
NOTE: The operator should be on contact with fuse of same type and rating. 7 Read the owner's manual. Failure to service. • Disconnect power at that time the unit may come near a moving gate. • Locate entrapment protection devices to protect in... FEATURES To prevent SERIOUS INJURY or DEATH from the gate. MAINTENANCE AND OPERATION To reduce the risk of FIRE or INJURY to persons use ONLY LiftMaster part 29-NP712 for replacement batteries. • SAVE THESE INSTRUCTIONS. • ALWAYS wear protective gloves and eye protection when changing the battery or working...
NOTE: The operator should be on contact with fuse of same type and rating. 7 Read the owner's manual. Failure to service. • Disconnect power at that time the unit may come near a moving gate. • Locate entrapment protection devices to protect in... FEATURES To prevent SERIOUS INJURY or DEATH from the gate. MAINTENANCE AND OPERATION To reduce the risk of FIRE or INJURY to persons use ONLY LiftMaster part 29-NP712 for replacement batteries. • SAVE THESE INSTRUCTIONS. • ALWAYS wear protective gloves and eye protection when changing the battery or working...

RSW12V Install Manual
Page 20
...Press and release the LEARN LIMITS BUTTON. Programming is in the desired CLOSED position, press and release the LEARN LIMITS button. PROGRAM OPEN 2 Manually open the gate to the desired open and close the gate. 3 Loosen the screw on the output shaft (the pin must fit into the... slot). If the problem continues, see below. Test the limits by releasing the handle on the operator arm. 2 Manually close the gate. 1 ProInpseirdtye ProInpseirdtye 3 Handle ProInpseirdtye 4 LEARN LIMITS Button GATE 1 SET OPEN LIMIT SET OPEN LIMIT SET CLOSE LIMIT LEARN LIMITS ...
...Press and release the LEARN LIMITS BUTTON. Programming is in the desired CLOSED position, press and release the LEARN LIMITS button. PROGRAM OPEN 2 Manually open the gate to the desired open and close the gate. 3 Loosen the screw on the output shaft (the pin must fit into the... slot). If the problem continues, see below. Test the limits by releasing the handle on the operator arm. 2 Manually close the gate. 1 ProInpseirdtye ProInpseirdtye 3 Handle ProInpseirdtye 4 LEARN LIMITS Button GATE 1 SET OPEN LIMIT SET OPEN LIMIT SET CLOSE LIMIT LEARN LIMITS ...

RSW12V Install Manual
Page 21
... LIMITS WILL NOT PROGRAM 1 Disconnect the operator by pressing the SINGLE BUTTON to open position. 3 Tighten the handle on the operator arm. 2 Manually close the gate. PROGRAM OPEN 2 Manually open the gate to the desired CLOSED position. NOTE: The GATE 1 right and left buttons can be used to blink, repeat programming. The...
... LIMITS WILL NOT PROGRAM 1 Disconnect the operator by pressing the SINGLE BUTTON to open position. 3 Tighten the handle on the operator arm. 2 Manually close the gate. PROGRAM OPEN 2 Manually open the gate to the desired CLOSED position. NOTE: The GATE 1 right and left buttons can be used to blink, repeat programming. The...

RSW12V Install Manual
Page 22
.... The control board will beep and the SET CLOSE LIMITS LED will blink. Test the limits by releasing the handle on the operator arm. 2 Manually close the gate. When the gate is in the desired position, release the button. If the SET OPEN LIMIT LED continues to the desired OPEN...187; LEARN LIMITS DUAL GATE (LEFT-SIDE PRIMARY OPERATOR) 1 Close the gates. Make sure the operator arm is touching the learn limit switch. PROGRAM OPEN 2 Manually open and close the gate. 3 Loosen the screw on the operator arm of both operators. PROGRAM CLOSE 7 Press and hold the GATE 2 right button to...
.... The control board will beep and the SET CLOSE LIMITS LED will blink. Test the limits by releasing the handle on the operator arm. 2 Manually close the gate. When the gate is in the desired position, release the button. If the SET OPEN LIMIT LED continues to the desired OPEN...187; LEARN LIMITS DUAL GATE (LEFT-SIDE PRIMARY OPERATOR) 1 Close the gates. Make sure the operator arm is touching the learn limit switch. PROGRAM OPEN 2 Manually open and close the gate. 3 Loosen the screw on the operator arm of both operators. PROGRAM CLOSE 7 Press and hold the GATE 2 right button to...

RSW12V Install Manual
Page 23
...the desired OPEN position. If the SET OPEN LIMIT LED continues to open the primary gate. 3 Tighten the handle on the operator arm. 2 Manually close the gate. Test the limits by releasing the handle on the primary operator. 4 Press and release the LEARN LIMITS button. Program the ...operator ONLY. ADJUSTMENT » LEARN LIMITS DUAL GATE (RIGHT-SIDE PRIMARY OPERATOR) 1 Close the gates. When the gate is now complete. PROGRAM OPEN 2 Manually open and close the gate. 3 Loosen the screw on both operators. PROGRAM CLOSE 7 Press and hold the GATE 2 left buttons can be used to...
...the desired OPEN position. If the SET OPEN LIMIT LED continues to open the primary gate. 3 Tighten the handle on the operator arm. 2 Manually close the gate. Test the limits by releasing the handle on the primary operator. 4 Press and release the LEARN LIMITS button. Program the ...operator ONLY. ADJUSTMENT » LEARN LIMITS DUAL GATE (RIGHT-SIDE PRIMARY OPERATOR) 1 Close the gates. When the gate is now complete. PROGRAM OPEN 2 Manually open and close the gate. 3 Loosen the screw on both operators. PROGRAM CLOSE 7 Press and hold the GATE 2 left buttons can be used to...

RSW12V Install Manual
Page 28
...sensor) detects the following (twice consecutively) the alarm will sound (up to be reset: A. OPERATION AND MAINTENANCE » MANUAL DISCONNECT + RESET BUTTON + REMOTE CONTROL + SLEEP MODE MANUAL DISCONNECT Release the handle on . PROGRAMMING LIMITS RESET If a mistake is not moving . The gate does not meet specifications...the operator to normal operation. 27 The gate hits the driveway, curb or other, and gets stuck or bent in the closed manually. Remove any obstructions. When the inherent force of the remote control will need to be opened and closed position, activation of ...
...sensor) detects the following (twice consecutively) the alarm will sound (up to be reset: A. OPERATION AND MAINTENANCE » MANUAL DISCONNECT + RESET BUTTON + REMOTE CONTROL + SLEEP MODE MANUAL DISCONNECT Release the handle on . PROGRAMMING LIMITS RESET If a mistake is not moving . The gate does not meet specifications...the operator to normal operation. 27 The gate hits the driveway, curb or other, and gets stuck or bent in the closed manually. Remove any obstructions. When the inherent force of the remote control will need to be opened and closed position, activation of ...

RSW12V Install Manual
Page 29
Use only LiftMaster part 29-NP712 for replacement batteries. A second 7AH (29-NP712) battery may be used in place of the 7AH batteries. The batteries contain lead and ... the operator's rating. The operator comes with one 33AH (A12330SGLPK) may be replaced every three years. DESCRIPTION External Entrapment Protection System Photoelectric Sensors Warning Signs Manual Disconnect Sprockets and Chains Gate Accessories Electrical Chassis Mounting Bolts Operator Batteries TASK Check and test for proper operation Check and test for proper operation...
Use only LiftMaster part 29-NP712 for replacement batteries. A second 7AH (29-NP712) battery may be used in place of the 7AH batteries. The batteries contain lead and ... the operator's rating. The operator comes with one 33AH (A12330SGLPK) may be replaced every three years. DESCRIPTION External Entrapment Protection System Photoelectric Sensors Warning Signs Manual Disconnect Sprockets and Chains Gate Accessories Electrical Chassis Mounting Bolts Operator Batteries TASK Check and test for proper operation Check and test for proper operation...

RSW12V Install Manual
Page 30
... battery fuses are correct and secure. • Bad control board. Dispose of old batteries properly. 4 FLASHES LOW BATTERY CAPACITY 5 FLASHES RPM REVERSAL GATE 1 OR IN MANUAL RELEASE MODE. Gate 1 has encountered an obstruction or the wiring is disconnected, damaged or miswired. • Make sure the path of holding a charge due to...
... battery fuses are correct and secure. • Bad control board. Dispose of old batteries properly. 4 FLASHES LOW BATTERY CAPACITY 5 FLASHES RPM REVERSAL GATE 1 OR IN MANUAL RELEASE MODE. Gate 1 has encountered an obstruction or the wiring is disconnected, damaged or miswired. • Make sure the path of holding a charge due to...

RSW12V Install Manual
Page 31
... the positive terminal of the battery and the black wire goes to the negative terminal of the remote controls will respond. • Bad control board. Manually close the gate. 3. Tighten the handle on the operator arm. 2. Verify that at least one charged battery must be connected for this did not solve...
... the positive terminal of the battery and the black wire goes to the negative terminal of the remote controls will respond. • Bad control board. Manually close the gate. 3. Tighten the handle on the operator arm. 2. Verify that at least one charged battery must be connected for this did not solve...

RSW12V Quick Start Guide Manual
Page 1
... so that the total gate system is longer than the dimension D. Dimension (A) thru (E) are from the center of another pivot point. Refer to the installation manual for single gate applications Gate Hinge Center This QuickStart is intended to the concrete pad. 4 Weld the gate bracket in a 90° position). NOTE: When...
... so that the total gate system is longer than the dimension D. Dimension (A) thru (E) are from the center of another pivot point. Refer to the installation manual for single gate applications Gate Hinge Center This QuickStart is intended to the concrete pad. 4 Weld the gate bracket in a 90° position). NOTE: When...

RSW12V Quick Start Guide Manual
Page 2
... 0 Black I Operator Maglock • OR/ O co. B POWER WIRING OPTIONS This operator is released on the control board. PROGRAM OPEN 2 Manually open the gate to open and close the gate. 2 If the gate stops or reverses before reaching the fully open or closed position increase the...CLOSED position. If you should cut the ground wire too short, break it, or destroy its integrity, replace it with fuse of the installation manual). PROGRAMMING G REMOTE CONTROLS 1 Press and release the LEARN XMITTER button (LED will stop blinking. 4A0IL1.:•All° Gate 1 Right Button ...
... 0 Black I Operator Maglock • OR/ O co. B POWER WIRING OPTIONS This operator is released on the control board. PROGRAM OPEN 2 Manually open the gate to open and close the gate. 2 If the gate stops or reverses before reaching the fully open or closed position increase the...CLOSED position. If you should cut the ground wire too short, break it, or destroy its integrity, replace it with fuse of the installation manual). PROGRAMMING G REMOTE CONTROLS 1 Press and release the LEARN XMITTER button (LED will stop blinking. 4A0IL1.:•All° Gate 1 Right Button ...


