
Installation Manual - English French Spanish
Page 11
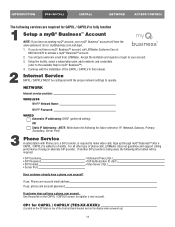
... with the proper network settings to operate. Accept the invitation and register or login to your myQ® Business™ account will get a welcome email from LiftMaster. For all other type of the CAPXL / CAPXLV in myQ® Business™). 4. If customer does not have a myQ...® Business™ account, call LiftMaster Customer Care at 800.323.2276 to activate a myQ® Business...
... with the proper network settings to operate. Accept the invitation and register or login to your myQ® Business™ account will get a welcome email from LiftMaster. For all other type of the CAPXL / CAPXLV in myQ® Business™). 4. If customer does not have a myQ...® Business™ account, call LiftMaster Customer Care at 800.323.2276 to activate a myQ® Business...
Installation Manual - English French Spanish
Page 17
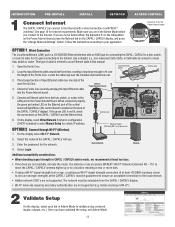
...2 Connect through Wi-Fi® (Wireless) 1. Enter the password for Internet requirements. Additional compatibility considerations: • When checking signal strength in CAPXL / CAPXLV admin mode, we recommend at least two bars. • If two bars are not available, relocate the router, the antenna or use accessory WFAEXT...select Wired Network if dynamic configuration (DHCP) is a 10/100/1000 Ethernet interface with Wi-Fi® (wireless). Select Login. ACCESS CONTROL Dipswitch #1 on the Ethernet port of at least -65 DBM (numbers closer to the LAN port on Power/Internet ...
...2 Connect through Wi-Fi® (Wireless) 1. Enter the password for Internet requirements. Additional compatibility considerations: • When checking signal strength in CAPXL / CAPXLV admin mode, we recommend at least two bars. • If two bars are not available, relocate the router, the antenna or use accessory WFAEXT...select Wired Network if dynamic configuration (DHCP) is a 10/100/1000 Ethernet interface with Wi-Fi® (wireless). Select Login. ACCESS CONTROL Dipswitch #1 on the Ethernet port of at least -65 DBM (numbers closer to the LAN port on Power/Internet ...
Installation Manual - English French Spanish
Page 19
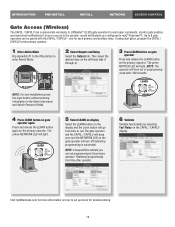
...dual gates, program the CAPXL / CAPXLV to the primary operator. 1 Enter Admin Mode Flip dipswitch #1 to the ON position to the primary operator. ON ON 2 Select Outputs and Relay Select the Outputs tab. NOTE: For new installations press the login button without entering information ... Gate Access (Wireless) The CAPXL / CAPXLV can communicate wirelessly to LiftMaster® UL325 gate operators to 8 gate operators can be paired with the CAPXL / CAPXLV - NOTE: The operator will light. Visit myQBusiness.com for more information on the CAPXL / CAPXLV display. one for wireless linking...
...dual gates, program the CAPXL / CAPXLV to the primary operator. 1 Enter Admin Mode Flip dipswitch #1 to the ON position to the primary operator. ON ON 2 Select Outputs and Relay Select the Outputs tab. NOTE: For new installations press the login button without entering information ... Gate Access (Wireless) The CAPXL / CAPXLV can communicate wirelessly to LiftMaster® UL325 gate operators to 8 gate operators can be paired with the CAPXL / CAPXLV - NOTE: The operator will light. Visit myQBusiness.com for more information on the CAPXL / CAPXLV display. one for wireless linking...
Installation Manual - English French Spanish
Page 24
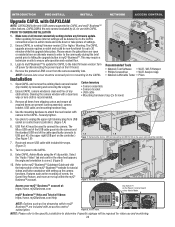
...™ are present: camera assembly, camera bracket, USB cable, and mounting hardware bag. 4. Ensure CAPXL is correct. (Figure 3) 10. Login to myQ®Business™ to update the CAPXL to the latest firmware version.Turn off power by loosening and removing the wingnut. 2. The Micro...; Business™ account. Figure 2. PRIOR TO CAMERA INSTALLATION 1. This may require a technician on the upper right side of settings. 2. Enter CAPXL Admin Mode using the #1 dip switch. Select the "Audio / Video" tab and confirm the video feed appears, the angle and ...
...™ are present: camera assembly, camera bracket, USB cable, and mounting hardware bag. 4. Ensure CAPXL is correct. (Figure 3) 10. Login to myQ®Business™ to update the CAPXL to the latest firmware version.Turn off power by loosening and removing the wingnut. 2. The Micro...; Business™ account. Figure 2. PRIOR TO CAMERA INSTALLATION 1. This may require a technician on the upper right side of settings. 2. Enter CAPXL Admin Mode using the #1 dip switch. Select the "Audio / Video" tab and confirm the video feed appears, the angle and ...
