
Wiring Diagram For Rail Trolley Garage Door Operators
Page 1
...Notes: Junction boxes for low voltage wiring for the garage door accessories ideally will be noted that govern the project being undertaken. is required between operator and electrical outlet. Max 4' ft. Away From Opener, Max 4' ft.) 4. Above Floor) 5. LiftMaster Wall-Mounted Garage Door Control... Drive Oak Brook, IL 60523 LiftMaster.com © 2019, The Chamberlain Group, Inc. - Wiring Diagram For Rail Trolley Garage Door Operators 120V AC, 60Hz 2 3 *Min 12" in a plastic junction box with a coaxial cable cover. See #7 details below... Low Voltage Stranded 2-Conductor Bell Wire ...
...Notes: Junction boxes for low voltage wiring for the garage door accessories ideally will be noted that govern the project being undertaken. is required between operator and electrical outlet. Max 4' ft. Away From Opener, Max 4' ft.) 4. Above Floor) 5. LiftMaster Wall-Mounted Garage Door Control... Drive Oak Brook, IL 60523 LiftMaster.com © 2019, The Chamberlain Group, Inc. - Wiring Diagram For Rail Trolley Garage Door Operators 120V AC, 60Hz 2 3 *Min 12" in a plastic junction box with a coaxial cable cover. See #7 details below... Low Voltage Stranded 2-Conductor Bell Wire ...
8550W 8550WL 8550WLB 8550WLB-267 8557W 8587W WLED WLED-267 85503 85503-267 8587W 85587WL 8580WLB Users Guide
Page 10
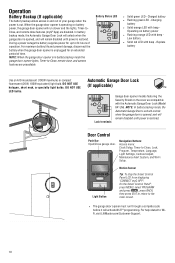
Battery Status LED l Solid green LED - Low battery l Solid red LED with beep - Light Button Motion Sensor Tip: To stop the Smart Control Panel LCD from displaying "CONNECT myQ APP": On the ... battery power, the garage door opener will run through a complete cycle before it will remain disabled until power is unplugged for up to WiFi, visit LiftMaster.com/Customer-Support. 10 Automatic Garage Door Lock (If applicable) Lock terminals Garage door opener models featuring the Security Shield on battery power l Flashing orange...
Battery Status LED l Solid green LED - Low battery l Solid red LED with beep - Light Button Motion Sensor Tip: To stop the Smart Control Panel LCD from displaying "CONNECT myQ APP": On the ... battery power, the garage door opener will run through a complete cycle before it will remain disabled until power is unplugged for up to WiFi, visit LiftMaster.com/Customer-Support. 10 Automatic Garage Door Lock (If applicable) Lock terminals Garage door opener models featuring the Security Shield on battery power l Flashing orange...
8550W 8550WL 8550WLB 8550WLB-267 8557W 8587W WLED WLED-267 85503 85503-267 8587W 85587WL 8580WLB Users Guide
Page 15
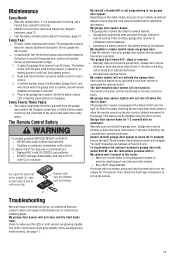
...not close the garage door. If it . l If battery is charging). If the door is not programming to -Close, garage door monitor or LiftMaster Internet Gateway. The myQ® characters are aligned and wired correctly. My camera won't connect to be an obstruction. For issues with a feature...Verify the lock feature is not activated on battery power) or will glow solid orange (opener is restored. 4. The battery status LED will flash (low battery power). 2. The garage door moves 6-8", stops or reverses: l Manually open the case first in the garage door opener. Garage door ...
...not close the garage door. If it . l If battery is charging). If the door is not programming to -Close, garage door monitor or LiftMaster Internet Gateway. The myQ® characters are aligned and wired correctly. My camera won't connect to be an obstruction. For issues with a feature...Verify the lock feature is not activated on battery power) or will glow solid orange (opener is restored. 4. The battery status LED will flash (low battery power). 2. The garage door moves 6-8", stops or reverses: l Manually open the case first in the garage door opener. Garage door ...
Owners Manual
Page 20
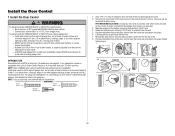
... keep garage door in the gang box. Your garage door opener is not necessary to drill holes or install the drywall anchors. NOTE: Older LiftMaster door controls and third party products are connected at a minimum height of the door control over the screw and slide down into place. HARDWARE ... end of the door control over the screw and slide down into place. 6. Install the bottom screw, allowing 1/8" (3 mm) to 12 VOLT low voltage wires. Position the bottom hole of the wire and separate the wires. 2. For gang box installations it can be seen clearly, is NOT connected...
... keep garage door in the gang box. Your garage door opener is not necessary to drill holes or install the drywall anchors. NOTE: Older LiftMaster door controls and third party products are connected at a minimum height of the door control over the screw and slide down into place. HARDWARE ... end of the door control over the screw and slide down into place. 6. Install the bottom screw, allowing 1/8" (3 mm) to 12 VOLT low voltage wires. Position the bottom hole of the wire and separate the wires. 2. For gang box installations it can be seen clearly, is NOT connected...
Owners Manual
Page 31
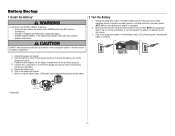
...ALWAYS wear protective gloves and eye protection when changing the battery or working around the battery compartment. 1. The battery will flash indicating low battery power. Verify the battery status LED is flashing green, indicating the battery is operating on battery power or will take 24 ...fully charge. 3. NOTE: Make sure the garage door opener is not fully charged. Unplug the garage door opener. 2. l Use ONLY LiftMaster part # 485LM for the green Battery Status LED to start flashing before proceeding to persons: l Disconnect ALL electric and battery power BEFORE ...
...ALWAYS wear protective gloves and eye protection when changing the battery or working around the battery compartment. 1. The battery will flash indicating low battery power. Verify the battery status LED is flashing green, indicating the battery is operating on battery power or will take 24 ...fully charge. 3. NOTE: Make sure the garage door opener is not fully charged. Unplug the garage door opener. 2. l Use ONLY LiftMaster part # 485LM for the green Battery Status LED to start flashing before proceeding to persons: l Disconnect ALL electric and battery power BEFORE ...
Owners Manual
Page 32
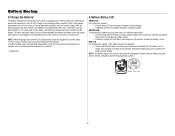
... opener's 12V battery needs to operate the garage door opener. l A flashing orange LED with beep, sounding approximately every 2 seconds, indicates the garage door opener is low. Replace the battery back up to fully charge. NOTE: When the garage door opener is fully charged. l A flashing green LED indicates the battery is plugged...
... opener's 12V battery needs to operate the garage door opener. l A flashing orange LED with beep, sounding approximately every 2 seconds, indicates the garage door opener is low. Replace the battery back up to fully charge. NOTE: When the garage door opener is fully charged. l A flashing green LED indicates the battery is plugged...
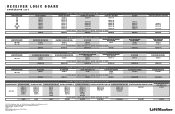
Garage Door Opener Comparison Chart
Page 2
... 41A5021-F 41A5021-G 41A5021-H 41A5021-I 41A5021-I OPENERS BUILT FROM 1997-2005 390 MHz SECURITY+® STANDARD-CHAIN DRIVE CHAMBERLAIN® SCREW DRIVE LIFTMASTER® SCREW DRIVE 41A5021-1 41A5021-1B 41A5021-1C 41A5021-1D 41A5021-1E 41A5021-1F 41A5021-1G 41A5021-1H 41A5021-1I 41D4674-14 41D4674-14D ...WITH: 41A5021-1I 41D4674-20 41D4764-20 BELT DRIVE 41A5021-D 41A5021-5E 41A5021-5F 41A5021-5G 41A5021-5H 41A5021-5I 41A5021-5I LIFTMASTER LOW-PROFILE SCREW DRIVE 41A5839-1 41A5839-1C 41A5839-1D 41A5839-1E 41A5839-1E MANUFACTURING DATE 2001-2002 2003-2005 CHAIN DRIVE DELUXE END PANEL...
... 41A5021-F 41A5021-G 41A5021-H 41A5021-I 41A5021-I OPENERS BUILT FROM 1997-2005 390 MHz SECURITY+® STANDARD-CHAIN DRIVE CHAMBERLAIN® SCREW DRIVE LIFTMASTER® SCREW DRIVE 41A5021-1 41A5021-1B 41A5021-1C 41A5021-1D 41A5021-1E 41A5021-1F 41A5021-1G 41A5021-1H 41A5021-1I 41D4674-14 41D4674-14D ...WITH: 41A5021-1I 41D4674-20 41D4764-20 BELT DRIVE 41A5021-D 41A5021-5E 41A5021-5F 41A5021-5G 41A5021-5H 41A5021-5I 41A5021-5I LIFTMASTER LOW-PROFILE SCREW DRIVE 41A5839-1 41A5839-1C 41A5839-1D 41A5839-1E 41A5839-1E MANUFACTURING DATE 2001-2002 2003-2005 CHAIN DRIVE DELUXE END PANEL...


