
8500 Manual
Page 1
etails The Chamberlain Group, Inc. 845 Larch Avenue Elmhurst, Illinois 60126-1196 www.liftmaster.com Model 8500 GARAGE DOOR OPENER For Residential and Light Duty Commercial Use Install On Sectional Doors With Torsion Assemblies Only See Page 18 for D This product is ... the garage door opener are required to door springs and or track configurations. This product is ONLY compatible with MyQ™ and Security✚ 2.0™ accessories. This product may require adjustments to ensure safe operation. ■ The model number label is located behind the hinged door of your opener. ■ ...
etails The Chamberlain Group, Inc. 845 Larch Avenue Elmhurst, Illinois 60126-1196 www.liftmaster.com Model 8500 GARAGE DOOR OPENER For Residential and Light Duty Commercial Use Install On Sectional Doors With Torsion Assemblies Only See Page 18 for D This product is ... the garage door opener are required to door springs and or track configurations. This product is ONLY compatible with MyQ™ and Security✚ 2.0™ accessories. This product may require adjustments to ensure safe operation. ■ The model number label is located behind the hinged door of your opener. ■ ...
8500 Manual
Page 2
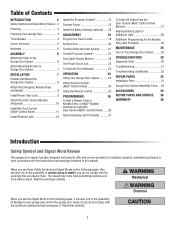
...® Control Panel 24 Using the Remote Control 25 PROGRAMMING 26 To Add a Remote Control, Keyless Entry, or MyQ® Enabled Accessories using the Door Control (MyQ® Control Panel) ....... 26 Internet Gateway (Not Provided 27 To Erase All Codes From the Door Control...30 Diagnostic Chart 30 Troubleshooting 31 Troubleshooting (Continued 32 REPAIR PARTS 33 Installation Parts 33 Garage Door Opener Assembly Parts..... 34 ACCESSORIES 35 REPAIR PARTS AND SERVICE 36 WARRANTY 36 Introduction Safety Symbol and Signal Word Review This garage door opener has been designed...
...® Control Panel 24 Using the Remote Control 25 PROGRAMMING 26 To Add a Remote Control, Keyless Entry, or MyQ® Enabled Accessories using the Door Control (MyQ® Control Panel) ....... 26 Internet Gateway (Not Provided 27 To Erase All Codes From the Door Control...30 Diagnostic Chart 30 Troubleshooting 31 Troubleshooting (Continued 32 REPAIR PARTS 33 Installation Parts 33 Garage Door Opener Assembly Parts..... 34 ACCESSORIES 35 REPAIR PARTS AND SERVICE 36 WARRANTY 36 Introduction Safety Symbol and Signal Word Review This garage door opener has been designed...

8500 Manual
Page 5
Introduction Carton Inventory Accessories included with Screws Safety Labels and Literature Hardware Hex Screw #14-10x1-7/8" (4) Screw #6x1-1/4" (2) Machine Screw #6x1" (2) Carriage Bolt 1/4"-20x1/2" (2) Wing Nut 1/4"-20 (2) Pan Head ...
Introduction Carton Inventory Accessories included with Screws Safety Labels and Literature Hardware Hex Screw #14-10x1-7/8" (4) Screw #6x1-1/4" (2) Machine Screw #6x1" (2) Carriage Bolt 1/4"-20x1/2" (2) Wing Nut 1/4"-20 (2) Pan Head ...
8500 Manual
Page 8
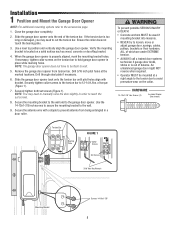
... garage door binds, sticks or is too long or damaged, you may need to wall. 5. Securely tighten collar screws to the torsion bar to the accessories page. 1. If necessary, tighten collar screws on the collar. Slide the garage door opener back onto the torsion bar until pilot holes align with a staple...
... garage door binds, sticks or is too long or damaged, you may need to wall. 5. Securely tighten collar screws to the torsion bar to the accessories page. 1. If necessary, tighten collar screws on the collar. Slide the garage door opener back onto the torsion bar until pilot holes align with a staple...

8500 Manual
Page 13
... and align the safety reversing sensor. Be sure power is a required safety device and cannot be unobstructed. The units must be disabled. Extension brackets (see accessories) are designed to full open position, and the opener lights will detect an obstacle in the path of wood at each other hardware) may interrupt...
... and align the safety reversing sensor. Be sure power is a required safety device and cannot be unobstructed. The units must be disabled. Extension brackets (see accessories) are designed to full open position, and the opener lights will detect an obstacle in the path of wood at each other hardware) may interrupt...

8500 Manual
Page 14
... the sensor beam to Wall with Lag Screws (not provided) Safety Reversing Sensor Bracket Lag Screws (not provided) Extension Bracket (See Accessories) (Provided with Extension Bracket) (Provided with lag screws (not provided). OPTION A: Track Installation 1. If your door track will face... the brackets so the safety reversing sensors will not support the bracket securely, wall installation is needed, an extension bracket (see Accessories) to wall with Extension Bracket) OPTION C: Floor Installation 1. Make sure all door hardware obstructions are cleared. Safety Reversing Sensor ...
... the sensor beam to Wall with Lag Screws (not provided) Safety Reversing Sensor Bracket Lag Screws (not provided) Extension Bracket (See Accessories) (Provided with Extension Bracket) (Provided with lag screws (not provided). OPTION A: Track Installation 1. If your door track will face... the brackets so the safety reversing sensors will not support the bracket securely, wall installation is needed, an extension bracket (see Accessories) to wall with Extension Bracket) OPTION C: Floor Installation 1. Make sure all door hardware obstructions are cleared. Safety Reversing Sensor ...

8500 Manual
Page 23
... 4. To avoid SERIOUS PERSONAL INJURY or DEATH from any position other hardware, ALL of SEVERE INJURY or DEATH. 7. When programmed to the LiftMaster® Internet Gateway you hold the light button for 10 seconds until the light goes off , press and hold the light button for 10...unless doorway is equipped with each use emergency release handle to provide two-way communication between the garage door opener and MyQ® enabled accessories. This operator system is clear of your remote control, which are under EXTREME tension, MUST be seen clearly, it is interrupted while ...
... 4. To avoid SERIOUS PERSONAL INJURY or DEATH from any position other hardware, ALL of SEVERE INJURY or DEATH. 7. When programmed to the LiftMaster® Internet Gateway you hold the light button for 10 seconds until the light goes off , press and hold the light button for 10...unless doorway is equipped with each use emergency release handle to provide two-way communication between the garage door opener and MyQ® enabled accessories. This operator system is clear of your remote control, which are under EXTREME tension, MUST be seen clearly, it is interrupted while ...

8500 Manual
Page 24
... turn off again.* * Approximately 10 seconds 24 MOTION SENSOR This feature will open /close from the Door Control, the Outdoor Key Switch, the Keyless Entry Accessories and MyQ® Internet Gateway. When the obstruction has been cleared or the safety reversing sensors have been aligned, the door will turn off after...
... turn off again.* * Approximately 10 seconds 24 MOTION SENSOR This feature will open /close from the Door Control, the Outdoor Key Switch, the Keyless Entry Accessories and MyQ® Internet Gateway. When the obstruction has been cleared or the safety reversing sensors have been aligned, the door will turn off after...

8500 Manual
Page 26
... REMOTE CONTROL 1. Press the MyQ® Control Panel LEARN button twice, the red learn button on . 2. PIN MyQ® ENABLED ACCESSORIES 1. Programming Your hand-held remote control (model 895MAX) has already programmed to the door control. Below are instructions for programming additional remote controls..., keyless entries, and MyQ® enabled accessories to the door control (MyQ® Control Panel) at the factory. The yellow learn LED will turn on the door control to the LiftMaster® Internet Gateway (Model 828LM) or the MyQ® ...
... REMOTE CONTROL 1. Press the MyQ® Control Panel LEARN button twice, the red learn button on . 2. PIN MyQ® ENABLED ACCESSORIES 1. Programming Your hand-held remote control (model 895MAX) has already programmed to the door control. Below are instructions for programming additional remote controls..., keyless entries, and MyQ® enabled accessories to the door control (MyQ® Control Panel) at the factory. The yellow learn LED will turn on the door control to the LiftMaster® Internet Gateway (Model 828LM) or the MyQ® ...

8500 Manual
Page 27
...® Control Panel) Memory Erase all devices (including MyQ® enabled accessories): 1. To program your internet connected computer or mobile device. Once the control panel is complete. You can then name the device (e.g., My Control Panel, etc.). Model 828LM LiftMaster® Internet Gateway www.myliftmaster.com Red Learn LED 27 Immediately press...
...® Control Panel) Memory Erase all devices (including MyQ® enabled accessories): 1. To program your internet connected computer or mobile device. Once the control panel is complete. You can then name the device (e.g., My Control Panel, etc.). Model 828LM LiftMaster® Internet Gateway www.myliftmaster.com Red Learn LED 27 Immediately press...

8500 Manual
Page 35
...reversing sensor installation onto the wall or floor. 480LM Alternate Mounting Kit: This kit allows model 8500 to be mounted below the torsion bar in the home. STANDARD ACCESSORIES 885LM Security✚ 2.0™ Wireless Door Control: Push bar, light feature and auxiliary button. Single... MAX Remote Control 825LM Remote Light Control: Automatically control your lights using your current wired wall switch. 828LM LiftMaster® Internet Gateway: Internet enabled accessory which connects to the computer and allows you to monitor and control garage door openers and lighting...
...reversing sensor installation onto the wall or floor. 480LM Alternate Mounting Kit: This kit allows model 8500 to be mounted below the torsion bar in the home. STANDARD ACCESSORIES 885LM Security✚ 2.0™ Wireless Door Control: Push bar, light feature and auxiliary button. Single... MAX Remote Control 825LM Remote Light Control: Automatically control your lights using your current wired wall switch. 828LM LiftMaster® Internet Gateway: Internet enabled accessory which connects to the computer and allows you to monitor and control garage door openers and lighting...