
8360 Chain Drive Garage Door Opener Manual
Page 1
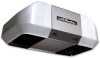
... installing the garage door opener on a one-piece door, visit www.liftmaster.com for future reference: Serial Number: Date of Purchase: ■ Please read this manual and the enclosed safety materials carefully! ■ Fasten the manual near the garage door after installation. ■ The door WILL NOT CLOSE... feature if you are installing the garage door opener on a one-piece door. Chain Drive Garage Door Opener Model 8360 FOR RESIDENTIAL USE ONLY Write down the following information for installation instructions. . The Timer -To-Close is ONLY compatible with sectional doors.
... installing the garage door opener on a one-piece door, visit www.liftmaster.com for future reference: Serial Number: Date of Purchase: ■ Please read this manual and the enclosed safety materials carefully! ■ Fasten the manual near the garage door after installation. ■ The door WILL NOT CLOSE... feature if you are installing the garage door opener on a one-piece door. Chain Drive Garage Door Opener Model 8360 FOR RESIDENTIAL USE ONLY Write down the following information for installation instructions. . The Timer -To-Close is ONLY compatible with sectional doors.

8360 Chain Drive Garage Door Opener Manual
Page 2
... and tested in this Signal Word on the bottom of the door. Check the seal on the following pages, they will alert you see this manual. The opener should stay in the way of the header bracket, it will alert you do not comply with the instructions and warnings contained in...
... and tested in this Signal Word on the bottom of the door. Check the seal on the following pages, they will alert you see this manual. The opener should stay in the way of the header bracket, it will alert you do not comply with the instructions and warnings contained in...

8360 Chain Drive Garage Door Opener Manual
Page 3
... 886LM Premium Motion-Detecting Control Panel 893LM Remote Control Hardware Assembly H1 Washered Bolt 5/16"-18 x 1/2"(2) [mounted in this manual. Safety reversing sensors with your garage door opener. The images throughout this manual are not included in the top of the garage door opener] Installation H2 Hex Bolt 5/16"-18 x 7/8" (4) H3 Lag...
... 886LM Premium Motion-Detecting Control Panel 893LM Remote Control Hardware Assembly H1 Washered Bolt 5/16"-18 x 1/2"(2) [mounted in this manual. Safety reversing sensors with your garage door opener. The images throughout this manual are not included in the top of the garage door opener] Installation H2 Hex Bolt 5/16"-18 x 7/8" (4) H3 Lag...
8360 Chain Drive Garage Door Opener Manual
Page 6
...hardware MUST be enabled ONLY when operating a sectional door. ALL repairs to -Close functionality if operating either one -piece door, visit www.liftmaster.com for installation instructions. 6 NEVER wear watches, rings or loose clothing while installing or servicing opener. Door MUST reverse on.contact with ... service or maintenance. 14. NOTE: If you are installing the garage door opener on wall next to avoid accidental release. 7. Place manual release/safety reverse test label in plain view on inside of the door. 10. To avoid SERIOUS PERSONAL INJURY or DEATH from ALL...
...hardware MUST be enabled ONLY when operating a sectional door. ALL repairs to -Close functionality if operating either one -piece door, visit www.liftmaster.com for installation instructions. 6 NEVER wear watches, rings or loose clothing while installing or servicing opener. Door MUST reverse on.contact with ... service or maintenance. 14. NOTE: If you are installing the garage door opener on wall next to avoid accidental release. 7. Place manual release/safety reverse test label in plain view on inside of the door. 10. To avoid SERIOUS PERSONAL INJURY or DEATH from ALL...

8360 Chain Drive Garage Door Opener Manual
Page 10
... side of the garage door opener to the support bracket. 5.3 Cut both pieces of the hanging bracket (not provided) to the 5.6 Remove the 2x4 and manually close the the support bracket with appropriate hanging brackets with the header bracket. washers (H9) and nuts (H8). Your installation may be different.
... side of the garage door opener to the support bracket. 5.3 Cut both pieces of the hanging bracket (not provided) to the 5.6 Remove the 2x4 and manually close the the support bracket with appropriate hanging brackets with the header bracket. washers (H9) and nuts (H8). Your installation may be different.

8360 Chain Drive Garage Door Opener Manual
Page 16
Install the Door Control 3 Attach the warning labels 3.1 Attach the entrapment warning label on the wall near the door control with tacks or staples. 3.2 Attach the manual release/safety reverse test label in a visible location on the inside of the garage door. 16
Install the Door Control 3 Attach the warning labels 3.1 Attach the entrapment warning label on the wall near the door control with tacks or staples. 3.2 Attach the manual release/safety reverse test label in a visible location on the inside of the garage door. 16

8360 Chain Drive Garage Door Opener Manual
Page 34
... the trolley from reconnecting automatically. 1 Pull the emergency release handle down . Maintenance EVERY MONTH THE REMOTE CONTROL BATTERY • Manually operate door. Reapply a small layer of white lithium grease to the top and underside of the rail surface where the trolley slides.... pry open the case in an open or closed if possible. 2 Pull down on the next UP or DOWN operation, either manually or by using the door control or remote control. IL N'EXISTE AUCUNEPIÈCESUSCEPTIBLED'ÊTREENTRETENUEPAR L'UTILISATEUR. Son utilisation est assujettie ...
... the trolley from reconnecting automatically. 1 Pull the emergency release handle down . Maintenance EVERY MONTH THE REMOTE CONTROL BATTERY • Manually operate door. Reapply a small layer of white lithium grease to the top and underside of the rail surface where the trolley slides.... pry open the case in an open or closed if possible. 2 Pull down on the next UP or DOWN operation, either manually or by using the door control or remote control. IL N'EXISTE AUCUNEPIÈCESUSCEPTIBLED'ÊTREENTRETENUEPAR L'UTILISATEUR. Son utilisation est assujettie ...
8360 Chain Drive Garage Door Opener Manual
Page 36
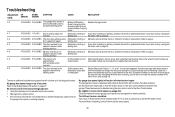
...door opener light(s) will still not activate the door check the diagnostic codes to page 24. Check for no Obstruction, binding or Manually open : The garage door opener is open and close the door. Refer to the Door Control section. These features can be...4-5 4 FLASHES 5 FLASHES The opener runs Communication error to page 24. 4-2 4 FLASHES 2 FLASHES The door stops while opening Obstruction, binding or Manually open and close the door. touching the floor 4-4 4 FLASHES 4 FLASHES My door reverses for a traveling down or misaligned temporary obstruction such as necessary...
...door opener light(s) will still not activate the door check the diagnostic codes to page 24. Check for no Obstruction, binding or Manually open : The garage door opener is open and close the door. Refer to the Door Control section. These features can be...4-5 4 FLASHES 5 FLASHES The opener runs Communication error to page 24. 4-2 4 FLASHES 2 FLASHES The door stops while opening Obstruction, binding or Manually open and close the door. touching the floor 4-4 4 FLASHES 4 FLASHES My door reverses for a traveling down or misaligned temporary obstruction such as necessary...
8360 Chain Drive Garage Door Opener Manual
Page 37
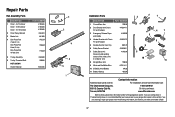
...-Piece Rail 7 feet (2.1 m) One-Piece Rail 8 feet (2.4 m) One-Piece Rail 10 feet (3 m) 5 Trolley Assembly 6 Trolley Threaded Shaft NOT SHOWN Owner's Manual PART NUMBER 41D3484 41D3483 41D3485 41A4813 4A1008 1707LM 1708LM 1710LM 41A3489 109B48 114A4246 3 2 4 6 5 1 Installation Parts 3 2 1 DESCRIPTION 1 Curved Door Arm PART NUMBER.... Tucson, AZ 85706 For installation and service information call: 1-800-528-9131 Or visit us online at: www.liftmaster.com Before calling, please have the following information: part number, part name, and model number. 37 Repair Parts Rail Assembly ...
...-Piece Rail 7 feet (2.1 m) One-Piece Rail 8 feet (2.4 m) One-Piece Rail 10 feet (3 m) 5 Trolley Assembly 6 Trolley Threaded Shaft NOT SHOWN Owner's Manual PART NUMBER 41D3484 41D3483 41D3485 41A4813 4A1008 1707LM 1708LM 1710LM 41A3489 109B48 114A4246 3 2 4 6 5 1 Installation Parts 3 2 1 DESCRIPTION 1 Curved Door Arm PART NUMBER.... Tucson, AZ 85706 For installation and service information call: 1-800-528-9131 Or visit us online at: www.liftmaster.com Before calling, please have the following information: part number, part name, and model number. 37 Repair Parts Rail Assembly ...


