
8160W Product Guide
Page 1
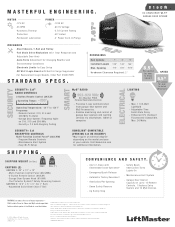
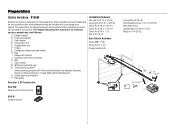
...FEATURES QUIET OPERATION DC Motor Trusted reliability and quiet operation. PRODUCT GUIDE 8160W DC CHAIN DRIVE WI-FI GARAGE DOOR OPENER 3-BUTTON REMOTE CONTROL Operates up to control it with multiple home automation platforms. Visit LiftMaster.com/WorksWithMyQ for a full list of MyQ partners.* RELIABLE CUSTOMIZED ...doors from home requires an Apple TV® with tvOS™ 10.0 or later or an iPad® with a smartphone or garage remote. GARAGE DOOR AND GATE MONITOR Monitors and closes up to a partner may require an additional accessory purchase or subscription fee. CHAIN DRIVE ...
...FEATURES QUIET OPERATION DC Motor Trusted reliability and quiet operation. PRODUCT GUIDE 8160W DC CHAIN DRIVE WI-FI GARAGE DOOR OPENER 3-BUTTON REMOTE CONTROL Operates up to control it with multiple home automation platforms. Visit LiftMaster.com/WorksWithMyQ for a full list of MyQ partners.* RELIABLE CUSTOMIZED ...doors from home requires an Apple TV® with tvOS™ 10.0 or later or an iPad® with a smartphone or garage remote. GARAGE DOOR AND GATE MONITOR Monitors and closes up to a partner may require an additional accessory purchase or subscription fee. CHAIN DRIVE ...
8160W Product Guide
Page 2
... in lbs.) 18 20 CARTONS (2) HEAD RAIL (7') CARTON 1: 20" x 12" x 10" - -M ul ti -F unction Contr ol Pan e l ( 882L MW) - -3-Button Remote Con tr ol ( 893L M) - -G a ra ge Door O pen er Head ( 8160W) - -T h e P r o t e c t o r S y s t e m ® S a f e t y R e v e r s i n g S e n s o r s CARTON 2: 10'4" x 5" x 5" (for 7' Rail) - -Asse m ... HIGHER*) *May require an external adapter depending on a sectional door. © 2018 LiftMaster All Rights Reserved 300 Windsor Drive, Oak Brook, IL 60523 LiftMaster.com ALARM.COM is a registered trademark of Wi-Fi Alliance HomeLink® and the ...
... in lbs.) 18 20 CARTONS (2) HEAD RAIL (7') CARTON 1: 20" x 12" x 10" - -M ul ti -F unction Contr ol Pan e l ( 882L MW) - -3-Button Remote Con tr ol ( 893L M) - -G a ra ge Door O pen er Head ( 8160W) - -T h e P r o t e c t o r S y s t e m ® S a f e t y R e v e r s i n g S e n s o r s CARTON 2: 10'4" x 5" x 5" (for 7' Rail) - -Asse m ... HIGHER*) *May require an external adapter depending on a sectional door. © 2018 LiftMaster All Rights Reserved 300 Windsor Drive, Oak Brook, IL 60523 LiftMaster.com ALARM.COM is a registered trademark of Wi-Fi Alliance HomeLink® and the ...
Owners Manual
Page 2
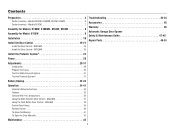
..., 8164W, 8165W 6 Carton Inventory - Models 8155W 7 Assembly for Models: 8160W, 8160WB, 8164W, 8165W 8 Assembly for Model: 8155W 9 Installation 10 Install the Door Control 19-21 Install the Door Control - 882LMW 19 Install the Door Control - ... Connect With Your Smartphone 36 Using the Multi-Function Door Control - 882LMW 37 Using the Push Button Door Control - 883LMW 38 Control Panel Setup 39 Remote Control 40 To Erase the Memory 41 To Open the Door Manually 41 Maintenance 42 2
..., 8164W, 8165W 6 Carton Inventory - Models 8155W 7 Assembly for Models: 8160W, 8160WB, 8164W, 8165W 8 Assembly for Model: 8155W 9 Installation 10 Install the Door Control 19-21 Install the Door Control - 882LMW 19 Install the Door Control - ... Connect With Your Smartphone 36 Using the Multi-Function Door Control - 882LMW 37 Using the Push Button Door Control - 883LMW 38 Control Panel Setup 39 Remote Control 40 To Erase the Memory 41 To Open the Door Manually 41 Maintenance 42 2
Owners Manual
Page 6
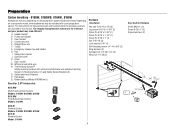
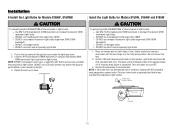
...sensors with your garage door opener. Door bracket D. Emergency release rope and handle H. Rail grease Q. Preparation Carton Inventory - 8160W, 8160WB, 8164W, 8165W Accessories will be attached to the accessory and are for these accessories will vary depending on your ...Not Provided O P I . Garage door opener J. White and red/white wire N. Header bracket B. Rail I Q 893LM Remote Control Models: 8160W, 8160WB, 8165W 891LM Remote Control Model: 8164W 6 Door control M. Safety labels and literature P. The instructions for reference and your product may be included...
...sensors with your garage door opener. Door bracket D. Emergency release rope and handle H. Rail grease Q. Preparation Carton Inventory - 8160W, 8160WB, 8164W, 8165W Accessories will be attached to the accessory and are for these accessories will vary depending on your ...Not Provided O P I . Garage door opener J. White and red/white wire N. Header bracket B. Rail I Q 893LM Remote Control Models: 8160W, 8160WB, 8165W 891LM Remote Control Model: 8164W 6 Door control M. Safety labels and literature P. The instructions for reference and your product may be included...
Owners Manual
Page 7
... 5/16" x 1" (1) Nut 5/16"-18 (4) Door Control Hardware Screw 6AB x 1" (2) Screw 6-32 x 1" (2) Drywall anchors (2) AB CF G DE Security+ 2.0® Accessories N 882LMW Multi-Function Door Control 893LM Remote Control Lock washer 5/16" (4) Self-threading screw 1/4"-14 x 5/8" (2) Ring fastener (3) Carriage bolt 1/4"-20 x 1/2" (2) Wing nut 1/4"-20 (2) K H L M Not Provided J Not Provided P O I . Emergency release rope and handle...
... 5/16" x 1" (1) Nut 5/16"-18 (4) Door Control Hardware Screw 6AB x 1" (2) Screw 6-32 x 1" (2) Drywall anchors (2) AB CF G DE Security+ 2.0® Accessories N 882LMW Multi-Function Door Control 893LM Remote Control Lock washer 5/16" (4) Self-threading screw 1/4"-14 x 5/8" (2) Ring fastener (3) Carriage bolt 1/4"-20 x 1/2" (2) Wing nut 1/4"-20 (2) K H L M Not Provided J Not Provided P O I . Emergency release rope and handle...
Owners Manual
Page 15
... use incandescent bulbs larger than 26W (100W equivalent). Do not remove the lens. 2. Then the lights will turn OFF. 3. Pull on both sides of your remote control(s). 3. DO NOT use compact fluorescent light bulbs larger than 100W. or To prevent possible OVERHEATING of the end panel or light socket: l Use ONLY... larger than 100W. l DO NOT use LED bulbs as these may reduce the range or performance of lens. Installation 6 Install the Light Bulbs for Models 8160W, 8160WB Install the Light Bulbs for approximately 4-1/2 minutes when power is in each socket.
... use incandescent bulbs larger than 26W (100W equivalent). Do not remove the lens. 2. Then the lights will turn OFF. 3. Pull on both sides of your remote control(s). 3. DO NOT use compact fluorescent light bulbs larger than 100W. or To prevent possible OVERHEATING of the end panel or light socket: l Use ONLY... larger than 100W. l DO NOT use LED bulbs as these may reduce the range or performance of lens. Installation 6 Install the Light Bulbs for Models 8160W, 8160WB Install the Light Bulbs for approximately 4-1/2 minutes when power is in each socket.
Owners Manual
Page 19
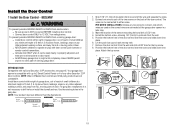
... or 4 of any other adjacent walking surface, and away from ALL moving parts of door. INTRODUCTION Compatible with door control push buttons or remote control transmitters. NOTE: Older LiftMaster door controls and third party products are no obstructions to either screw. Install the bottom screw, allowing 1/8" (3 mm) to 12 VOLT low voltage...
... or 4 of any other adjacent walking surface, and away from ALL moving parts of door. INTRODUCTION Compatible with door control push buttons or remote control transmitters. NOTE: Older LiftMaster door controls and third party products are no obstructions to either screw. Install the bottom screw, allowing 1/8" (3 mm) to 12 VOLT low voltage...
Owners Manual
Page 20
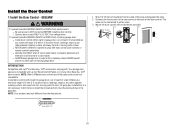
... surface, and away from ALL moving parts of door. Connect one end of the wire and separate the wires. 2. NOTE: Older LiftMaster door controls and third party products are no obstructions to door travel. Your garage door opener is properly adjusted, and there are not ...electrocution: l Be sure power is not necessary to drill holes or install the drywall anchors. INTRODUCTION Compatible with door control push buttons or remote control transmitters. HARDWARE 1. l Connect door control ONLY to 12 VOLT low voltage wires. To prevent possible SERIOUS INJURY or DEATH from a ...
... surface, and away from ALL moving parts of door. Connect one end of the wire and separate the wires. 2. NOTE: Older LiftMaster door controls and third party products are no obstructions to door travel. Your garage door opener is properly adjusted, and there are not ...electrocution: l Be sure power is not necessary to drill holes or install the drywall anchors. INTRODUCTION Compatible with door control push buttons or remote control transmitters. HARDWARE 1. l Connect door control ONLY to 12 VOLT low voltage wires. To prevent possible SERIOUS INJURY or DEATH from a ...
Owners Manual
Page 30
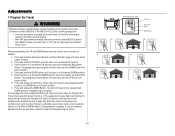
..., the programming has timed out. Programming is complete. If you are aligned and unobstructed, cycle the door through a complete up and down cycle using the remote control or the UP and DOWN buttons. Press and release the DOWN Button. Once the door is heard. 2. When the sensors are unable to flash...
..., the programming has timed out. Programming is complete. If you are aligned and unobstructed, cycle the door through a complete up and down cycle using the remote control or the UP and DOWN buttons. Press and release the DOWN Button. Once the door is heard. 2. When the sensors are unable to flash...

Owners Manual
Page 31
...door. 2. Repeat Program the Travel (see Adjustment Step 1); 3. Open the door. The garage door opener will flash 10 times. Press the remote control push button to insure all steps were followed; 2. Repeat the Safety Reversal test. Review the installation instructions provided to close from... than 1" (2.5 cm), and the garage door opener lights will not close the door. l Safety reversal system MUST be tested. Press the remote control push button to the fact that the sensor is obstructed (and the sensors are made, the safety reversal system MUST be tested every month...
...door. 2. Repeat Program the Travel (see Adjustment Step 1); 3. Open the door. The garage door opener will flash 10 times. Press the remote control push button to insure all steps were followed; 2. Repeat the Safety Reversal test. Review the installation instructions provided to close from... than 1" (2.5 cm), and the garage door opener lights will not close the door. l Safety reversal system MUST be tested. Press the remote control push button to the fact that the sensor is obstructed (and the sensors are made, the safety reversal system MUST be tested every month...
Owners Manual
Page 32
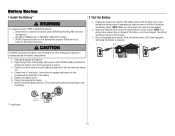
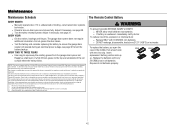
l Use ONLY LiftMaster part # 485LM for disposal instructions. 2 Test the Battery 1. Unplug the garage door opener. Plug in the garage door opener. 7. Open the light lens of battery ... Backup 1 Install the Battery* To reduce the risk of FIRE or INJURY to test the battery. * If applicable. Open and close the door using the remote control or door control.
l Use ONLY LiftMaster part # 485LM for disposal instructions. 2 Test the Battery 1. Unplug the garage door opener. Plug in the garage door opener. 7. Open the light lens of battery ... Backup 1 Install the Battery* To reduce the risk of FIRE or INJURY to test the battery. * If applicable. Open and close the door using the remote control or door control.

Owners Manual
Page 33
...: The garage door opener has lost power and is in battery backup mode. RED LED: The garage door opener's 12V battery needs to -Close, and Remote Close features are unavailable. * If applicable. The battery will recharge within 24 hours. l A flashing green LED indicates the battery is operating on battery power. l A solid...
...: The garage door opener has lost power and is in battery backup mode. RED LED: The garage door opener's 12V battery needs to -Close, and Remote Close features are unavailable. * If applicable. The battery will recharge within 24 hours. l A flashing green LED indicates the battery is operating on battery power. l A solid...

Owners Manual
Page 34
... ONLY when garage door is properly adjusted, and there are under EXTREME tension, MUST be used ONLY with garage door control push buttons or remote controls. 3. This operator system is clear of SEVERE INJURY or DEATH. 11. NO ONE SHOULD CROSS THE PATH OF THE MOVING DOOR. 15.... Operation IMPORTANT SAFETY INSTRUCTIONS To reduce the risk of SEVERE INJURY or DEATH. 7. READ AND FOLLOW ALL WARNINGS AND INSTRUCTIONS. 2. ALWAYS keep remote controls out of reach of which are no obstructions to be made , the safety reversal system MUST be tested every month. An improperly balanced ...
... ONLY when garage door is properly adjusted, and there are under EXTREME tension, MUST be used ONLY with garage door control push buttons or remote controls. 3. This operator system is clear of SEVERE INJURY or DEATH. 11. NO ONE SHOULD CROSS THE PATH OF THE MOVING DOOR. 15.... Operation IMPORTANT SAFETY INSTRUCTIONS To reduce the risk of SEVERE INJURY or DEATH. 7. READ AND FOLLOW ALL WARNINGS AND INSTRUCTIONS. 2. ALWAYS keep remote controls out of reach of which are no obstructions to be made , the safety reversal system MUST be tested every month. An improperly balanced ...
Owners Manual
Page 35
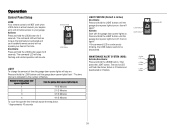
...the path of your garage door operation. TIMER-TO-CLOSE (TTC) The TTC feature automatically closes the door after 4-1/2 minutes. NOTE: Older LiftMaster remote controls, door controls, and third party products are misaligned, the door will turn off the sensor LEDs will not close the door if ...as the light bulb turns off and whenever the garage door opener lights turn on when someone enters through a wall-mounted door control, remote control, wireless keyless entry or myQ accessory. The safety reversing sensors do not effect the opening the door will beep. The sleep mode...
...the path of your garage door operation. TIMER-TO-CLOSE (TTC) The TTC feature automatically closes the door after 4-1/2 minutes. NOTE: Older LiftMaster remote controls, door controls, and third party products are misaligned, the door will turn off the sensor LEDs will not close the door if ...as the light bulb turns off and whenever the garage door opener lights turn on when someone enters through a wall-mounted door control, remote control, wireless keyless entry or myQ accessory. The safety reversing sensors do not effect the opening the door will beep. The sleep mode...
Owners Manual
Page 37
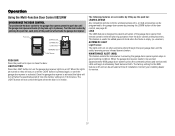
...to alternately flash back and forth. When the lights are accessible by pressing the push bar, each press of the garage door opener from remote controls while still allowing activation from the door control and keyless entry. This feature is useful for service. 37 AUTOMATIC LIGHT Light Feature The...LIGHT button is pressed again, or until the garage door opener activates (it may take up the push bar: LEARN A DEVICE Any compatible remote controls, wireless keyless entry, or myQ accessories can be programmed to the garage door opener by pressing the LEARN button of mind when the ...
...to alternately flash back and forth. When the lights are accessible by pressing the push bar, each press of the garage door opener from remote controls while still allowing activation from the door control and keyless entry. This feature is useful for service. 37 AUTOMATIC LIGHT Light Feature The...LIGHT button is pressed again, or until the garage door opener activates (it may take up the push bar: LEARN A DEVICE Any compatible remote controls, wireless keyless entry, or myQ accessories can be programmed to the garage door opener by pressing the LEARN button of mind when the ...
Owners Manual
Page 39
...opener lights turn off again.* Activate: Start with the garage door opener lights on. Active is 2 flashes and deactivated is activated and your handheld remote control will not operate your door at this time. MAINTENANCE ALERT SYSTEM (MAS): Activate/Deactivate: Press and hold the LOCK button again for 2 ...by the number of flashes. Number of time the garage door opener lights will flash the status; Operation Control Panel Setup LOCK Your remote controls will NOT work when LOCK mode is active however your keyless entry will resume. Command LED LOCK Button LIGHT To change the amount...
...opener lights turn off again.* Activate: Start with the garage door opener lights on. Active is 2 flashes and deactivated is activated and your handheld remote control will not operate your door at this time. MAINTENANCE ALERT SYSTEM (MAS): Activate/Deactivate: Press and hold the LOCK button again for 2 ...by the number of flashes. Number of time the garage door opener lights will flash the status; Operation Control Panel Setup LOCK Your remote controls will NOT work when LOCK mode is active however your keyless entry will resume. Command LED LOCK Button LIGHT To change the amount...

Owners Manual
Page 40
...ENTER button. MODEL 883LMW 1. Repeat the steps above for additional information. Press and release the LEARN Button on the keyless entry keypad. Older LiftMaster remote controls are heard. 1 2 "cli"cckl"ick" LEARN Button LEARN LED 40 Programming can be done through the door control or the learn ... DOOR CONTROL - TO ADD, REPROGRAM, OR CHANGE A REMOTE CONTROL/KEYLESS ENTRY PIN USING THE PUSH BUTTON DOOR CONTROL - Press and hold the LIGHT button and the push button until the push button LED begins to the instructions provided with the accessory or visit LiftMaster.com.
...ENTER button. MODEL 883LMW 1. Repeat the steps above for additional information. Press and release the LEARN Button on the keyless entry keypad. Older LiftMaster remote controls are heard. 1 2 "cli"cckl"ick" LEARN Button LEARN LED 40 Programming can be done through the door control or the learn ... DOOR CONTROL - TO ADD, REPROGRAM, OR CHANGE A REMOTE CONTROL/KEYLESS ENTRY PIN USING THE PUSH BUTTON DOOR CONTROL - Press and hold the LIGHT button and the push button until the push button LED begins to the instructions provided with the accessory or visit LiftMaster.com.

Owners Manual
Page 41
..., you could result in an open or closed if possible. 2. Pull down and back (toward the opener). The door can then be fully closed . All remote control and keyless entry codes are heard (Approximately 6 seconds). Immediately press and hold the black adjustment button on the garage door opener until the learn... GARAGE DOOR OPENER 1. Press and hold the LEARN button on the next UP or DOWN operation, either manually or by using the door control or remote control. 41 Operation To Erase the Memory To Open the Door Manually ERASE ALL...
..., you could result in an open or closed if possible. 2. Pull down and back (toward the opener). The door can then be fully closed . All remote control and keyless entry codes are heard (Approximately 6 seconds). Immediately press and hold the black adjustment button on the garage door opener until the learn... GARAGE DOOR OPENER 1. Press and hold the LEARN button on the next UP or DOWN operation, either manually or by using the door control or remote control. 41 Operation To Erase the Memory To Open the Door Manually ERASE ALL...
Owners Manual
Page 42
... sure door opens and closes fully. l Connect the equipment into an outlet on , the user is unbalanced or binding, call a trained door systems technician. The Remote Control Battery To prevent possible SERIOUS INJURY or DEATH: l NEVER allow small children near batteries. To reduce risk of fire, explosion or chemical burn: l Replace...
... sure door opens and closes fully. l Connect the equipment into an outlet on , the user is unbalanced or binding, call a trained door systems technician. The Remote Control Battery To prevent possible SERIOUS INJURY or DEATH: l NEVER allow small children near batteries. To reduce risk of fire, explosion or chemical burn: l Replace...
Owners Manual
Page 44
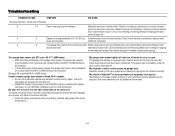
...and the Safety reversing sensors are steady and not flickering. This feature can be disabled using the door control, see page 4 or visit WiFiHelp.LiftMaster.com for more information. Check for additional information. 44 Check travel module connections, replace travel (refer to page 30). 4 5 Opener runs ...The garage door opener will NOT enter Wi-Fi® LEARN mode: l After the initial installation of your garage door opener and reprogram the remote control(s). l Weak Wi-Fi signal in the down direction. l Verify the safety reversing sensors are between A-F and 0-9 only. If the ...
...and the Safety reversing sensors are steady and not flickering. This feature can be disabled using the door control, see page 4 or visit WiFiHelp.LiftMaster.com for more information. Check for additional information. 44 Check travel module connections, replace travel (refer to page 30). 4 5 Opener runs ...The garage door opener will NOT enter Wi-Fi® LEARN mode: l After the initial installation of your garage door opener and reprogram the remote control(s). l Weak Wi-Fi signal in the down direction. l Verify the safety reversing sensors are between A-F and 0-9 only. If the ...


