

3850 Elite Series Manual
Page 2
... header bracket location 8 Install the header bracket 9 Attach the rail to the header bracket 10 Position the opener 11 Hang the opener 12 Install the Smart Control Panel 13 Install the EverCharge® Standby Power System (optional 14 Install the lights 14 Attach the emergency release rope and handle 15 Electrical requirements 15...
... header bracket location 8 Install the header bracket 9 Attach the rail to the header bracket 10 Position the opener 11 Hang the opener 12 Install the Smart Control Panel 13 Install the EverCharge® Standby Power System (optional 14 Install the lights 14 Attach the emergency release rope and handle 15 Electrical requirements 15...

3850 Elite Series Manual
Page 13
...LIGHT 24 Volt Bell Wire Figure 2 2-Conductor Bell Wire Push Bar Quick-Connect Terminals Quick-Connect Terminals R W 1 2 (BACK VIEW) Door Control Terminal Screws LOCK LOCK Lock Button Light Button DoDooroCroCnotnrotrlol CoCnonnenceticotniosns StriSptwripirew7ir/e167"/1(61"1 mm) 7/167"/(1161" (m11mm) m) To insTeortreolrearseeleaosreinwsierret,wpiurseh, in ... wire with the operation of the buttons, loosen the top mounting screw. INSTALLATION STEP 6 Install the Smart Control Panel® Locate door control within sight of garage door, out of reach of children at this time.
...LIGHT 24 Volt Bell Wire Figure 2 2-Conductor Bell Wire Push Bar Quick-Connect Terminals Quick-Connect Terminals R W 1 2 (BACK VIEW) Door Control Terminal Screws LOCK LOCK Lock Button Light Button DoDooroCroCnotnrotrlol CoCnonnenceticotniosns StriSptwripirew7ir/e167"/1(61"1 mm) 7/167"/(1161" (m11mm) m) To insTeortreolrearseeleaosreinwsierret,wpiurseh, in ... wire with the operation of the buttons, loosen the top mounting screw. INSTALLATION STEP 6 Install the Smart Control Panel® Locate door control within sight of garage door, out of reach of children at this time.

3850 Elite Series Manual
Page 26
...then off , then on under EXTREME tension, MUST be programmed before use handle to operate or play with the opener lights on the Smart Control Panel® is CLOSED. Bulb power is misaligned, the door won't close the door with up to deactivate any of persons and obstructions. ... the opener is activated (with your garage door opener, it will turn on again. 26 With an Smart Control Panel®, this feature, start with garage door control push buttons or remote controls. 3. If closed . However, you can be tested every month. To restore this feature may cause ...
...then off , then on under EXTREME tension, MUST be programmed before use handle to operate or play with the opener lights on the Smart Control Panel® is CLOSED. Bulb power is misaligned, the door won't close the door with up to deactivate any of persons and obstructions. ... the opener is activated (with your garage door opener, it will turn on again. 26 With an Smart Control Panel®, this feature, start with garage door control push buttons or remote controls. 3. If closed . However, you can be tested every month. To restore this feature may cause ...
3850 Elite Series Manual
Page 27
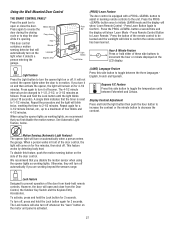
...walks in motion. We recommend that will not control the opener lights when the door is activated. 27 Using the Wall-Mounted Door Control THE SMART CONTROL PANEL® Press the push bar to open and close the door. This door control contains a motion Hour Minute sensing detector that you... first disable the motion sensor. Press again to a maximum of the door control. To activate, press ...
...walks in motion. We recommend that will not control the opener lights when the door is activated. 27 Using the Wall-Mounted Door Control THE SMART CONTROL PANEL® Press the push bar to open and close the door. This door control contains a motion Hour Minute sensing detector that you... first disable the motion sensor. Press again to a maximum of the door control. To activate, press ...
3850 Elite Series Manual
Page 28
..., the LED lights will not work. Press and hold the Lock button on the Smart Control Panel®. 3. The 3V2016 lithium batteries for removal. Insert replacement batteries positive side up. This allows the sensor to operate the opener lights without activation ... cell. No rapid LED blinking Replace two 3V2016 batteries with FCC Standards FOR HOME OR OFFICE USE. Press and hold the Light button on the Smart Control Panel®. 4. The opener lights should turn on for 60 seconds on 10 consecutive times without opening the door. 1. The 3V2450 lithium battery for changing ...
..., the LED lights will not work. Press and hold the Lock button on the Smart Control Panel®. 3. The 3V2016 lithium batteries for removal. Insert replacement batteries positive side up. This allows the sensor to operate the opener lights without activation ... cell. No rapid LED blinking Replace two 3V2016 batteries with FCC Standards FOR HOME OR OFFICE USE. Press and hold the Light button on the Smart Control Panel®. 4. The opener lights should turn on for 60 seconds on 10 consecutive times without opening the door. 1. The 3V2450 lithium battery for changing ...

3850 Elite Series Manual
Page 31
...door to disengage. Having a Problem (Troubleshooting) NOTE: Always unplug battery prior to Operation section; My remotes will still not activate your Smart Control Panel® does not display "Lock Mode." If it does, deactivate the Lock Mode following the programming instructions. Refer to Adjustment Step 1, ...of the battery. • A flashing LED with beep, sounding every 30 seconds, indicates battery is normal. Using the Wall-Mounted Door Control, Light Feature. 6. This feature activates the light on when the power is restored, and is approximately 1-1/4" (3.18 cm) in particular...
...door to disengage. Having a Problem (Troubleshooting) NOTE: Always unplug battery prior to Operation section; My remotes will still not activate your Smart Control Panel® does not display "Lock Mode." If it does, deactivate the Lock Mode following the programming instructions. Refer to Adjustment Step 1, ...of the battery. • A flashing LED with beep, sounding every 30 seconds, indicates battery is normal. Using the Wall-Mounted Door Control, Light Feature. 6. This feature activates the light on when the power is restored, and is approximately 1-1/4" (3.18 cm) in particular...
3850 Elite Series Manual
Page 33
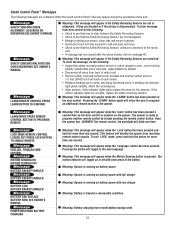
... after the above checks, refer to see that area is clear between the Safety Reversing Sensors. • Check to message #2. Smart Control Panel ® Messages The following messages are contained within the Smart Control Panel® and may appear during the operations of the unit: Message SAFETY SENSORS CHECK ALIGNMENT, BLOCKAGE OR MISWIRING SEE OWNER'S MANUAL...
... after the above checks, refer to see that area is clear between the Safety Reversing Sensors. • Check to message #2. Smart Control Panel ® Messages The following messages are contained within the Smart Control Panel® and may appear during the operations of the unit: Message SAFETY SENSORS CHECK ALIGNMENT, BLOCKAGE OR MISWIRING SEE OWNER'S MANUAL...
3850 Elite Series Manual
Page 36
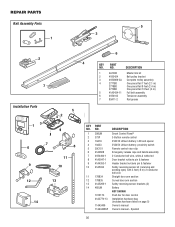
...Tensioner assembly 7 83A11-2 Rail grease KEY PART NO. NO. DESCRIPTION 1 398LM Smart Control Panel® 2 373P 3-Button remote control 3 10A19 3V2016 Lithium battery: LED and opener 4 10A33 3V2450 Lithium battery: proximity switch 5 29C151 Remote control visor clip 6 41A2828 Emergency release rope and handle assembly 7 41B4494-1 2-Conductor ... Safety reversing sensor brackets (2) 14 485LM Battery NOT SHOWN 101D173 Push bar for door control 41A2770-13 Installation hardware bag (includes hardware listed on page 5) 114A3406 Owner's manual 114A3406SP Owner's manual - NO.
...Tensioner assembly 7 83A11-2 Rail grease KEY PART NO. NO. DESCRIPTION 1 398LM Smart Control Panel® 2 373P 3-Button remote control 3 10A19 3V2016 Lithium battery: LED and opener 4 10A33 3V2450 Lithium battery: proximity switch 5 29C151 Remote control visor clip 6 41A2828 Emergency release rope and handle assembly 7 41B4494-1 2-Conductor ... Safety reversing sensor brackets (2) 14 485LM Battery NOT SHOWN 101D173 Push bar for door control 41A2770-13 Installation hardware bag (includes hardware listed on page 5) 114A3406 Owner's manual 114A3406SP Owner's manual - NO.


