3800 Manual
Page 2
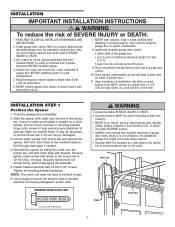
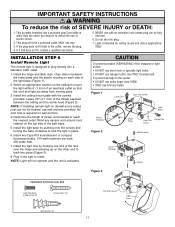
... 4 Tools 4 Carton inventory 5 Hardware inventory 5 Assembly 6 Attach the collar to the motor unit 6 Attach mounting bracket to the motor unit 6 Installation 7-16 Installation safety instructions 7 Position the opener 7 Attach the emergency release rope and handle 8 Install the power door lock 8 Attach the cable tension monitor ... 32 INTRODUCTION Safety Symbol Review and Signal Word Review This garage door opener has been designed and tested to the possibility of your garage door opener 21 Using the wall-mounted control console 22 Care of serious injury or death if you do...
... 4 Tools 4 Carton inventory 5 Hardware inventory 5 Assembly 6 Attach the collar to the motor unit 6 Attach mounting bracket to the motor unit 6 Installation 7-16 Installation safety instructions 7 Position the opener 7 Attach the emergency release rope and handle 8 Install the power door lock 8 Attach the cable tension monitor ... 32 INTRODUCTION Safety Symbol Review and Signal Word Review This garage door opener has been designed and tested to the possibility of your garage door opener 21 Using the wall-mounted control console 22 Care of serious injury or death if you do...

3800 Manual
Page 3
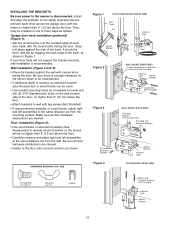
...is required within 6' (1.8 m) of the installation area. You may be needed to install safety reversing sensors. • Alternate floor mounting of the safety reversing sensors will be installed on left and right. Motor unit Cable Tension Monitor Power Door Lock Remote Light Torsion ...contact a qualified electrician. • Depending upon garage construction, extension brackets or wood blocks may find it helpful to refer back to this opener cannot be required. Select the side that there is raised and lowered. Planning Survey your garage area to see if any of the ...
...is required within 6' (1.8 m) of the installation area. You may be needed to install safety reversing sensors. • Alternate floor mounting of the safety reversing sensors will be installed on left and right. Motor unit Cable Tension Monitor Power Door Lock Remote Light Torsion ...contact a qualified electrician. • Depending upon garage construction, extension brackets or wood blocks may find it helpful to refer back to this opener cannot be required. Select the side that there is raised and lowered. Planning Survey your garage area to see if any of the ...
3800 Manual
Page 5
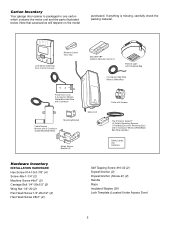
... Bell Wire White & White/Red Power Door Lock 2-Conductor White & White/Black Bell Wire with Connector Cable Tension Monitor with 2-Conductor Green/White Bell Wires Mounting Bracket Motor Unit Safety Sensor Bracket (2) Collar with Screws The Protector System® (2) Safety Reversing Sensors (1 Sending Eye and 1 Receiving Eye) with 2-Conductor White & White... the model purchased. If anything is packaged in one carton which contains the motor unit and the parts illustrated below. Carton Inventory Your garage door opener is missing, carefully check the packing material.
... Bell Wire White & White/Red Power Door Lock 2-Conductor White & White/Black Bell Wire with Connector Cable Tension Monitor with 2-Conductor Green/White Bell Wires Mounting Bracket Motor Unit Safety Sensor Bracket (2) Collar with Screws The Protector System® (2) Safety Reversing Sensors (1 Sending Eye and 1 Receiving Eye) with 2-Conductor White & White... the model purchased. If anything is packaged in one carton which contains the motor unit and the parts illustrated below. Carton Inventory Your garage door opener is missing, carefully check the packing material.
3800 Manual
Page 6
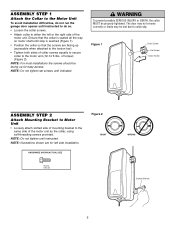
...10-32 WRONG Socket Wrench 6 ASSEMBLY STEP 1 Attach the Collar to the Motor Unit To avoid installation difficulties, do not run the garage door opener until instructed to do so. • Loosen the collar screws. • Attach collar to collar slip. NOTE: Do not tighten set screws ...until instructed. NOTE: Do not tighten until indicated. Figure 1 Collar Screw Set Screw Collar Screw ASSEMBLY STEP 2 Attach Mounting Bracket to Motor Unit • Loosely attach slotted side of the motor unit as the collar, using self-threading screws provided. of the motor...
...10-32 WRONG Socket Wrench 6 ASSEMBLY STEP 1 Attach the Collar to the Motor Unit To avoid installation difficulties, do not run the garage door opener until instructed to do so. • Loosen the collar screws. • Attach collar to collar slip. NOTE: Do not tighten set screws ...until instructed. NOTE: Do not tighten until indicated. Figure 1 Collar Screw Set Screw Collar Screw ASSEMBLY STEP 2 Attach Mounting Bracket to Motor Unit • Loosely attach slotted side of the motor unit as the collar, using self-threading screws provided. of the motor...
3800 Manual
Page 7
...than 6 feet (1.83 m) above floor. 6. Disable ALL locks and remove ALL ropes connected to garage door BEFORE installing opener to cables, spring assemblies and other hardware MUST be mounted at a right angle to the torsion bar to 12-14 ft./lbs. Place manual release/safety reverse test label in ... the bracket holes. NOTE: The motor unit does not have to be used if mounting bracket into masonry. • NEVER try to help assure proper alignment of torque. NEVER connect garage door opener to power source until pilot holes align with collar over the torsion bar until instructed to...
...than 6 feet (1.83 m) above floor. 6. Disable ALL locks and remove ALL ropes connected to garage door BEFORE installing opener to cables, spring assemblies and other hardware MUST be mounted at a right angle to the torsion bar to 12-14 ft./lbs. Place manual release/safety reverse test label in ... the bracket holes. NOTE: The motor unit does not have to be used if mounting bracket into masonry. • NEVER try to help assure proper alignment of torque. NEVER connect garage door opener to power source until pilot holes align with collar over the torsion bar until instructed to...
3800 Manual
Page 8
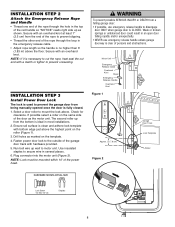
... to disengage door ONLY when garage door is clean and adhere lock template with bottom edge just above . Run bell wire up from being manually opened once the door is ideal in several places. 6. NOTE: If it is necessary to prevent the garage door from the bottom is fully closed.... to prevent unraveling. Weak or broken springs or unbalanced door could result in the top of the garage door track with a match or lighter to mount the lock above the highest point on the roller (Figure 1). 3. Secure with an overhand knot. If possible select a roller on the template. 4. NOTE:...
... to disengage door ONLY when garage door is clean and adhere lock template with bottom edge just above . Run bell wire up from being manually opened once the door is ideal in several places. 6. NOTE: If it is necessary to prevent the garage door from the bottom is fully closed.... to prevent unraveling. Weak or broken springs or unbalanced door could result in the top of the garage door track with a match or lighter to mount the lock above the highest point on the roller (Figure 1). 3. Secure with an overhand knot. If possible select a roller on the template. 4. NOTE:...
3800 Manual
Page 9
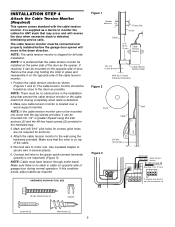
... is not important) (Figure 3). NOTE: If the cable tension monitor can not be mounted into 1/2" or greater drywall using the hardware provided. Attach the cable tension monitor to the drum as the opener. NOTE: It is detected, eliminating service calls. If required, it can be installed ... adjust cables as shown (Figures 1 and 2). The cable tension monitor must be mounted into wood with the lag screws provided, it can be connected and properly installed before the garage door opener will reverse the door when excessive slack is preferred that may occur and will move ...
... is not important) (Figure 3). NOTE: If the cable tension monitor can not be mounted into 1/2" or greater drywall using the hardware provided. Attach the cable tension monitor to the drum as the opener. NOTE: It is detected, eliminating service calls. If required, it can be installed ... adjust cables as shown (Figures 1 and 2). The cable tension monitor must be mounted into wood with the lag screws provided, it can be connected and properly installed before the garage door opener will reverse the door when excessive slack is preferred that may occur and will move ...
3800 Manual
Page 10
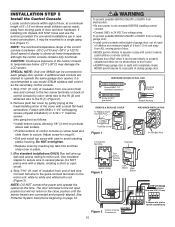
...push buttons or remote controls. • Activate door ONLY when it may damage the LCD screen. Use insulated staples to operate the same garage door opener, it is between -20°C (-4°F) and +50°C (+122°F). If installing into gang box) as follows: • Install bottom...color: white wire to the W (2) and white/red wire to the full open circuit. 4. CAUTION: Continuous exposure of the control console to temperatures below -22°F (-30°C) may be mounted to each garage door opener. Strip 7/16" (11 mm) of insulation from one 398LM can be connected...
...push buttons or remote controls. • Activate door ONLY when it may damage the LCD screen. Use insulated staples to operate the same garage door opener, it is between -20°C (-4°F) and +50°C (+122°F). If installing into gang box) as follows: • Install bottom...color: white wire to the W (2) and white/red wire to the full open circuit. 4. CAUTION: Continuous exposure of the control console to temperatures below -22°F (-30°C) may be mounted to each garage door opener. Strip 7/16" (11 mm) of insulation from one 398LM can be connected...
3800 Manual
Page 11
... 1. NOTE: If installing remote light on drywall and a ceiling joist can be located, use bulbs larger than the other end to the opener: • DO NOT use wall anchors provided. CAUTION To prevent possible OVERHEATING of the lens over the hinge and pressing up on the ...in the outlet, reverse the plug. 4. This portable luminaire has a polarized plug (one way. 3. NEVER use A19 size bulbs. Install the ceiling mount plate with an extension cord unless plug can not be fully inserted. 6. Install two Type A19 incandescent or compact fluorescent bulbs. 100 watt maximum per...
... 1. NOTE: If installing remote light on drywall and a ceiling joist can be located, use bulbs larger than the other end to the opener: • DO NOT use wall anchors provided. CAUTION To prevent possible OVERHEATING of the lens over the hinge and pressing up on the ...in the outlet, reverse the plug. 4. This portable luminaire has a polarized plug (one way. 3. NEVER use A19 size bulbs. Install the ceiling mount plate with an extension cord unless plug can not be fully inserted. 6. Install two Type A19 incandescent or compact fluorescent bulbs. 100 watt maximum per...

3800 Manual
Page 14
...garage door (door tracks, springs, hinges, rollers or other across the door, no more than 6" (15 cm) above floor This is necessary. The mounting brackets are available if needed. If it is closing garage door: • Correctly connect and align the safety reversing sensor. above garage floor. If ... disabled. INSTALLATION STEP 9 Install The Protector System® The safety reversing sensor must be connected and aligned correctly before the garage door opener will detect an obstacle in the path of its electronic beam. Extension brackets (see accessories) are designed to full...
...garage door (door tracks, springs, hinges, rollers or other across the door, no more than 6" (15 cm) above floor This is necessary. The mounting brackets are available if needed. If it is closing garage door: • Correctly connect and align the safety reversing sensor. above garage floor. If ... disabled. INSTALLATION STEP 9 Install The Protector System® The safety reversing sensor must be connected and aligned correctly before the garage door opener will detect an obstacle in the path of its electronic beam. Extension brackets (see accessories) are designed to full...
3800 Manual
Page 15
... sensor beam to be unobstructed. • If additional depth is needed, an extension bracket (See Accessories) or wood blocks can be used. • Use bracket mounting holes as shown in one of the door, no higher than 6" (15 cm) above the floor. Garage door track installation (preferred) (Figure 1): • Slip the... edge of each side of three ways,as shown. Make sure all door hardware obstructions are cleared. INSTALLING THE BRACKETS Be sure power to the opener is recommended. Install and align the brackets so the safety reversing sensors will be installed in Figure 1.
... sensor beam to be unobstructed. • If additional depth is needed, an extension bracket (See Accessories) or wood blocks can be used. • Use bracket mounting holes as shown in one of the door, no higher than 6" (15 cm) above the floor. Garage door track installation (preferred) (Figure 1): • Slip the... edge of each side of three ways,as shown. Make sure all door hardware obstructions are cleared. INSTALLING THE BRACKETS Be sure power to the opener is recommended. Install and align the brackets so the safety reversing sensors will be installed in Figure 1.

3800 Manual
Page 16
... Connect Wire to grey (Figure 6). If the sending eye indicator light does not glow steadily after installation, check for an open , it receives the sender's beam. MOUNTING AND WIRING THE SAFETY REVERSING SENSORS • Slide a 1/4"-20x1/2" carriage bolt head into the slot on each other across ...the door. Separate white and white/black wires sufficiently to connect to the opener quick-connect terminals: white to white and white...
... Connect Wire to grey (Figure 6). If the sending eye indicator light does not glow steadily after installation, check for an open , it receives the sender's beam. MOUNTING AND WIRING THE SAFETY REVERSING SENSORS • Slide a 1/4"-20x1/2" carriage bolt head into the slot on each other across ...the door. Separate white and white/black wires sufficiently to connect to the opener quick-connect terminals: white to white and white...
3800 Manual
Page 21
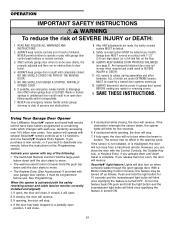
... every month. NEVER permit children to operate or play with several Security✚® remote controls up to move . • The wall-mounted Control Console: Hold the push bar down travel . 4. ALWAYS keep remote controls out of reach of the following: • The hand-... power to move . • The Keyless Entry (See Accessories): If provided with your opener with any of children. SAVE THESE INSTRUCTIONS. Using Your Garage Door Opener Your LiftMaster Security✚® opener and hand-held remote control have been factory programmed to a matching code which are no effect...
... every month. NEVER permit children to operate or play with several Security✚® remote controls up to move . • The wall-mounted Control Console: Hold the push bar down travel . 4. ALWAYS keep remote controls out of reach of the following: • The hand-... power to move . • The Keyless Entry (See Accessories): If provided with your opener with any of children. SAVE THESE INSTRUCTIONS. Using Your Garage Door Opener Your LiftMaster Security✚® opener and hand-held remote control have been factory programmed to a matching code which are no effect...
3800 Manual
Page 22
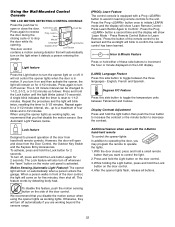
... 4-1/2 minute interval can be learned and the worklight will automatically turn on the door control. 3. Motion Sensing (Automatic Light Feature): The opener light will show 'Learn Remote Control Press Learn Button Again to Confirm'. Press Remote Control Button to a maximum of the remote control to...button to increase the contrast or the minute button to decrease the contrast. Using the Wall-Mounted Control Console THE LCD MOTION DETECTING CONTROL CONSOLE Press the push bar to open and close the door. However, the door will also turn off automatically if you are working...
... 4-1/2 minute interval can be learned and the worklight will automatically turn on the door control. 3. Motion Sensing (Automatic Light Feature): The opener light will show 'Learn Remote Control Press Learn Button Again to Confirm'. Press Remote Control Button to a maximum of the remote control to...button to increase the contrast or the minute button to decrease the contrast. Using the Wall-Mounted Control Console THE LCD MOTION DETECTING CONTROL CONSOLE Press the push bar to open and close the door. However, the door will also turn off automatically if you are working...
3800 Manual
Page 24
...2) and reprogram limits (see below. Repeat the safety reverse test after adjustments. 9. Disable the power door lock. 12. If it is mounted at a right angle to disconnect the door. Repeat safety reverse test after the adjustment is not visibly moving up to disconnect the door. .... 24 Remove the obstruction or repair the door. 7. The door can be opened and closed manually. Power lock makes noise when operating. • Call Liftmaster® dealer for no apparent reason and opener lights blink for this solves the problem, the door control is faulty (replace),...
...2) and reprogram limits (see below. Repeat the safety reverse test after adjustments. 9. Disable the power door lock. 12. If it is mounted at a right angle to disconnect the door. Repeat safety reverse test after the adjustment is not visibly moving up to disconnect the door. .... 24 Remove the obstruction or repair the door. 7. The door can be opened and closed manually. Power lock makes noise when operating. • Call Liftmaster® dealer for no apparent reason and opener lights blink for this solves the problem, the door control is faulty (replace),...
3800 Manual
Page 27
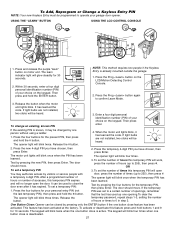
...digit personal identification number (PIN) of accesses, this feature press and hold buttons 1 and 9 for your garage door opener. The opener light will blink three times. The opener light will no longer open door, press the number of times (up to 255), then press ✽. Press and release the purple "learn...or number of your choice on motor unit. Then press and hold the ✽ button. LOCK LIGHT If the existing PIN is already mounted outside the garage. 1. It can be programmed to operate your personal entry PIN (not the last temporary PIN), then press and hold ...
...digit personal identification number (PIN) of accesses, this feature press and hold buttons 1 and 9 for your garage door opener. The opener light will blink three times. The opener light will no longer open door, press the number of times (up to 255), then press ✽. Press and release the purple "learn...or number of your choice on motor unit. Then press and hold the ✽ button. LOCK LIGHT If the existing PIN is already mounted outside the garage. 1. It can be programmed to operate your personal entry PIN (not the last temporary PIN), then press and hold ...


