3585 Elite Series Manual
Page 1
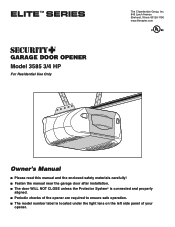
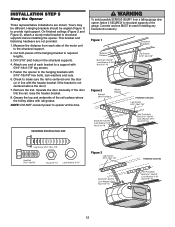
® GARAGE DOOR OPENER Model 3585 3/4 HP For Residential Use Only The Chamberlain Group, Inc. 845 Larch Avenue Elmhurst, Illinois 60126-1196 www.liftmaster.com Owner's Manual ■ Please read this manual and the enclosed safety materials carefully! ■ Fasten the manual near the garage door after installation. ■ The door WILL NOT CLOSE unless the...
® GARAGE DOOR OPENER Model 3585 3/4 HP For Residential Use Only The Chamberlain Group, Inc. 845 Larch Avenue Elmhurst, Illinois 60126-1196 www.liftmaster.com Owner's Manual ■ Please read this manual and the enclosed safety materials carefully! ■ Fasten the manual near the garage door after installation. ■ The door WILL NOT CLOSE unless the...
3585 Elite Series Manual
Page 2
...you do not comply with the instructions and warnings contained in strict accordance with the warnings that accompany it. Mechanical Electrical When you see this manual. Read the warnings carefully. When you see these Safety Symbols and Signal Words on the following pages, they will alert you to the ...instructions 26 Using your garage door opener 26 Using the wall-mounted door control 27 Using the remote control 28 To open the door manually 29 Care of your garage door and/or the garage door opener if you do not comply with the cautionary statements that accompany them...
...you do not comply with the instructions and warnings contained in strict accordance with the warnings that accompany it. Mechanical Electrical When you see this manual. Read the warnings carefully. When you see these Safety Symbols and Signal Words on the following pages, they will alert you to the ...instructions 26 Using your garage door opener 26 Using the wall-mounted door control 27 Using the remote control 28 To open the door manually 29 Care of your garage door and/or the garage door opener if you do not comply with the cautionary statements that accompany them...
3585 Elite Series Manual
Page 7
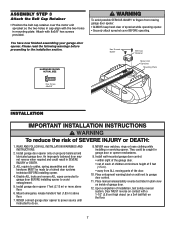
... the motor unit sprocket so the two holes in cap align with the two holes in plain view on inside of garage door. 12. Place manual release/safety reverse test label in mounting plate. An improperly balanced door may 9. Please read the following warnings before proceeding to fingers from ALL moving...
... the motor unit sprocket so the two holes in cap align with the two holes in plain view on inside of garage door. 12. Place manual release/safety reverse test label in mounting plate. An improperly balanced door may 9. Please read the following warnings before proceeding to fingers from ALL moving...
3585 Elite Series Manual
Page 12
... are not provided. 1. This bracket and fastening hardware are shown. Check to make sure the rail is not centered above the door). 7. Operate the door manually. Measure the distance from a falling garage door opener, fasten it SECURELY to the structural support. 2. Attach one end of the motor unit to structural supports...
... are not provided. 1. This bracket and fastening hardware are shown. Check to make sure the rail is not centered above the door). 7. Operate the door manually. Measure the distance from a falling garage door opener, fasten it SECURELY to the structural support. 2. Attach one end of the motor unit to structural supports...

3585 Elite Series Manual
Page 22
...Door Arm Connector Hole Emergency Release Handle Closed Door Inner Trolley Outer Trolley Correct Angle Door Arm Open Door Door with the remaining clevis pin. Manually raise the door to the open as shown on the following page, the door should not have a "backward" slant when fully open position ...), and lift the door arm to the trolley. NOTE: When setting the up limit on page 23. Press the door control push button. Manually close the door and lift the door arm to the trolley. Limit adjustment screws are located on the left side panel as illustrated below . ...
...Door Arm Connector Hole Emergency Release Handle Closed Door Inner Trolley Outer Trolley Correct Angle Door Arm Open Door Door with the remaining clevis pin. Manually raise the door to the open as shown on the following page, the door should not have a "backward" slant when fully open position ...), and lift the door arm to the trolley. NOTE: When setting the up limit on page 23. Press the door control push button. Manually close the door and lift the door arm to the trolley. Limit adjustment screws are located on the left side panel as illustrated below . ...

3585 Elite Series Manual
Page 23
.... Turn the down limit adjustment screw counterclockwise. HOW AND WHEN TO ADJUST THE LIMITS • If the door does not open and close the door. Manually open completely but opens at least 5 feet (1.5 m): Increase up or down travel. Run the opener through a complete travel cycle. • Does the door open ) force...
.... Turn the down limit adjustment screw counterclockwise. HOW AND WHEN TO ADJUST THE LIMITS • If the door does not open and close the door. Manually open completely but opens at least 5 feet (1.5 m): Increase up or down travel. Run the opener through a complete travel cycle. • Does the door open ) force...

3585 Elite Series Manual
Page 29
... not require additional lubrication. The door can then be fully closed . Follow the instructions carefully. Make any adjustment of operation. MANUAL DISCONNECT POSITION Trolley Release Arm Emergency Release Handle (Down and Back) NOTICE LOCKOUT POSITION CARE OF YOUR OPENER LIMIT AND FORCE ADJUSTMENTS...falling rapidly and/or unexpectedly. • NEVER use handle to be sure door opens and closes fully. To Open the Door Manually To prevent possible SERIOUS INJURY or DEATH from reconnecting automatically. Adjust limits and/or force if necessary. (See pages 23 and ...
... not require additional lubrication. The door can then be fully closed . Follow the instructions carefully. Make any adjustment of operation. MANUAL DISCONNECT POSITION Trolley Release Arm Emergency Release Handle (Down and Back) NOTICE LOCKOUT POSITION CARE OF YOUR OPENER LIMIT AND FORCE ADJUSTMENTS...falling rapidly and/or unexpectedly. • NEVER use handle to be sure door opens and closes fully. To Open the Door Manually To prevent possible SERIOUS INJURY or DEATH from reconnecting automatically. Adjust limits and/or force if necessary. (See pages 23 and ...

3585 Elite Series Manual
Page 30
...adjustment screw clockwise. 6. This relieves the tension. • Run the motor unit from the opener by pulling the Emergency Release Rope. • Manually bring the door to a closed position. • Loosen the belt by adjusting the outer nut 4 to Operation section; Using the Wall Mounted Door... and DOWN Travel Limits. My door reverses for flashes on motor unit then refer to disengage. • Decrease the UP travel . • Manually check door for Using the Wall Mounted Door Control. • Reprogram remotes following page. 2. Trolley 5. My door will move away from the arrow...
...adjustment screw clockwise. 6. This relieves the tension. • Run the motor unit from the opener by pulling the Emergency Release Rope. • Manually bring the door to a closed position. • Loosen the belt by adjusting the outer nut 4 to Operation section; Using the Wall Mounted Door... and DOWN Travel Limits. My door reverses for flashes on motor unit then refer to disengage. • Decrease the UP travel . • Manually check door for Using the Wall Mounted Door Control. • Reprogram remotes following page. 2. Trolley 5. My door will move away from the arrow...
3585 Elite Series Manual
Page 32
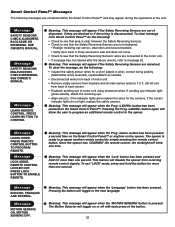
... safety sensors from brackets and shorten sensor wires to 1-2 ft. (30-60 cm) from back of each press of the button. 32 SEE OWNER'S MANUAL. SEE OWNER'S MANUAL. Message LEARN MODE. PRESS LOCK BUTTON TO ENABLE REMOTE. Message ENGLISH, FRANÇAIS AND ESPAÑOL. The Motion Detector will allow the...
... safety sensors from brackets and shorten sensor wires to 1-2 ft. (30-60 cm) from back of each press of the button. 32 SEE OWNER'S MANUAL. SEE OWNER'S MANUAL. Message LEARN MODE. PRESS LOCK BUTTON TO ENABLE REMOTE. Message ENGLISH, FRANÇAIS AND ESPAÑOL. The Motion Detector will allow the...
3585 Elite Series Manual
Page 35
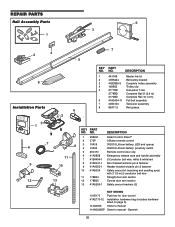
... section Safety sensor brackets (2) NOT SHOWN 101D173 Push bar for door control 41A2770-12 Installation hardware bag (includes hardware 14 listed on page 5). 114A3396 Owner's manual 114A3396SP Owner's manual - NO. REPAIR PARTS Rail Assembly Parts 6 3 1 7 2 4 5 KEY PART NO. Spanish 35
... section Safety sensor brackets (2) NOT SHOWN 101D173 Push bar for door control 41A2770-12 Installation hardware bag (includes hardware 14 listed on page 5). 114A3396 Owner's manual 114A3396SP Owner's manual - NO. REPAIR PARTS Rail Assembly Parts 6 3 1 7 2 4 5 KEY PART NO. Spanish 35

3585 Elite Series Manual
Page 37
... opener remote or from anywhere in the garage. 990LM Surge Protector: The Garage Door Opener Surge Protector is open garage door manually from outside radio signals while you if your home! Enhanced functions include Lock Feature to lock out outside by adding additional sensor...3-Button Mini-Remote Control with Security✚®: With key ring and fastening strip. 377LM 395LM 378LM Wireless Keyless Entry with an additional LiftMaster Security✚® remote. Combine up to three controls into one wall control panel for a neat compact appearance. This temporary password can...
... opener remote or from anywhere in the garage. 990LM Surge Protector: The Garage Door Opener Surge Protector is open garage door manually from outside radio signals while you if your home! Enhanced functions include Lock Feature to lock out outside by adding additional sensor...3-Button Mini-Remote Control with Security✚®: With key ring and fastening strip. 377LM 395LM 378LM Wireless Keyless Entry with an additional LiftMaster Security✚® remote. Combine up to three controls into one wall control panel for a neat compact appearance. This temporary password can...


