
Getting Started
Page 2
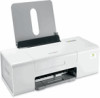
Lexmark is near the product and easily accessible. For complete descriptions: • Windows users-See the User's Guide. • Macintosh users-If your product supports Macintosh, see the Mac Help installed with this product or make any electrical or cabling connections, such as ...the power supply cord or telephone, during a lightning storm. Refer service or repairs, other replacement parts. SAVE THESE INSTRUCTIONS. The safety features of specific Lexmark ...
Lexmark is near the product and easily accessible. For complete descriptions: • Windows users-See the User's Guide. • Macintosh users-If your product supports Macintosh, see the Mac Help installed with this product or make any electrical or cabling connections, such as ...the power supply cord or telephone, during a lightning storm. Refer service or repairs, other replacement parts. SAVE THESE INSTRUCTIONS. The safety features of specific Lexmark ...
Getting Started
Page 5
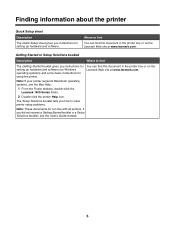
...or a Setup Solutions booklet, see the Mac Help: 1 From the Finder desktop, double-click the Lexmark 1400 Series folder. 2 Double-click the printer Help icon. Note: If your printer supports Macintosh operating systems, see the User's Guide instead. 5 Getting Started or Setup Solutions booklet Description Where...printer Quick Setup sheet Description The Quick Setup sheet gives you instructions for setting up hardware and software (on the Lexmark Web site at www.lexmark.com. Where to solve printer setup problems. Note: These documents do not ship with all printers. You can ...
...or a Setup Solutions booklet, see the Mac Help: 1 From the Finder desktop, double-click the Lexmark 1400 Series folder. 2 Double-click the printer Help icon. Note: If your printer supports Macintosh operating systems, see the User's Guide instead. 5 Getting Started or Setup Solutions booklet Description Where...printer Quick Setup sheet Description The Quick Setup sheet gives you instructions for setting up hardware and software (on the Lexmark Web site at www.lexmark.com. Where to solve printer setup problems. Note: These documents do not ship with all printers. You can ...
Getting Started
Page 6
... to the User's Guide is the letter of the User's Guide appears on the Lexmark Web site at www.lexmark.com. An icon of your CD-ROM • Connecting the printer to a network (if supported by your printer) The installation screen appears. • Maintaining the printer Note: If...Guide gives you instructions for using the When you instructions for using the software, if While in any Lexmark software program, click Help, your printer connects to a computer. Note: If your printer supports Macintosh operating systems, see the Mac Help: 4 Click Yes. 1 From the Finder desktop, double...
... to the User's Guide is the letter of the User's Guide appears on the Lexmark Web site at www.lexmark.com. An icon of your CD-ROM • Connecting the printer to a network (if supported by your printer) The installation screen appears. • Maintaining the printer Note: If...Guide gives you instructions for using the When you instructions for using the software, if While in any Lexmark software program, click Help, your printer connects to a computer. Note: If your printer supports Macintosh operating systems, see the Mac Help: 4 Click Yes. 1 From the Finder desktop, double...
Getting Started
Page 7
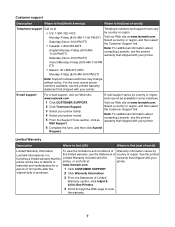
... www.lexmark.com. materials and workmanship for a www.lexmark.com. E-mail support For e-mail support, visit our Web site: www.lexmark.com. Select a country or region, and then select the Customer Support link. Mail Support. period of world) Telephone support Call us at printer. Customer support Description ...00 AM- 11:00 PM ET) Saturday (Noon-6:00 PM ET) Telephone numbers and support hours vary by country or region. Note: For additional information about contacting Lexmark, see the printed warranty statement that shipped with your printer. 6 Complete the form, ...
... www.lexmark.com. materials and workmanship for a www.lexmark.com. E-mail support For e-mail support, visit our Web site: www.lexmark.com. Select a country or region, and then select the Customer Support link. Mail Support. period of world) Telephone support Call us at printer. Customer support Description ...00 AM- 11:00 PM ET) Saturday (Noon-6:00 PM ET) Telephone numbers and support hours vary by country or region. Note: For additional information about contacting Lexmark, see the printed warranty statement that shipped with your printer. 6 Complete the form, ...
Getting Started
Page 11
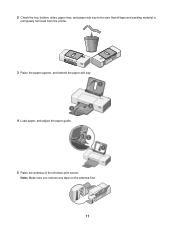
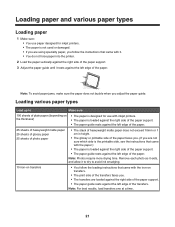
2 Check the top, bottom, sides, paper tray, and paper exit tray to be sure that all tape and packing material is completely removed from the printer. 3 Raise the paper support, and extend the paper exit tray. 4 Load paper, and adjust the paper guide. 5 Raise the antenna of the wireless print server. Note: Make sure you remove any tape on the antenna first. 11
2 Check the top, bottom, sides, paper tray, and paper exit tray to be sure that all tape and packing material is completely removed from the printer. 3 Raise the paper support, and extend the paper exit tray. 4 Load paper, and adjust the paper guide. 5 Raise the antenna of the wireless print server. Note: Make sure you remove any tape on the antenna first. 11

Getting Started
Page 23
Connect the printer to a wireless network. 23 Use the 8 Paper support To Load paper. 1 Use the 1 USB port 2 Power supply 2 3 To Connect the printer to a computer using . 2 1 3 If the light is not on, press . 3 Internal wireless adapter Connect to a power source using the power cord. 1 Plug the power cord all the way into the power supply on the printer. 2 Plug the power cord into an electrical outlet that other electrical devices have been using a USB cable.
Connect the printer to a wireless network. 23 Use the 8 Paper support To Load paper. 1 Use the 1 USB port 2 Power supply 2 3 To Connect the printer to a computer using . 2 1 3 If the light is not on, press . 3 Internal wireless adapter Connect to a power source using the power cord. 1 Plug the power cord all the way into the power supply on the printer. 2 Plug the power cord into an electrical outlet that other electrical devices have been using a USB cable.
Getting Started
Page 34
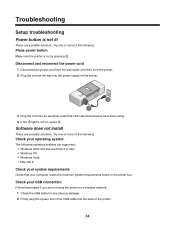
.... Try one or more of the following: Check your operating system The following : Press power button Make sure the printer is not lit These are supported: • Windows 2000 with Service Pack 3 or later • Windows XP • Windows Vista • Mac OS X Check your system requirements Check that other electrical...
.... Try one or more of the following: Check your operating system The following : Press power button Make sure the printer is not lit These are supported: • Windows 2000 with Service Pack 3 or later • Windows XP • Windows Vista • Mac OS X Check your system requirements Check that other electrical...

Getting Started
Page 56
... any existing intellectual property right may be made to the information herein; Changes are periodically made at any time. For Lexmark technical support, visit support.lexmark.com. Any reference to a product, program, or service is a trademark of Lexmark International, Inc. If you don't have access to the Internet, you . All rights reserved. Notices Product name...
... any existing intellectual property right may be made to the information herein; Changes are periodically made at any time. For Lexmark technical support, visit support.lexmark.com. Any reference to a product, program, or service is a trademark of Lexmark International, Inc. If you don't have access to the Internet, you . All rights reserved. Notices Product name...

Getting Started
Page 59
... the back of WPA. Other possible security settings are less likely to support this. To find the UAA, print a network setup page and look for the UAA listing. A device that connects wireless devices together to form a wireless network A ...
... the back of WPA. Other possible security settings are less likely to support this. To find the UAA, print a network setup page and look for the UAA listing. A device that connects wireless devices together to form a wireless network A ...

User's Guide
Page 2
... supply and power supply cord. For complete descriptions: • Windows users-See the User's Guide. • Macintosh users-If your product supports Macintosh, see the Mac Help installed with the printer software. The safety features of other than those described in the user documentation, to meet... strict global safety standards with the use of specific Lexmark components. Connect the power supply cord to a properly grounded electrical outlet that is not responsible for the use this product near the...
... supply and power supply cord. For complete descriptions: • Windows users-See the User's Guide. • Macintosh users-If your product supports Macintosh, see the Mac Help installed with the printer software. The safety features of other than those described in the user documentation, to meet... strict global safety standards with the use of specific Lexmark components. Connect the power supply cord to a properly grounded electrical outlet that is not responsible for the use this product near the...
User's Guide
Page 4
... cartridge nozzles ...34 Wiping the print cartridge nozzles and contacts 35 Preserving the print cartridges...36 Ordering supplies...36 Using genuine Lexmark print cartridges 37 Refilling a print cartridge...37 Recycling Lexmark products...37 Troubleshooting...38 Setup troubleshooting...38 Power light is not lit...38 Software does not install ...38 Page does not... graphic quality ...43 Partial document or photo prints...44 Jams and misfeeds troubleshooting 44 Paper jam in the printer ...44 Paper jam in the paper support ...44 4
... cartridge nozzles ...34 Wiping the print cartridge nozzles and contacts 35 Preserving the print cartridges...36 Ordering supplies...36 Using genuine Lexmark print cartridges 37 Refilling a print cartridge...37 Recycling Lexmark products...37 Troubleshooting...38 Setup troubleshooting...38 Power light is not lit...38 Software does not install ...38 Page does not... graphic quality ...43 Partial document or photo prints...44 Jams and misfeeds troubleshooting 44 Paper jam in the printer ...44 Paper jam in the paper support ...44 4

User's Guide
Page 7
Note: If your printer supports Macintosh operating systems, see the User's Guide instead. 7 The Setup Solutions booklet tells you did not receive a Getting Started booklet or a Setup Solutions booklet, see the Mac Help: 1 From the Finder desktop, double-click the Lexmark 1400 Series folder. 2 Double-click the ...You can find this document in the printer box or on the Lexmark Web site at www.lexmark.com. You can find this document in the printer box or on the Lexmark Web site at www.lexmark.com. Finding information about the printer Quick Setup sheet Description The ...
Note: If your printer supports Macintosh operating systems, see the User's Guide instead. 7 The Setup Solutions booklet tells you did not receive a Getting Started booklet or a Setup Solutions booklet, see the Mac Help: 1 From the Finder desktop, double-click the Lexmark 1400 Series folder. 2 Double-click the ...You can find this document in the printer box or on the Lexmark Web site at www.lexmark.com. You can find this document in the printer box or on the Lexmark Web site at www.lexmark.com. Finding information about the printer Quick Setup sheet Description The ...
User's Guide
Page 8
... Programs Œ connects to the User's Guide is not on your desktop, • Scanning (if supported by your printer) follow these instructions: • Making copies (if supported by your printer) 1 Insert the CD. • Faxing (if supported by drive. Lexmark 1400 Series. 2 Select Lexmark Solution Center. 8 your desktop, and the User's Guide appears on the...
... Programs Œ connects to the User's Guide is not on your desktop, • Scanning (if supported by your printer) follow these instructions: • Making copies (if supported by your printer) 1 Insert the CD. • Faxing (if supported by drive. Lexmark 1400 Series. 2 Select Lexmark Solution Center. 8 your desktop, and the User's Guide appears on the...

User's Guide
Page 9
... (8:00 AM- 11:00 PM ET) Saturday (Noon-6:00 PM ET) Telephone numbers and support hours vary by Lexmark International, Inc. materials and workmanship for a www.lexmark.com. See the printed furnishes a limited warranty that this Limited Warranty included with this limited warranty...Complete the form, and then click Submit Request. Select a country or region, and then select the Customer Support link. Note: For additional information about contacting Lexmark, see the printed warranty that shipped with your printer. Limited Warranty Description Where to find (US) Where to...
... (8:00 AM- 11:00 PM ET) Saturday (Noon-6:00 PM ET) Telephone numbers and support hours vary by Lexmark International, Inc. materials and workmanship for a www.lexmark.com. See the printed furnishes a limited warranty that this Limited Warranty included with this limited warranty...Complete the form, and then click Submit Request. Select a country or region, and then select the Customer Support link. Note: For additional information about contacting Lexmark, see the printed warranty that shipped with your printer. Limited Warranty Description Where to find (US) Where to...
User's Guide
Page 13
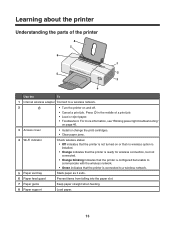
... tray Stack paper as it exits. 6 Paper feed guard Prevent items from falling into the paper slot. 7 Paper guide Keep paper straight when feeding. 8 Paper support Load paper. 13 For more information, see "Blinking power light troubleshooting" on page 46. 3 Access cover • Install or change the print cartridges. • Clear...
... tray Stack paper as it exits. 6 Paper feed guard Prevent items from falling into the paper slot. 7 Paper guide Keep paper straight when feeding. 8 Paper support Load paper. 13 For more information, see "Blinking power light troubleshooting" on page 46. 3 Access cover • Install or change the print cartridges. • Clear...
User's Guide
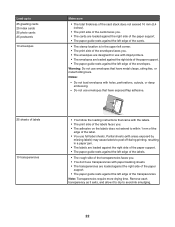
Page 21
.... 10 iron-on transfers. • The print side of the transfers faces you. • The transfers are loaded against the right side of the paper support. • The paper guide rests against the left edge of plain paper (depending on the thickness) • The paper is designed for inkjet printers. ...• The paper is loaded against the right side of the paper support. • The paper guide rests against the left edge of the paper. Note: To avoid paper jams, make sure the paper does not buckle when...
.... 10 iron-on transfers. • The print side of the transfers faces you. • The transfers are loaded against the right side of the paper support. • The paper guide rests against the left edge of plain paper (depending on the thickness) • The paper is designed for inkjet printers. ...• The paper is loaded against the right side of the paper support. • The paper guide rests against the left edge of the paper. Note: To avoid paper jams, make sure the paper does not buckle when...
User's Guide
Page 22
...you . • The envelopes are designed for use with inkjet printers. • The envelopes are loaded against the right side of the paper support. • The paper guide rests against the left edge of the transparencies. Notes: - Remove each transparency as it exits, and allow it to... faces you. • You don't use transparencies with paper backing sheets. • The transparencies are loaded against the right side of the paper support. • The paper guide rests against the left edge of the envelopes. Warning: Do not use envelopes that have exposed flap adhesive. •...
...you . • The envelopes are designed for use with inkjet printers. • The envelopes are loaded against the right side of the paper support. • The paper guide rests against the left edge of the transparencies. Notes: - Remove each transparency as it exits, and allow it to... faces you. • You don't use transparencies with paper backing sheets. • The transparencies are loaded against the right side of the paper support. • The paper guide rests against the left edge of the envelopes. Warning: Do not use envelopes that have exposed flap adhesive. •...

User's Guide
Page 23
... in Print Properties. For more information, see "Using Print Properties" on page 17. • The paper is loaded against the right side of the paper support. • The paper guide rests against the left edge of the paper. 100 sheets of custom-size paper (depending on a level surface behind the printer... tear off only the number of pages needed to print the banner. • The banner paper is loaded against the right side of the paper support. • The paper guide rests against the left edge of the paper faces you. • The paper size fits within these dimensions: Width: - 76-...
... in Print Properties. For more information, see "Using Print Properties" on page 17. • The paper is loaded against the right side of the paper support. • The paper guide rests against the left edge of the paper. 100 sheets of custom-size paper (depending on a level surface behind the printer... tear off only the number of pages needed to print the banner. • The banner paper is loaded against the right side of the paper support. • The paper guide rests against the left edge of the paper faces you. • The paper size fits within these dimensions: Width: - 76-...

User's Guide
Page 24
... 1 Tear off only the number of sheets needed for other types of paper on a level surface behind the printer, and feed up over the paper support. 3 With your document open , click File ΠPrint. 3 Click Properties, Preferences, Options, or Setup. 4 Adjust the settings. 5 Click OK. 6 Click OK or Print...
... 1 Tear off only the number of sheets needed for other types of paper on a level surface behind the printer, and feed up over the paper support. 3 With your document open , click File ΠPrint. 3 Click Properties, Preferences, Options, or Setup. 4 Adjust the settings. 5 Click OK. 6 Click OK or Print...

User's Guide
Page 30
Paper sizes supported Dimensions A4 210 x 297 millimeters Letter 8.5 x 11 inches Greeting cards 4 x 8 inches (10...is the printable side, see the instructions that came with the paper.) 2 From the desktop, double-click the Lexmark Imaging Studio icon. 3 Click Photo Packages. 4 Click to select the photos you want to print your photo ...9 Select the number of the screen. Creating photo projects Creating Photo Greeting Cards 1 From the desktop, double-click the Lexmark Imaging Studio icon. 2 Click Photo Greeting Cards. 3 From the Style tab, click to select a style for your greeting...
Paper sizes supported Dimensions A4 210 x 297 millimeters Letter 8.5 x 11 inches Greeting cards 4 x 8 inches (10...is the printable side, see the instructions that came with the paper.) 2 From the desktop, double-click the Lexmark Imaging Studio icon. 3 Click Photo Packages. 4 Click to select the photos you want to print your photo ...9 Select the number of the screen. Creating photo projects Creating Photo Greeting Cards 1 From the desktop, double-click the Lexmark Imaging Studio icon. 2 Click Photo Greeting Cards. 3 From the Style tab, click to select a style for your greeting...
