User's Guide
Page 3
... the Toolbar...17 Resetting printer software settings to defaults 18 Loading paper and various paper types 20 Loading paper...20 Loading various paper types...20 Printing...23 Printing a document...23 Printing a banner...23 Printing cards...23 Printing collated copies...24 Printing envelopes...24 Printing iron-on transfers...25 Printing multiple pages on one sheet 25 Printing the last page first...
... the Toolbar...17 Resetting printer software settings to defaults 18 Loading paper and various paper types 20 Loading paper...20 Loading various paper types...20 Printing...23 Printing a document...23 Printing a banner...23 Printing cards...23 Printing collated copies...24 Printing envelopes...24 Printing iron-on transfers...25 Printing multiple pages on one sheet 25 Printing the last page first...
User's Guide
Page 4
... Maintaining the printer 31 Changing print cartridges...31 Removing a used print cartridge...31 Installing print cartridges...32 Achieving better print quality...33 Improving print quality ...33 Aligning the print cartridges ...33 Cleaning the print cartridge nozzles ...34 Wiping the print cartridge nozzles and contacts 34 Preserving the print cartridges...35 Ordering supplies...35 Using genuine Lexmark print cartridges 36 Refilling a print cartridge...37...
... Maintaining the printer 31 Changing print cartridges...31 Removing a used print cartridge...31 Installing print cartridges...32 Achieving better print quality...33 Improving print quality ...33 Aligning the print cartridges ...33 Cleaning the print cartridge nozzles ...34 Wiping the print cartridge nozzles and contacts 34 Preserving the print cartridges...35 Ordering supplies...35 Using genuine Lexmark print cartridges 36 Refilling a print cartridge...37...
User's Guide
Page 8
... D is included on Windows operating systems) 1 Click Start Œ Programs or All Programs Œ • Loading paper Lexmark 1300 Series. • Printing 2 Click User's Guide. • Working with photos If the link to a computer. your printer) 2 Click View User's Guide (including Setup • Troubleshooting problems with the other information such as: will be...
... D is included on Windows operating systems) 1 Click Start Œ Programs or All Programs Œ • Loading paper Lexmark 1300 Series. • Printing 2 Click User's Guide. • Working with photos If the link to a computer. your printer) 2 Click View User's Guide (including Setup • Troubleshooting problems with the other information such as: will be...
User's Guide
Page 9
...Support link. original date of purchase. 2 Click Warranty Information. 3 From the Statement of Limited Warranty section, click Inkjet & All-In-One Printers. 4 Scroll through the Web page to find (rest of world) Limited Warranty Information To view the limitations and conditions...this limited warranty, see the printed warranty that shipped with your printer. Visit our Web site at www.lexmark.com. Note: For additional information about contacting Lexmark, see the printed warranty statement that shipped with your printer will be available in printer, or set forth at •...
...Support link. original date of purchase. 2 Click Warranty Information. 3 From the Statement of Limited Warranty section, click Inkjet & All-In-One Printers. 4 Scroll through the Web page to find (rest of world) Limited Warranty Information To view the limitations and conditions...this limited warranty, see the printed warranty that shipped with your printer. Visit our Web site at www.lexmark.com. Note: For additional information about contacting Lexmark, see the printed warranty statement that shipped with your printer will be available in printer, or set forth at •...
User's Guide
Page 11
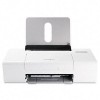
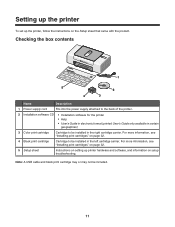
... carrier. For more information, see "Installing print cartridges" on page 32. 5 Setup sheet Instructions on setting up the printer, follow the instructions on page 32. 4 Black print cartridge Cartridge to be installed in certain geographies) 3 Color print cartridge Cartridge to be included. 11 Setting up the printer To set up printer hardware and software, and information on...
... carrier. For more information, see "Installing print cartridges" on page 32. 5 Setup sheet Instructions on setting up the printer, follow the instructions on page 32. 4 Black print cartridge Cartridge to be installed in certain geographies) 3 Color print cartridge Cartridge to be included. 11 Setting up the printer To set up printer hardware and software, and information on...
User's Guide
Page 12
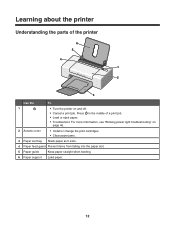
.... For more information, see "Blinking power light troubleshooting" on and off. • Cancel a print job. Press in the middle of the printer 6 5 4 1 2 3 Use the To 1 • Turn the printer on page 46. 2 Access cover • Install or change the print cartridges. • Clear paper jams. 3 Paper exit tray Stack paper as it exits. 4 Paper...
.... For more information, see "Blinking power light troubleshooting" on and off. • Cancel a print job. Press in the middle of the printer 6 5 4 1 2 3 Use the To 1 • Turn the printer on page 46. 2 Access cover • Install or change the print cartridges. • Clear paper jams. 3 Paper exit tray Stack paper as it exits. 4 Paper...
User's Guide
Page 14
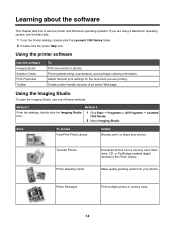
... Studio icon. 1 Click Start ΠPrograms or All Programs ΠLexmark 1300 Series. 2 Select Imaging Studio. Learning about the software This chapter tells how to the Photo Library. Using the printer software Use this software Imaging Studio Solution Center Print Properties Toolbar To Print documents or photos. Transfer Photos Photo Greeting Cards Download photos...
... Studio icon. 1 Click Start ΠPrograms or All Programs ΠLexmark 1300 Series. 2 Select Imaging Studio. Learning about the software This chapter tells how to the Photo Library. Using the printer software Use this software Imaging Studio Solution Center Print Properties Toolbar To Print documents or photos. Transfer Photos Photo Greeting Cards Download photos...
User's Guide
Page 15
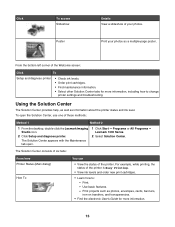
...print cartridges. • Find maintenance information. • Select other Solution Center tabs for more information, including how to : - The Solution Center appears with the Maintenance tab open the Solution Center, use one of these methods: Method 1 Method 2 1 From the desktop, double-click the Lexmark Imaging Studio icon. 2 Click Setup and diagnose printer.... To open . 1 Click Start Œ Programs or All Programs Œ Lexmark 1300 Series. 2 Select Solution Center. Use...
...print cartridges. • Find maintenance information. • Select other Solution Center tabs for more information, including how to : - The Solution Center appears with the Maintenance tab open the Solution Center, use one of these methods: Method 1 Method 2 1 From the desktop, double-click the Lexmark Imaging Studio icon. 2 Click Setup and diagnose printer.... To open . 1 Click Start Œ Programs or All Programs Œ Lexmark 1300 Series. 2 Select Solution Center. Use...
User's Guide
Page 16
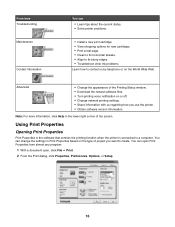
...; Install a new print cartridge. • View shopping options for new cartridges. • Print a test page. • Clean to fix horizontal streaks. • Align to fix blurry edges. • Troubleshoot other ink problems. Learn how to create. Using Print Properties Opening Print Properties Print Properties is the software that controls the printing function when the printer is connected to...
...; Install a new print cartridge. • View shopping options for new cartridges. • Print a test page. • Clean to fix horizontal streaks. • Align to fix blurry edges. • Troubleshoot other ink problems. Learn how to create. Using Print Properties Opening Print Properties Print Properties is the software that controls the printing function when the printer is connected to...

User's Guide
Page 17
...click the Help button on the screen. Tab Quality/Copies Paper Setup Print Layout Options • Select a Quality/Speed setting. • Select a Paper Type. • Customize how the printer prints several copies of a single print job: collated or normal. • Choose Automatic Image Sharpening. ...• Choose to have the last page printed first. • Specify the size of paper loaded. • Select the...
...click the Help button on the screen. Tab Quality/Copies Paper Setup Print Layout Options • Select a Quality/Speed setting. • Select a Paper Type. • Customize how the printer prints several copies of a single print job: collated or normal. • Choose Automatic Image Sharpening. ...• Choose to have the last page printed first. • Specify the size of paper loaded. • Select the...
User's Guide
Page 18
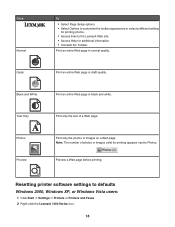
... of a Web page. Preview a Web page before printing. Resetting printer software settings to Photos. Quick Print an entire Web page in normal quality. Black and White Print an entire Web page in black and white. Click Normal... To • Select Page Setup options. • Select Options to customize the toolbar appearance or select a different setting for printing photos. • Access links to the Lexmark...
... of a Web page. Preview a Web page before printing. Resetting printer software settings to Photos. Quick Print an entire Web page in normal quality. Black and White Print an entire Web page in black and white. Click Normal... To • Select Page Setup options. • Select Options to customize the toolbar appearance or select a different setting for printing photos. • Access links to the Lexmark...

User's Guide
Page 19
3 Click Printing Preferences. 4 Click the Save Settings menu. 5 From the Restore section, select Factory Settings (Defaults). Note: Factory default settings cannot be deleted. 19
3 Click Printing Preferences. 4 Click the Save Settings menu. 5 From the Restore section, select Factory Settings (Defaults). Note: Factory default settings cannot be deleted. 19
User's Guide
Page 20
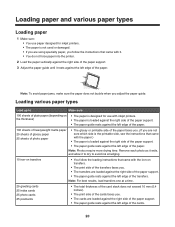
... the paper does not buckle when you adjust the paper guide. Loading paper and various paper types Loading paper 1 Make sure: • You use with inkjet printers. • The paper is loaded against the right side of the paper support. • The paper guide rests against the left edge of the paper... faces you. (If you are not sure which side is the printable side, see the instructions that came with the iron-on transfers. • The print side of the transfers faces you. • The transfers are loaded against the right side of the paper support. • The paper guide rests against...
... the paper does not buckle when you adjust the paper guide. Loading paper and various paper types Loading paper 1 Make sure: • You use with inkjet printers. • The paper is loaded against the right side of the paper support. • The paper guide rests against the left edge of the paper... faces you. (If you are not sure which side is the printable side, see the instructions that came with the iron-on transfers. • The print side of the transfers faces you. • The transfers are loaded against the right side of the paper support. • The paper guide rests against...
User's Guide
Page 21
... of the labels faces you. • The adhesive on the labels does not extend to peel off during printing, resulting in the upper left corner. • The print side of the envelopes. Load up to avoid ink smudging. 21 Remove each transparency as it exits, and allow ...exposed flap adhesive. • You follow the loading instructions that have metal clasps, string ties, or metal folding bars. Do not use transparencies with inkjet printers. • The envelopes are designed for use full label sheets. Partial sheets (with areas exposed by missing labels) may cause labels to within ...
... of the labels faces you. • The adhesive on the labels does not extend to peel off during printing, resulting in the upper left corner. • The print side of the envelopes. Load up to avoid ink smudging. 21 Remove each transparency as it exits, and allow ...exposed flap adhesive. • You follow the loading instructions that have metal clasps, string ties, or metal folding bars. Do not use transparencies with inkjet printers. • The envelopes are designed for use full label sheets. Partial sheets (with areas exposed by missing labels) may cause labels to within ...

User's Guide
Page 22
... support. • The paper guide rests against the left edge of the paper. 100 sheets of custom-size paper (depending on the thickness) • The print side of the paper faces you. • The paper size fits within these dimensions: Width: - 76-216 mm - 3.0-8.5 inches Length: - 127-432 mm - 5.0-17....0 inches • The paper is placed on a level surface behind the printer and fed up to 20 sheets of banner paper Make sure • You remove all the paper from the paper support before loading the banner...
... support. • The paper guide rests against the left edge of the paper. 100 sheets of custom-size paper (depending on the thickness) • The print side of the paper faces you. • The paper size fits within these dimensions: Width: - 76-216 mm - 3.0-8.5 inches Length: - 127-432 mm - 5.0-17....0 inches • The paper is placed on a level surface behind the printer and fed up to 20 sheets of banner paper Make sure • You remove all the paper from the paper support before loading the banner...

User's Guide
Page 23
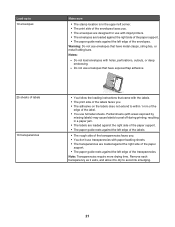
... a level surface behind the printer, and feed up to 20 sheets). 2 Set the stack of cards. 5 Select the Paper Setup tab. 6 Select Paper. 7 From the Paper Size list, select a card size. 8 Click OK. 9 Click OK or Print. 23 Select Photo for photos...cards, index cards, or postcards. 2 From the software application, click File ΠPrint. 3 Click Properties, Preferences, Options, or Setup. 4 Select a Quality/Speed setting. Printing Printing a document 1 Load paper. 2 With a document open , click File ΠPrint. 4 Click Properties, Preferences, Options, or Setup. 5 From the Layout drop-down menu...
... a level surface behind the printer, and feed up to 20 sheets). 2 Set the stack of cards. 5 Select the Paper Setup tab. 6 Select Paper. 7 From the Paper Size list, select a card size. 8 Click OK. 9 Click OK or Print. 23 Select Photo for photos...cards, index cards, or postcards. 2 From the software application, click File ΠPrint. 3 Click Properties, Preferences, Options, or Setup. 4 Select a Quality/Speed setting. Printing Printing a document 1 Load paper. 2 With a document open , click File ΠPrint. 4 Click Properties, Preferences, Options, or Setup. 5 From the Layout drop-down menu...
User's Guide
Page 24
.... 6 If you want to print each card as groups of a document, you print multiple copies of pages (not collated). Notes: • To avoid paper jams, do not force the cards into the printer. • To prevent smudging, remove each copy as a set (collated) or to print the copies as it exits,... and let it dry before stacking. Printing collated copies If you can choose to print with reverse page order, select the Print Last Page First check box. 7 ...
.... 6 If you want to print each card as groups of a document, you print multiple copies of pages (not collated). Notes: • To avoid paper jams, do not force the cards into the printer. • To prevent smudging, remove each copy as a set (collated) or to print the copies as it exits,... and let it dry before stacking. Printing collated copies If you can choose to print with reverse page order, select the Print Last Page First check box. 7 ...
User's Guide
Page 25
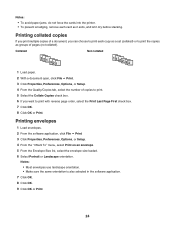
... iron-on transfers. 2 With your image open, click File ΠPrint. 3 Click Properties, Preferences, Options, or Setup. 4 From the Print Layout tab, select Mirror if you want the printer software to be surrounded by a border, select Print Page Borders. 7 Click OK. 8 Click OK or Print. Printing the last page first (reverse page order) 1 Load paper. 2 With...
... iron-on transfers. 2 With your image open, click File ΠPrint. 3 Click Properties, Preferences, Options, or Setup. 4 From the Print Layout tab, select Mirror if you want the printer software to be surrounded by a border, select Print Page Borders. 7 Click OK. 8 Click OK or Print. Printing the last page first (reverse page order) 1 Load paper. 2 With...
User's Guide
Page 26
... pages, zoom in or out, or select whether to check or change your print settings: a From the toolbar area, click Lexmark ΠPage Setup. c Select a lower minimum photo size. b Adjust the print settings. For best results, use the Toolbar to create a printer-friendly version of any Web page. 1 Load paper. 2 Open a Web page using...
... pages, zoom in or out, or select whether to check or change your print settings: a From the toolbar area, click Lexmark ΠPage Setup. c Select a lower minimum photo size. b Adjust the print settings. For best results, use the Toolbar to create a printer-friendly version of any Web page. 1 Load paper. 2 Open a Web page using...

User's Guide
Page 27
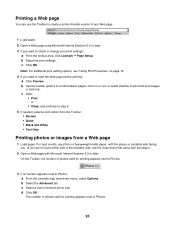
... the same settings, select the size you want, the blank paper size in the printer, and the number of copies. 6 If you do not want , the blank paper size in the printer, and the number of copies. 7 Click Print Now. 27 b To make common editing changes: 1 Right click the photo or image. 2 Click...
... the same settings, select the size you want, the blank paper size in the printer, and the number of copies. 6 If you do not want , the blank paper size in the printer, and the number of copies. 7 Click Print Now. 27 b To make common editing changes: 1 Right click the photo or image. 2 Click...


