
User Guide
Page 5
...parts and supplies...72 Checking the status of parts and supplies ...72 Using genuine Lexmark parts and supplies ...72 Ordering toner cartridges ...73 Ordering a photoconductor unit...73 Ordering a waste toner bottle...73 Ordering staple cartridges ...73 Ordering maintenance kits ...74 Configuring ...supply notifications...74 Replacing parts and supplies...75 Replacing a toner cartridge ...75 Replacing a photoconductor unit...78 Replacing the waste toner bottle ...82 Replacing the pick, feed, and separator rollers 83 Replacing the transfer belt...88 ...
...parts and supplies...72 Checking the status of parts and supplies ...72 Using genuine Lexmark parts and supplies ...72 Ordering toner cartridges ...73 Ordering a photoconductor unit...73 Ordering a waste toner bottle...73 Ordering staple cartridges ...73 Ordering maintenance kits ...74 Configuring ...supply notifications...74 Replacing parts and supplies...75 Replacing a toner cartridge ...75 Replacing a photoconductor unit...78 Replacing the waste toner bottle ...82 Replacing the pick, feed, and separator rollers 83 Replacing the transfer belt...88 ...
User Guide
Page 69
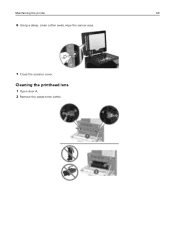
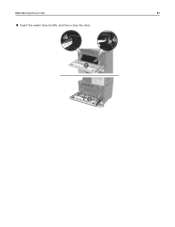
Cleaning the printhead lens 1 Open door A. 2 Remove the waste toner bottle. Maintaining the printer 69 6 Using a damp, clean cotton swab, wipe the sensor area. 7 Close the scanner cover.
Cleaning the printhead lens 1 Open door A. 2 Remove the waste toner bottle. Maintaining the printer 69 6 Using a damp, clean cotton swab, wipe the sensor area. 7 Close the scanner cover.
User Guide
Page 70
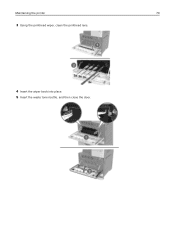
Maintaining the printer 70 3 Using the printhead wiper, clean the printhead lens. 4 Insert the wiper back into place. 5 Insert the waste toner bottle, and then close the door.
Maintaining the printer 70 3 Using the printhead wiper, clean the printhead lens. 4 Insert the wiper back into place. 5 Insert the waste toner bottle, and then close the door.

User Guide
Page 73
... Magenta Yellow Black Part number 24B6842 24B6843 24B6844 24B6845 XC9235, XC9245, XC9255, and XC9265 toner cartridges Toner cartridges Cyan Magenta Yellow Black Part number 24B6846 24B6847 24B6848 24B6849 Ordering a photoconductor unit Item Black photoconductor unit Color photoconductor unit Part number 76C0PK0 76C0PV0 Ordering a waste toner bottle Item Waste toner bottle Part number 54G0W00 Ordering staple cartridges Item...
... Magenta Yellow Black Part number 24B6842 24B6843 24B6844 24B6845 XC9235, XC9245, XC9255, and XC9265 toner cartridges Toner cartridges Cyan Magenta Yellow Black Part number 24B6846 24B6847 24B6848 24B6849 Ordering a photoconductor unit Item Black photoconductor unit Color photoconductor unit Part number 76C0PK0 76C0PV0 Ordering a waste toner bottle Item Waste toner bottle Part number 54G0W00 Ordering staple cartridges Item...

User Guide
Page 76
Maintaining the printer 76 5 Insert the new toner cartridge. 6 Remove the waste toner bottle.
Maintaining the printer 76 5 Insert the new toner cartridge. 6 Remove the waste toner bottle.

User Guide
Page 77
Maintaining the printer 77 7 Using the printhead wiper, clean the printhead lens. 8 Insert the wiper back into place. 9 Insert the waste toner bottle, and then close the door.
Maintaining the printer 77 7 Using the printhead wiper, clean the printhead lens. 8 Insert the wiper back into place. 9 Insert the waste toner bottle, and then close the door.
User Guide
Page 78
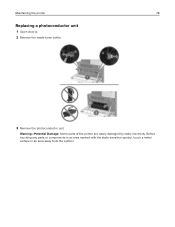
Before touching any parts or components in an area marked with the static‑sensitive symbol, touch a metal surface in an area away from the symbol. Warning-Potential Damage: Some parts of the printer are easily damaged by static electricity. Maintaining the printer 78 Replacing a photoconductor unit 1 Open door A. 2 Remove the waste toner bottle. 3 Remove the photoconductor unit.
Before touching any parts or components in an area marked with the static‑sensitive symbol, touch a metal surface in an area away from the symbol. Warning-Potential Damage: Some parts of the printer are easily damaged by static electricity. Maintaining the printer 78 Replacing a photoconductor unit 1 Open door A. 2 Remove the waste toner bottle. 3 Remove the photoconductor unit.
User Guide
Page 81
Maintaining the printer 81 8 Insert the waste toner bottle, and then close the door.
Maintaining the printer 81 8 Insert the waste toner bottle, and then close the door.
User Guide
Page 82
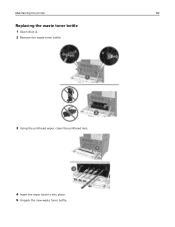
Maintaining the printer 82 Replacing the waste toner bottle 1 Open door A. 2 Remove the waste toner bottle. 3 Using the printhead wiper, clean the printhead lens. 4 Insert the wiper back to into place. 5 Unpack the new waste toner bottle.
Maintaining the printer 82 Replacing the waste toner bottle 1 Open door A. 2 Remove the waste toner bottle. 3 Using the printhead wiper, clean the printhead lens. 4 Insert the wiper back to into place. 5 Unpack the new waste toner bottle.

User Guide
Page 83
Maintaining the printer 83 6 Insert the new waste toner bottle, and then close the door. Replacing the pick, feed, and separator rollers 1 Pick roller 2 Feed roller 3 Separator roller
Maintaining the printer 83 6 Insert the new waste toner bottle, and then close the door. Replacing the pick, feed, and separator rollers 1 Pick roller 2 Feed roller 3 Separator roller

User Guide
Page 216
... noise emission levels 211 Non‑Lexmark supply 131 non‑volatile memory 62 erasing 61 Not enough free space in flash memory for resources 131 notices 211, 212 O optional card installing 176 ordering photoconductor unit 73 toner cartridges 73 ordering supplies staple cartridges 73 waste toner bottle 73 organizing cables 16 P paper...
... noise emission levels 211 Non‑Lexmark supply 131 non‑volatile memory 62 erasing 61 Not enough free space in flash memory for resources 131 notices 211, 212 O optional card installing 176 ordering photoconductor unit 73 toner cartridges 73 ordering supplies staple cartridges 73 waste toner bottle 73 organizing cables 16 P paper...

User Guide
Page 217
...25 printing held jobs from a Macintosh computer 37 from Windows 37 Push Button method 64 Q QR codes adding 24 R recycling Lexmark packaging 104 Lexmark products 104 toner cartridges 104 reducing copies 40 repeat print jobs 37 printing from a Macintosh computer 37 printing from Windows 37 repeating print defects ...93 feed roller 83 pick roller 83 separator roller 83 transfer belt 88 transfer roller 91 replacing supplies staple cartridge 97, 99, 101 waste toner bottle 82 replacing the ADF pick and feed rollers 95 replacing the ADF separator roller 93 replacing the pick, feed, and separator rollers...
...25 printing held jobs from a Macintosh computer 37 from Windows 37 Push Button method 64 Q QR codes adding 24 R recycling Lexmark packaging 104 Lexmark products 104 toner cartridges 104 reducing copies 40 repeat print jobs 37 printing from a Macintosh computer 37 printing from Windows 37 repeating print defects ...93 feed roller 83 pick roller 83 separator roller 83 transfer belt 88 transfer roller 91 replacing supplies staple cartridge 97, 99, 101 waste toner bottle 82 replacing the ADF pick and feed rollers 95 replacing the ADF separator roller 93 replacing the pick, feed, and separator rollers...

User Guide
Page 218
... 218 replacing the staple cartridge in the staple, hole punch finisher 99 replacing the transfer roller 91 replacing the waste toner bottle 82 reserve print jobs printing from a Macintosh computer 37 printing from Windows 37 resetting supply usage counters 131 resetting ...of volatility 62 storing print jobs 37 supplies conserving 104 supplies status checking 72 supplies, ordering photoconductor unit 73 staple cartridges 73 toner cartridges 73 waste toner bottle 73 supply notifications configuring 74 supply usage counters resetting 131 supported file types 36 supported ...
... 218 replacing the staple cartridge in the staple, hole punch finisher 99 replacing the transfer roller 91 replacing the waste toner bottle 82 reserve print jobs printing from a Macintosh computer 37 printing from Windows 37 resetting supply usage counters 131 resetting ...of volatility 62 storing print jobs 37 supplies conserving 104 supplies status checking 72 supplies, ordering photoconductor unit 73 staple cartridges 73 toner cartridges 73 waste toner bottle 73 supply notifications configuring 74 supply usage counters resetting 131 supported file types 36 supported ...

User Guide
Page 219
...setting 30 unlinking trays 34 updating firmware flash file 208 USB port enabling 129 USB ports 16 using genuine Lexmark parts 72 genuine Lexmark supplies 72 using Customer Support 24 using Display Customization 25 using Google Drive 25 using QR Code Generator 24 using the ADF copying ... setting up 43 voice over Internet Protocol (VoIP) fax setup 49 VoIP adapter 49 volatile memory 62 erasing 61 volatility statement of 62 W waste toner bottle ordering 73 replacing 82 white lines appear 158 white pages 139 wireless network Wi‑Fi Protected Setup 64 Wi‑Fi Protected Setup...
...setting 30 unlinking trays 34 updating firmware flash file 208 USB port enabling 129 USB ports 16 using genuine Lexmark parts 72 genuine Lexmark supplies 72 using Customer Support 24 using Display Customization 25 using Google Drive 25 using QR Code Generator 24 using the ADF copying ... setting up 43 voice over Internet Protocol (VoIP) fax setup 49 VoIP adapter 49 volatile memory 62 erasing 61 volatility statement of 62 W waste toner bottle ordering 73 replacing 82 white lines appear 158 white pages 139 wireless network Wi‑Fi Protected Setup 64 Wi‑Fi Protected Setup...


