
Setup Guide
Page 5
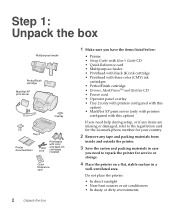
...Step 1: Unpack the box Multipurpose feeder PerfectFinish cartridge MarkNet XP print server Overlay CD Tray 2 Printer documentation Power cord Printheads with color and black ink cartridges installed Quick Reference card 2 Unpack the box 1 Make sure you have the items listed below: • Printer • Setup Guide ... this option) If you need help during setup, or if any items are missing or damaged, refer to the registration card for the Lexmark phone number for your country. 2 Remove any tape and packing materials from inside and outside the printer. 3 Save the carton and packing...
...Step 1: Unpack the box Multipurpose feeder PerfectFinish cartridge MarkNet XP print server Overlay CD Tray 2 Printer documentation Power cord Printheads with color and black ink cartridges installed Quick Reference card 2 Unpack the box 1 Make sure you have the items listed below: • Printer • Setup Guide ... this option) If you need help during setup, or if any items are missing or damaged, refer to the registration card for the Lexmark phone number for your country. 2 Remove any tape and packing materials from inside and outside the printer. 3 Save the carton and packing...
Setup Guide
Page 22
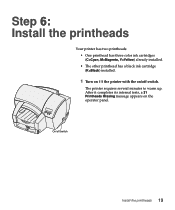
On/off switch. After it completes its internal tests, a 31 Printheads Missing message appears on /off switch Install the printheads 19 Step 6: Install the printheads Your printer has two printheads: • One printhead has three color ink cartridges (C=Cyan, M=Magenta, Y=Yellow) already installed. • The other printhead has a black ink cartridge (K=Black) installed. 1 Turn on (|) the printer with the on the operator panel. The printer requires several minutes to warm up.
On/off switch. After it completes its internal tests, a 31 Printheads Missing message appears on /off switch Install the printheads 19 Step 6: Install the printheads Your printer has two printheads: • One printhead has three color ink cartridges (C=Cyan, M=Magenta, Y=Yellow) already installed. • The other printhead has a black ink cartridge (K=Black) installed. 1 Turn on (|) the printer with the on the operator panel. The printer requires several minutes to warm up.
Setup Guide
Page 24
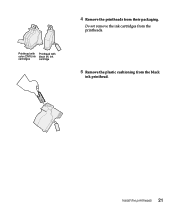
Install the printheads 21 Printhead with Printhead with color (CMY) ink black (K) ink cartridges cartridge 4 Remove the printheads from the black ink printhead. Do not remove the ink cartridges from the printheads. 5 Remove the plastic cushioning from their packaging.
Install the printheads 21 Printhead with Printhead with color (CMY) ink black (K) ink cartridges cartridge 4 Remove the printheads from the black ink printhead. Do not remove the ink cartridges from the printheads. 5 Remove the plastic cushioning from their packaging.
Setup Guide
Page 25
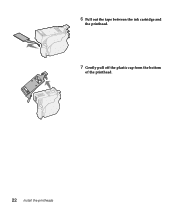
6 Pull out the tape between the ink cartridge and the printhead. 7 Gently pull off the plastic cap from the bottom of the printhead. 22 Install the printheads
6 Pull out the tape between the ink cartridge and the printhead. 7 Gently pull off the plastic cap from the bottom of the printhead. 22 Install the printheads
Setup Guide
Page 26
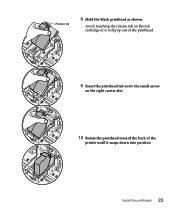
Release tab 8 Hold the black printhead as shown. Avoid touching the release tab on the ink cartridge or it will pop out of the printhead. 9 Insert the printhead tab under the small arrow on the right carrier slot. 10 Rotate the printhead toward the back of the printer until it snaps down into position Install the printheads 23
Release tab 8 Hold the black printhead as shown. Avoid touching the release tab on the ink cartridge or it will pop out of the printhead. 9 Insert the printhead tab under the small arrow on the right carrier slot. 10 Rotate the printhead toward the back of the printer until it snaps down into position Install the printheads 23
Setup Guide
Page 27
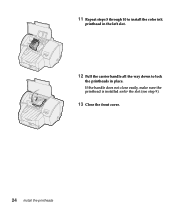
11 Repeat steps 5 through 10 to install the color ink printhead in the left slot. 12 Pull the carrier handle all the way down to lock the printheads in place. If the handle does not close easily, make sure the printhead is installed under the slot (see step 9). 13 Close the front cover. 24 Install the printheads
11 Repeat steps 5 through 10 to install the color ink printhead in the left slot. 12 Pull the carrier handle all the way down to lock the printheads in place. If the handle does not close easily, make sure the printhead is installed under the slot (see step 9). 13 Close the front cover. 24 Install the printheads

Setup Guide
Page 36
Use the User's Guide CD in the back of this book for: • Printing tips • Changing menu settings from the Windows driver, Macintosh driver, and the operator panel • Replacing ink cartridges, printheads and the PerfectFinish cartridge • Clearing paper jams • Troubleshooting Warning: If you move the printer, keep it level. Congratulations! Congratulations! 33 You are finished setting up your printer and are ready to print.
Use the User's Guide CD in the back of this book for: • Printing tips • Changing menu settings from the Windows driver, Macintosh driver, and the operator panel • Replacing ink cartridges, printheads and the PerfectFinish cartridge • Clearing paper jams • Troubleshooting Warning: If you move the printer, keep it level. Congratulations! Congratulations! 33 You are finished setting up your printer and are ready to print.
Setup Guide
Page 42
...by: • Modification or attachments • Accidents or misuse • Unsuitable physical or operating environment • Maintenance by a Lexmark warranty, technical support may only be available for warranty service, remove all programs, data, and removable storage media. Before you present...if applicable) • Use of print media outside of Lexmark specifications • Use of other than Lexmark supplies (such as inkjet cartridges, ink, pre-coating fluid and printheads) • Use of other than Lexmark product or component Statement of limited warranty 39 Warranty service ...
...by: • Modification or attachments • Accidents or misuse • Unsuitable physical or operating environment • Maintenance by a Lexmark warranty, technical support may only be available for warranty service, remove all programs, data, and removable storage media. Before you present...if applicable) • Use of print media outside of Lexmark specifications • Use of other than Lexmark supplies (such as inkjet cartridges, ink, pre-coating fluid and printheads) • Use of other than Lexmark product or component Statement of limited warranty 39 Warranty service ...
User's Guide
Page 6
... replace supplies 33 Operator panel 33 Audible alarm 33 Windows driver status window 33 MarkVision status window 34 Web page 34 Chapter 15: Replacing an ink cartridge 35 Chapter 16: Replacing PerfectFinish 38 Chapter 17: Replacing the printheads 42 Chapter 18: Aligning the printheads 47 Chapter 19: Cleaning the printheads 48...
... replace supplies 33 Operator panel 33 Audible alarm 33 Windows driver status window 33 MarkVision status window 34 Web page 34 Chapter 15: Replacing an ink cartridge 35 Chapter 16: Replacing PerfectFinish 38 Chapter 17: Replacing the printheads 42 Chapter 18: Aligning the printheads 47 Chapter 19: Cleaning the printheads 48...
User's Guide
Page 8
TCP/IP 92 Method 2 -- Hex Trace 77 Job Menu ...78 Setup Menu ...79 Print Timeout 79 Auto Continue 79 Display Language 80 Alarm Control 80 Ink Low Alarm 80 Dry Time Delay 81 PCL Emul Menu 82 Font Name 82 Point Size 82 Pitch ...82 Symbol Set 83 Orientation 83 Lines ...
TCP/IP 92 Method 2 -- Hex Trace 77 Job Menu ...78 Setup Menu ...79 Print Timeout 79 Auto Continue 79 Display Language 80 Alarm Control 80 Ink Low Alarm 80 Dry Time Delay 81 PCL Emul Menu 82 Font Name 82 Point Size 82 Pitch ...82 Symbol Set 83 Orientation 83 Lines ...
User's Guide
Page 42
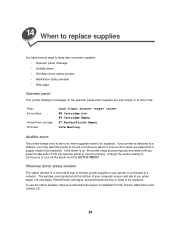
...14 When to replace supplies You have several ways to be replaced. If your printer is attached to a network, you when paper, ink cartridges, PerfectFinish cartridges, and printheads are low, empty, or at the bottom of life. Windows driver status window The status window is... setting to be replaced. The window runs minimized at end of your printer is installed from the operator panel to a network. Paper Ink cartridge PerfectFinish cartridge Printhead Load 88 Cartridge Low 89 Cartridge Empty 87 PerfectFinish Empty Life Warning Audible alarm The printer beeps once to alert you...
...14 When to replace supplies You have several ways to be replaced. If your printer is attached to a network, you when paper, ink cartridges, PerfectFinish cartridges, and printheads are low, empty, or at the bottom of life. Windows driver status window The status window is... setting to be replaced. The window runs minimized at end of your printer is installed from the operator panel to a network. Paper Ink cartridge PerfectFinish cartridge Printhead Load 88 Cartridge Low 89 Cartridge Empty 87 PerfectFinish Empty Life Warning Audible alarm The printer beeps once to alert you...
User's Guide
Page 44
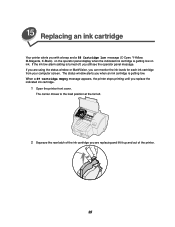
..., Y-Yellow, M-Magenta, K-Black) on the operator panel display when the indicated ink cartridge is getting low on ink. The status window alerts you when an ink cartridge is getting low. If the ink low alarm setting is turned off, you replace the indicated ink cartridge. 1 Open the printer front cover. If you can monitor the... until you still see the operator panel message. The carrier moves to the load position at the far left. 2 Squeeze the rear latch of the ink cartridge you are using the status window or MarkVision, you are replacing and lift it up and out of the printer. 35
..., Y-Yellow, M-Magenta, K-Black) on the operator panel display when the indicated ink cartridge is getting low on ink. The status window alerts you when an ink cartridge is getting low. If the ink low alarm setting is turned off, you replace the indicated ink cartridge. 1 Open the printer front cover. If you can monitor the... until you still see the operator panel message. The carrier moves to the load position at the far left. 2 Squeeze the rear latch of the ink cartridge you are using the status window or MarkVision, you are replacing and lift it up and out of the printer. 35
User's Guide
Page 45
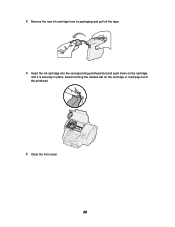
3 Remove the new ink cartridge from its packaging and pull off the tape. 4 Insert the ink cartridge into the corresponding printhead slot and push down on the cartridge or it is securely in place. Avoid touching the release tab on the cartridge until it will pop out of the printhead. 5 Close the front cover. 36
3 Remove the new ink cartridge from its packaging and pull off the tape. 4 Insert the ink cartridge into the corresponding printhead slot and push down on the cartridge or it is securely in place. Avoid touching the release tab on the cartridge until it will pop out of the printhead. 5 Close the front cover. 36

User's Guide
Page 46
To read more about ink cartridge messages, just click the message: MESSAGE: 31 DEFECTIVE INK CARTRIDGE MESSAGE: 31 MISSING CARTRIDGE XXXX MESSAGE: 32 UNSUPPORTED CARTRIDGE MESSAGE: 88 CARTRIDGE LOW MESSAGE: 89 CARTRIDGE EMPTY MESSAGE: CARTRIDGE LIFE EXPIRED MESSAGE: CARTRIDGE LIFE WARNING 37
To read more about ink cartridge messages, just click the message: MESSAGE: 31 DEFECTIVE INK CARTRIDGE MESSAGE: 31 MISSING CARTRIDGE XXXX MESSAGE: 32 UNSUPPORTED CARTRIDGE MESSAGE: 88 CARTRIDGE LOW MESSAGE: 89 CARTRIDGE EMPTY MESSAGE: CARTRIDGE LIFE EXPIRED MESSAGE: CARTRIDGE LIFE WARNING 37
User's Guide
Page 52
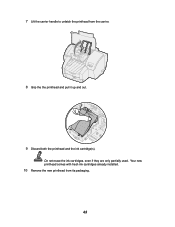
7 Lift the carrier handle to unlatch the printhead from its packaging. 43 Your new printhead comes with fresh ink cartridges already installed. 10 Remove the new printhead from the carrier. 8 Grip the the printhead and pull it up and out. 9 Discard both the printhead and the ink cartridge(s). Do not reuse the ink cartridges, even if they are only partially used.
7 Lift the carrier handle to unlatch the printhead from its packaging. 43 Your new printhead comes with fresh ink cartridges already installed. 10 Remove the new printhead from the carrier. 8 Grip the the printhead and pull it up and out. 9 Discard both the printhead and the ink cartridge(s). Do not reuse the ink cartridges, even if they are only partially used.
User's Guide
Page 53
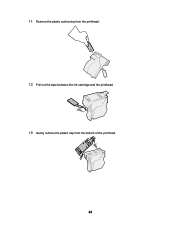
11 Remove the plastic cushioning from the printhead. 12 Pull out the tape between the ink cartridge and the printhead. 13 Gently remove the plastic cap from the bottom of the printhead. 44
11 Remove the plastic cushioning from the printhead. 12 Pull out the tape between the ink cartridge and the printhead. 13 Gently remove the plastic cap from the bottom of the printhead. 44
User's Guide
Page 57
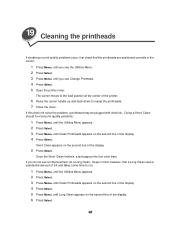
... streaking or print quality problems occur, first check that the printheads are positioned correctly in mind, however, that a Long Clean uses a substantial amount of ink and takes some time to run. 1 Press Menu> until the Utilities Menu appears. 2 Press Select. 3 Press Menu> until Clean Printheads appears on ... appears on the second line of the display. 6 Press Select. 48 If this does not solve the problem, a printhead may be plugged with dried ink. Keep in the carrier: 1 Press Menu> until you see the Utilities Menu. 2 Press Select. 3 Press Menu> until Clean Printheads appears on the...
... streaking or print quality problems occur, first check that the printheads are positioned correctly in mind, however, that a Long Clean uses a substantial amount of ink and takes some time to run. 1 Press Menu> until the Utilities Menu appears. 2 Press Select. 3 Press Menu> until Clean Printheads appears on ... appears on the second line of the display. 6 Press Select. 48 If this does not solve the problem, a printhead may be plugged with dried ink. Keep in the carrier: 1 Press Menu> until you see the Utilities Menu. 2 Press Select. 3 Press Menu> until Clean Printheads appears on the...
User's Guide
Page 58
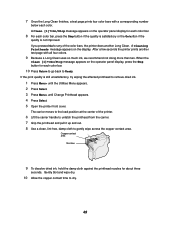
...Ready. 7 Once the Long Clean finishes, a test page prints four color bars with all four colors. 9 Because a Long Clean uses so much ink, we recommend not doing more than two. After a few seconds the printer prints another Long Clean. A Clean [1]?=Go/Stop message appears on the operator... panel display for each color bar. 10 Press Return to go back to remove dried ink. 1 Press Menu> until the Utilities Menu appears. 2 Press Select. 3 Press Menu> until Change Printhead appears. 4 Press Select. 5 Open the printer ...
...Ready. 7 Once the Long Clean finishes, a test page prints four color bars with all four colors. 9 Because a Long Clean uses so much ink, we recommend not doing more than two. After a few seconds the printer prints another Long Clean. A Clean [1]?=Go/Stop message appears on the operator... panel display for each color bar. 10 Press Return to go back to remove dried ink. 1 Press Menu> until the Utilities Menu appears. 2 Press Select. 3 Press Menu> until Change Printhead appears. 4 Press Select. 5 Open the printer ...
User's Guide
Page 67
... Missing Cartridge 31 Defective Ink Cartridge 32 Unsupported Cartridge 88 Cartridge Low 89 Cartridge Empty Cartridge Life Expired Cartridge Life Warning PerfectFinish 87 PerfectFinish Empty Printer Calibrating Printheads 31 Missing ...
... Missing Cartridge 31 Defective Ink Cartridge 32 Unsupported Cartridge 88 Cartridge Low 89 Cartridge Empty Cartridge Life Expired Cartridge Life Warning PerfectFinish 87 PerfectFinish Empty Printer Calibrating Printheads 31 Missing ...
User's Guide
Page 68
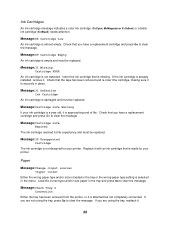
... reached its life expectancy and must be replaced. Load the correct type and/or size paper in place. Message:31 Defective Ink Cartridge An ink cartridge is empty and must be replaced. If you have a replacement cartridge and press Go to clear the message. Check that... you have a replacement cartridge and press Go to clear the message. Message:31 Missing Cartridge XXXX An ink cartridge is made for your printer. Message:32 Unsupported Cartridge The ink cartridge is attached but not completely connected. Message:Check Tray x Connection Either the tray has been removed ...
... reached its life expectancy and must be replaced. Load the correct type and/or size paper in place. Message:31 Defective Ink Cartridge An ink cartridge is empty and must be replaced. If you have a replacement cartridge and press Go to clear the message. Check that... you have a replacement cartridge and press Go to clear the message. Message:31 Missing Cartridge XXXX An ink cartridge is made for your printer. Message:32 Unsupported Cartridge The ink cartridge is attached but not completely connected. Message:Check Tray x Connection Either the tray has been removed ...


