Manual
Page 4
... 2.3 System Status 22 2.4 Advanced ...23 Appendix A FAQ and Troubleshooting 75 What can I do when I have some trouble at the first time 75 How do I connect router by using wireless 77 IP Address Password Wireless Mode Wireless SSID Wireless Security 192.168.1.1 admin Enable...
... 2.3 System Status 22 2.4 Advanced ...23 Appendix A FAQ and Troubleshooting 75 What can I do when I have some trouble at the first time 75 How do I connect router by using wireless 77 IP Address Password Wireless Mode Wireless SSID Wireless Security 192.168.1.1 admin Enable...
Manual
Page 5
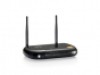
... please read this manual carefully for non-technical users. Chapter 1 Introduction Congratulations on your purchase of this product. 1.1 Packing List WBR-6012 Power Adapter Antenna (x2) Network Cable Quick Installation Guide CD User Manual / Utility / QIG 1.2 Spec Summary Table Device Interface ...Wireless On Function" Reset Button Reset to configure and operate even for fully exploiting the functions of this outstanding Wireless Broadband Router. Instructions for Small Office and Home Office needs. It provides a complete SOHO solution for Internet surfing, and is specifically ...
... please read this manual carefully for non-technical users. Chapter 1 Introduction Congratulations on your purchase of this product. 1.1 Packing List WBR-6012 Power Adapter Antenna (x2) Network Cable Quick Installation Guide CD User Manual / Utility / QIG 1.2 Spec Summary Table Device Interface ...Wireless On Function" Reset Button Reset to configure and operate even for fully exploiting the functions of this outstanding Wireless Broadband Router. Instructions for Small Office and Home Office needs. It provides a complete SOHO solution for Internet surfing, and is specifically ...

Manual
Page 9
1.6 Procedure for Hardware Installation Step 1 Insert the Ethernet cable into LAN Port: Insert the Ethernet patch cable into Wired WAN port on the back panel of your Router. 9 Power on Router: Connect the power adapter to the receptor on the network adapter in the computer you will use to configure the unit. Step 3. Step 2 Insert the Ethernet patch cable into Wired WAN port: Insert the Ethernet patch cable form DSL Modem into LAN port on the back panel of Router, and an available Ethernet port on the back panel of Router.
1.6 Procedure for Hardware Installation Step 1 Insert the Ethernet cable into LAN Port: Insert the Ethernet patch cable into Wired WAN port on the back panel of your Router. 9 Power on Router: Connect the power adapter to the receptor on the network adapter in the computer you will use to configure the unit. Step 3. Step 2 Insert the Ethernet patch cable into Wired WAN port: Insert the Ethernet patch cable form DSL Modem into LAN port on the back panel of Router, and an available Ethernet port on the back panel of Router.

Manual
Page 12
2.1 Login to diagnose the network settings of the router. 12 The program, AutoRun, will be executed automatically. Configure the settings by the following steps. 2.1.Select Language then click "Next" for this utility. And then you can click the Easy setup Icon for continues. 2.2 Setup mode You can select Wizard mode to run the setup step-by-step or run advanced mode to Configure from EZSetup Insert the CD into CD reader on your PC.
2.1 Login to diagnose the network settings of the router. 12 The program, AutoRun, will be executed automatically. Configure the settings by the following steps. 2.1.Select Language then click "Next" for this utility. And then you can click the Easy setup Icon for continues. 2.2 Setup mode You can select Wizard mode to run the setup step-by-step or run advanced mode to Configure from EZSetup Insert the CD into CD reader on your PC.

Manual
Page 13
Make sure the router is connected to the LAN port of PC, Router or Internet. 2.4 Quick Wizard Install mode Setup 1. Click "Next" for the Status of the router 3. 2.3 Advanced mode Setup. Check the PC, Router or Internet icons for continues 13 Make sure your network adapter has an IP address. Make sure your network adapter is powered on. 2.
Make sure the router is connected to the LAN port of PC, Router or Internet. 2.4 Quick Wizard Install mode Setup 1. Click "Next" for the Status of the router 3. 2.3 Advanced mode Setup. Check the PC, Router or Internet icons for continues 13 Make sure your network adapter has an IP address. Make sure your network adapter is powered on. 2.

Manual
Page 17
The EzSetup is finish, you can open the default web browser to complete the installation. 17 Click "Finish" to configure advanced settings of the Router. 2.11 Setup Completed.
The EzSetup is finish, you can open the default web browser to complete the installation. 17 Click "Finish" to configure advanced settings of the Router. 2.11 Setup Completed.
Manual
Page 32
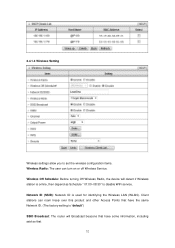
2.4.1.3 Wireless Setting Wireless settings allow you to disable WiFi service. Network ID (SSID): Network ID is "default") SSID Broadcast: The router will detect if Wireless station is online, then depend as Schedule " 01:00~08:30" to set the wireless configuration items. Wireless Radio: The user ...
2.4.1.3 Wireless Setting Wireless settings allow you to disable WiFi service. Network ID (SSID): Network ID is "default") SSID Broadcast: The router will detect if Wireless station is online, then depend as Schedule " 01:00~08:30" to set the wireless configuration items. Wireless Radio: The user ...

Manual
Page 34
...26 or 10 hexadecimal (0, 1, 2...8, 9, A, B...F) digits. 802.1X Check Box was used to another. RADIUS Shared Key Key value shared by the RADIUS server and this router first to use : WEP : When you want. Security: Select the data privacy algorithm you enable the 128 or 64 bit WEP key security, please select...the 802.1X. This key value is enabled, the Wireless user must authenticate to use the Network service. There are several security types to this router. RADIUS Server IP address or the 802.1X server's domain-name. When the 802.1X function is consistent with the key value in the ...
...26 or 10 hexadecimal (0, 1, 2...8, 9, A, B...F) digits. 802.1X Check Box was used to another. RADIUS Shared Key Key value shared by the RADIUS server and this router first to use : WEP : When you want. Security: Select the data privacy algorithm you enable the 128 or 64 bit WEP key security, please select...the 802.1X. This key value is enabled, the Wireless user must authenticate to use the Network service. There are several security types to this router. RADIUS Server IP address or the 802.1X server's domain-name. When the 802.1X function is consistent with the key value in the ...

Manual
Page 36
WPA2-PSK(AES) 1. RADIUS Server IP address or the 802.1X server's domain-name. Key value shared by the RADIUS server and this router first to use the Network service. This key value is enabled, the Wireless user must authenticate to 63. WPA Check Box was used to 63. ... 64 hexadecimal (0, 1, 2...8, 9, A, B...F) digits If ASCII, the length of Pre-share key is from 8 to switch the function of pre-share key is from 8 to this router. When the WPA function is consistent with the key value in 64 hexadecimal (0, 1, 2...8, 9, A, B...F) digits If ASCII, the length of the WPA.
WPA2-PSK(AES) 1. RADIUS Server IP address or the 802.1X server's domain-name. Key value shared by the RADIUS server and this router first to use the Network service. This key value is enabled, the Wireless user must authenticate to 63. WPA Check Box was used to 63. ... 64 hexadecimal (0, 1, 2...8, 9, A, B...F) digits If ASCII, the length of Pre-share key is from 8 to switch the function of pre-share key is from 8 to this router. When the WPA function is consistent with the key value in 64 hexadecimal (0, 1, 2...8, 9, A, B...F) digits If ASCII, the length of the WPA.

Manual
Page 37
Key value shared by the RADIUS server and this router first to 63. 2. WPA-PSK /WPA2-PSK The router will detect automatically which Security type the client uses to switch the function of the WPA. Select RADIUS Shared Key If you select HEX, you ..., Ex 12345678 37 Fill in 64 hexadecimal (0, 1, 2...8, 9, A, B...F) digits If ASCII, the length of Pre-share key is enabled, the Wireless user must authenticate to this router.
Key value shared by the RADIUS server and this router first to 63. 2. WPA-PSK /WPA2-PSK The router will detect automatically which Security type the client uses to switch the function of the WPA. Select RADIUS Shared Key If you select HEX, you ..., Ex 12345678 37 Fill in 64 hexadecimal (0, 1, 2...8, 9, A, B...F) digits If ASCII, the length of Pre-share key is enabled, the Wireless user must authenticate to this router.

Manual
Page 38
WPA/WPA2 Check Box was used to switch the function of Pre-share key is enabled, the Wireless user must authenticate to this router. Select RADIUS Shared Key If you select HEX, you have to 63. When the WPA function is from 8 to fill in the RADIUS server. 38 ...IP address or the 802.1X server's domain-name. Key value shared by the RADIUS server and this router first to encrypt. RADIUS Server The router will detect automatically which Security type(Wpa-psk version 1 or 2) the client uses to use the Network service. This key value is...
WPA/WPA2 Check Box was used to switch the function of Pre-share key is enabled, the Wireless user must authenticate to this router. Select RADIUS Shared Key If you select HEX, you have to 63. When the WPA function is from 8 to fill in the RADIUS server. 38 ...IP address or the 802.1X server's domain-name. Key value shared by the RADIUS server and this router first to encrypt. RADIUS Server The router will detect automatically which Security type(Wpa-psk version 1 or 2) the client uses to use the Network service. This key value is...

Manual
Page 41
... use each Special Application tunnel. 41 Trigger: the outbound port number issued by the application.. 2. Note! Because of these applications cannot work with a pure NAT router. 2.4.2.2 Special AP Some applications require multiple connections, like Internet games, Video conferencing, Internet telephony, etc.
... use each Special Application tunnel. 41 Trigger: the outbound port number issued by the application.. 2. Note! Because of these applications cannot work with a pure NAT router. 2.4.2.2 Special AP Some applications require multiple connections, like Internet games, Video conferencing, Internet telephony, etc.

Manual
Page 45
... rule, you to control what packets are allowed to Virtual Servers or DMZ host only. Outbound filter applies on packets that destined to pass the router.
... rule, you to control what packets are allowed to Virtual Servers or DMZ host only. Outbound filter applies on packets that destined to pass the router.

Manual
Page 47
Example 2: (1.2.3.100-1.2.3.119) Remote hosts can do everything (block nothing) Others are all allowed. Outbound Filter: 47 Others are all blocked. After Inbound Packet Filter setting is configured, click the save button. (1.2.3.100-1.2.3.149) Remote hosts are allow to send mail (port 25), and browse the Internet (port 80) (1.2.3.10-1.2.3.20) Remote hosts can do everything except read net news (port 119) and transfer files via FTP (port 21) behind Router Server.
Example 2: (1.2.3.100-1.2.3.119) Remote hosts can do everything (block nothing) Others are all allowed. Outbound Filter: 47 Others are all blocked. After Inbound Packet Filter setting is configured, click the save button. (1.2.3.100-1.2.3.149) Remote hosts are allow to send mail (port 25), and browse the Internet (port 80) (1.2.3.10-1.2.3.20) Remote hosts can do everything except read net news (port 119) and transfer files via FTP (port 21) behind Router Server.

Manual
Page 48
port 53 (DNS) is 192.168.12.254 (192.168.12.100-192.168.12.149) Located hosts are all blocked. 48 Example 1: Router LAN IP is necessary to resolve the domain name. (192.168.12.10-192.168.12.20) Located hosts can do everything (block nothing) Others are only allowed to Enable in the Outbound Packet Filter field. To enable Outbound Packet Filter click the check box next to send mail (port 25), receive mail (port 110), and browse Internet (port 80);
port 53 (DNS) is 192.168.12.254 (192.168.12.100-192.168.12.149) Located hosts are all blocked. 48 Example 1: Router LAN IP is necessary to resolve the domain name. (192.168.12.10-192.168.12.20) Located hosts can do everything (block nothing) Others are only allowed to Enable in the Outbound Packet Filter field. To enable Outbound Packet Filter click the check box next to send mail (port 25), receive mail (port 110), and browse Internet (port 80);

Manual
Page 49
Example 2: Router LAN IP is 192.168.12.254 (192.168.12.100 and 192.168.12.119) Located Hosts can do everything except read net news (port 119) and transfer files via FTP (port 21) Others are allowed After Outbound Packet Filter setting is configured, click the save button. 49
Example 2: Router LAN IP is 192.168.12.254 (192.168.12.100 and 192.168.12.119) Located Hosts can do everything except read net news (port 119) and transfer files via FTP (port 21) Others are allowed After Outbound Packet Filter setting is configured, click the save button. 49

Manual
Page 59
...associate to the wireless LAN. Discard PING from remote host. SPI Mode When this feature is 0.0.0.0, any host on . For example, "10.1.2.0/24". And the router will detect and log the DoS attack comes from the 59 Client 3 is a wired client and so is valid. This feature enables you to perform... to the wireless LAN, but a wireless client with a MAC address not specified in web pages to perform administration task. But client 1 is enabled, the router will check every incoming packet to detect if this product to perform administration task. You can perform remote administration.
...associate to the wireless LAN. Discard PING from remote host. SPI Mode When this feature is 0.0.0.0, any host on . For example, "10.1.2.0/24". And the router will detect and log the DoS attack comes from the 59 Client 3 is a wired client and so is valid. This feature enables you to perform... to the wireless LAN, but a wireless client with a MAC address not specified in web pages to perform administration task. But client 1 is enabled, the router will check every incoming packet to detect if this product to perform administration task. You can perform remote administration.

Manual
Page 60
Internet. VPN PPTP and IPSec Pass-Through Virtual Private Networking (VPN) is typically used for work-related networking. For VPN tunnels, the router supports IPSec Passthrough and PPTP Passthrough. 60 Currently, the router can detect the following DoS attack: SYN Attack, WinNuke, Port Scan, Ping of Death, Land Attack etc.
Internet. VPN PPTP and IPSec Pass-Through Virtual Private Networking (VPN) is typically used for work-related networking. For VPN tunnels, the router supports IPSec Passthrough and PPTP Passthrough. 60 Currently, the router can detect the following DoS attack: SYN Attack, WinNuke, Port Scan, Ping of Death, Land Attack etc.

Manual
Page 67
... or unchecking the Enable checkbox. Dynamic Routing Routing Information Protocol (RIP) will need this protocol. Please select RIPv2 only if you have more than one routers and subnets, you have different subnet in your network. Static Routing: For static routing, you can enter the destination IP address, subnet mask, gateway, hop...
... or unchecking the Enable checkbox. Dynamic Routing Routing Information Protocol (RIP) will need this protocol. Please select RIPv2 only if you have more than one routers and subnets, you have different subnet in your network. Static Routing: For static routing, you can enter the destination IP address, subnet mask, gateway, hop...

Manual
Page 68
After routing table setting is configured, click the save button. 68 Configuration on NAT Router Destination SubnetMask Gateway Hop 192.168.1.0 255.255.255.0 192.168.123.216 1 192.168.0.0 255.255.255.0 192.168.123.103 1 Enabled ˇ ˇ So if, for example, the client3 wanted to send an IP data gram to 192.168.0.2, it would use the above table to determine that it had to go via 192.168.123.103 (a gateway), And if it sends Packets to 192.168.1.11 will go via 192.168.123.216 Each rule can be enabled or disabled individually.
After routing table setting is configured, click the save button. 68 Configuration on NAT Router Destination SubnetMask Gateway Hop 192.168.1.0 255.255.255.0 192.168.123.216 1 192.168.0.0 255.255.255.0 192.168.123.103 1 Enabled ˇ ˇ So if, for example, the client3 wanted to send an IP data gram to 192.168.0.2, it would use the above table to determine that it had to go via 192.168.123.103 (a gateway), And if it sends Packets to 192.168.1.11 will go via 192.168.123.216 Each rule can be enabled or disabled individually.