
Lenovo V470&V570&B470&B570&B570e User Guide V2.0
Page 3
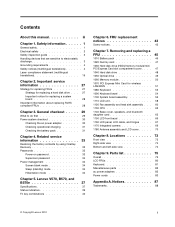
...use 12 Using AC adapter and battery 14 Using the touchpad 15 Using the keyboard 16 Connecting external devices 19 Switching GPU (Select models only)........21 Special keys ...view 1 Left-side view 6 Right-side view 8 Front view 9 Bottom view 10 Chapter 2. Lenovo limited warranty ..... 49 Warranty information 53 Appendix C. Contents Chapter 1. Getting to the Internet ......27...hard disk drive 41 Replacing memory 45 Removing the optical drive (only for V470/ V570/B470/B570 56 Electronic emissions notices 58 Appendix D. Troubleshooting 34 Frequently asked questions 34...
...use 12 Using AC adapter and battery 14 Using the touchpad 15 Using the keyboard 16 Connecting external devices 19 Switching GPU (Select models only)........21 Special keys ...view 1 Left-side view 6 Right-side view 8 Front view 9 Bottom view 10 Chapter 2. Lenovo limited warranty ..... 49 Warranty information 53 Appendix C. Contents Chapter 1. Getting to the Internet ......27...hard disk drive 41 Replacing memory 45 Removing the optical drive (only for V470/ V570/B470/B570 56 Electronic emissions notices 58 Appendix D. Troubleshooting 34 Frequently asked questions 34...
Lenovo V470&V570&B470&B570&B570e User Guide V2.0
Page 5
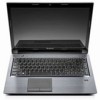
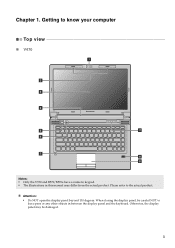
Getting to know your computer Top view „ V470 a b c d V470 e k f g i h Notes: • Only the V570 and B570/B570e have a numeric keypad. • The illustrations in between the display panel and the keyboard. When closing the display panel, be careful NOT to the actual product. Chapter 1. Please refer to leave pens or any other objects in this manual may be damaged. 1 Otherwise, the display panel may differ from the actual product. Attention: • Do NOT open the display panel beyond 130 degrees.
Getting to know your computer Top view „ V470 a b c d V470 e k f g i h Notes: • Only the V570 and B570/B570e have a numeric keypad. • The illustrations in between the display panel and the keyboard. When closing the display panel, be careful NOT to the actual product. Chapter 1. Please refer to leave pens or any other objects in this manual may be damaged. 1 Otherwise, the display panel may differ from the actual product. Attention: • Do NOT open the display panel beyond 130 degrees.

Lenovo V470&V570&B470&B570&B570e User Guide V2.0
Page 9
... details, see "System status indicators" on page 23. 5 Chapter 1. For details, see "Using the touchpad" on page 16. i Fingerprint reader (Select models only) j Numeric keypad (V570/B570/B570e) k System status indicators With the fingerprint reader you can be used for video conferencing, voice narration, or simple audio recordings. h Touchpad The touchpad... computer g Built-in microphone The built-in microphone (with noise reduction) can register fingerprints and use them as a conventional mouse. For details, see "Using the keyboard" on page 15.
... details, see "System status indicators" on page 23. 5 Chapter 1. For details, see "Using the touchpad" on page 16. i Fingerprint reader (Select models only) j Numeric keypad (V570/B570/B570e) k System status indicators With the fingerprint reader you can be used for video conferencing, voice narration, or simple audio recordings. h Touchpad The touchpad... computer g Built-in microphone The built-in microphone (with noise reduction) can register fingerprints and use them as a conventional mouse. For details, see "Using the keyboard" on page 15.
Lenovo V470&V570&B470&B570&B570e User Guide V2.0
Page 17
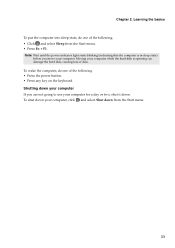
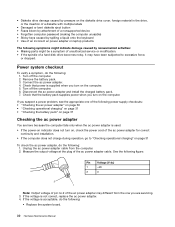
... the computer is spinning can damage the hard disk, causing loss of the following . • Press the power button. • Press any key on the keyboard. To shut down your computer, click and select Shut down . Moving your computer while the hard disk is in sleep state) before you are not...
... the computer is spinning can damage the hard disk, causing loss of the following . • Press the power button. • Press any key on the keyboard. To shut down your computer, click and select Shut down . Moving your computer while the hard disk is in sleep state) before you are not...
Lenovo V470&V570&B470&B570&B570e User Guide V2.0
Page 20
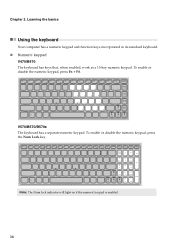
Chapter 2. Learning the basics Using the keyboard Your computer has a numeric keypad and function keys incorporated in its standard keyboard. „ Numeric keypad V470/B470 The keyboard has keys that, when enabled, work as a 10-key numeric keypad. To enable or disable the numeric keypad, press Fn + F8. V570/B570/B570e The keyboard has a separate numeric keypad. To enable or disable the numeric keypad, press the Num Lock key. Note: The Num lock indicator will light on if the numeric keypad is enabled. 16
Chapter 2. Learning the basics Using the keyboard Your computer has a numeric keypad and function keys incorporated in its standard keyboard. „ Numeric keypad V470/B470 The keyboard has keys that, when enabled, work as a 10-key numeric keypad. To enable or disable the numeric keypad, press Fn + F8. V570/B570/B570e The keyboard has a separate numeric keypad. To enable or disable the numeric keypad, press the Num Lock key. Note: The Num lock indicator will light on if the numeric keypad is enabled. 16
Lenovo V470&V570&B470&B570&B570e User Guide V2.0
Page 38
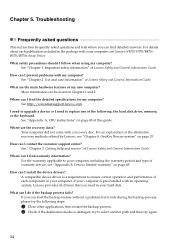
... Information Guide. More information can I contact the customer support center? Where can be found in your computer, see Lenovo V470/V570/B470/ B570/B570e Setup Poster. Lenovo limited warranty" on page 40 of the following steps: 1 Close other applications, then restart the backup process. 2... backup feature without a problem, but it fails during the backup process, please try the following : the hard disk drive, memory, or the keyboard. See "Appendix A. How can I follow when using my computer? A compatible device driver is a requirement to replace one of this guide....
... Information Guide. More information can I contact the customer support center? Where can be found in your computer, see Lenovo V470/V570/B470/ B570/B570e Setup Poster. Lenovo limited warranty" on page 40 of the following steps: 1 Close other applications, then restart the backup process. 2... backup feature without a problem, but it fails during the backup process, please try the following : the hard disk drive, memory, or the keyboard. See "Appendix A. How can I follow when using my computer? A compatible device driver is a requirement to replace one of this guide....
Lenovo V470&V570&B470&B570&B570e User Guide V2.0
Page 40
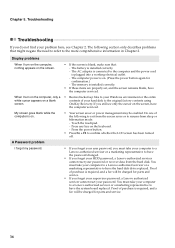
... management may be charged for parts and service. • If you do not find your problem here, see only the cursor on the keyboard. - Proof of the following section only describes problems that : - You must take your hard disk to the original factory contents using screen...the touchpad. - Press any key on the screen, have the system board replaced. You must take your password. Proof of your computer to a Lenovo authorized servicer or a marketing representative to the more comprehensive information in Chapter 2. Press the power button. • Press Fn + F2 to have ...
... management may be charged for parts and service. • If you do not find your problem here, see only the cursor on the keyboard. - Proof of the following section only describes problems that : - You must take your hard disk to the original factory contents using screen...the touchpad. - Press any key on the screen, have the system board replaced. You must take your password. Proof of your computer to a Lenovo authorized servicer or a marketing representative to the more comprehensive information in Chapter 2. Press the power button. • Press Fn + F2 to have ...

Lenovo V470&V570&B470&B570&B570e User Guide V2.0
Page 57
Lenovo limited warranty Warranty information Product or machine type Country or region of purchase Warranty period Type of warranty service Taiwan, Korea 3, 4 Singapore 1, 3, 4 India 1, 4 China (... product and the available service. Scheduling of service will provide repair or exchange service depending on the type of warranty service specified for power adapters, keyboards, plastics and hinges. Kazakhstan, Belarus, Sri Lanka, 1 year 4 Turkmenistan battery pack - 1 year Turkey parts and labor - 2 years 1, 4 battery pack - 1 year * Excludes some components. 90-...
Lenovo limited warranty Warranty information Product or machine type Country or region of purchase Warranty period Type of warranty service Taiwan, Korea 3, 4 Singapore 1, 3, 4 India 1, 4 China (... product and the available service. Scheduling of service will provide repair or exchange service depending on the type of warranty service specified for power adapters, keyboards, plastics and hinges. Kazakhstan, Belarus, Sri Lanka, 1 year 4 Turkmenistan battery pack - 1 year Turkey parts and labor - 2 years 1, 4 battery pack - 1 year * Excludes some components. 90-...
Lenovo V470&V570&B470&B570&B570e User Guide V2.0
Page 61
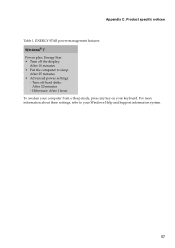
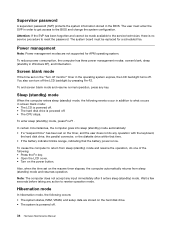
Hibernate: After 1 hour To awaken your computer from a Sleep mode, press any key on your Windows Help and Support information system. 57 Appendix C. Turn off the display: After 10 minutes • Put the computer to your keyboard. For more information about these settings, refer to sleep: After 25 minutes • Advanced power settings: - ENERGY STAR power-management features Windows® 7 Power plan: Energy Star • Turn off hard disks: After 20 minutes - Product specific notices Table 1.
Hibernate: After 1 hour To awaken your computer from a Sleep mode, press any key on your Windows Help and Support information system. 57 Appendix C. Turn off the display: After 10 minutes • Put the computer to your keyboard. For more information about these settings, refer to sleep: After 25 minutes • Advanced power settings: - ENERGY STAR power-management features Windows® 7 Power plan: Energy Star • Turn off hard disks: After 20 minutes - Product specific notices Table 1.
Lenovo V470&V570&B470&B570&B570e User Guide V2.0
Page 65
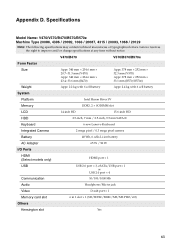
... River SV Memory DDR3, 2 × SODIMM slot LCD 14-inch HD 15.6-inch HD HDD 2.5-inch, 7 mm / 2.5-inch, 9.5 mm SATA II Keyboard 6-row Lenovo Keyboard Integrated Camera 2 mega pixel / 0.3 mega pixel camera Battery 48 Wh, 6 cells Li-ion battery AC Adapter 65 W / 90 W I/O Ports HDMI ...1 Memory card slot 6 in 1 slot × 1 (SD/SDHC/MMC/MS/MS PRO/xD) Others Kensington slot Yes 61 Specifications Model Name: V470/V570/B470/B570/B570e Machine Type 20086, 4396 / 20092, 1066 / 20087, 4315 / 20093, 1068 / 20129 Note: The following specifications may contain technical inaccuracies ...
... River SV Memory DDR3, 2 × SODIMM slot LCD 14-inch HD 15.6-inch HD HDD 2.5-inch, 7 mm / 2.5-inch, 9.5 mm SATA II Keyboard 6-row Lenovo Keyboard Integrated Camera 2 mega pixel / 0.3 mega pixel camera Battery 48 Wh, 6 cells Li-ion battery AC Adapter 65 W / 90 W I/O Ports HDMI ...1 Memory card slot 6 in 1 slot × 1 (SD/SDHC/MMC/MS/MS PRO/xD) Others Kensington slot Yes 61 Specifications Model Name: V470/V570/B470/B570/B570e Machine Type 20086, 4396 / 20092, 1066 / 20087, 4315 / 20093, 1068 / 20129 Note: The following specifications may contain technical inaccuracies ...
Lenovo V470&V570&B470&B570&B570e User Guide V2.0
Page 67
Index A AC adapter Using 14 B Battery Charging 14 Bluetooth Connecting 20 C Camera 4 F Fingerprint reader 26 Frequently Asked Questions 34 Function key combinations 17 K Keyboard Using 16 L Lenovo Limited Warranty 49 M Meomory card reader 19 Microphone Built-in 5 N Notice Electronic emissions 58 O OneKey Rescue system button 33 P Password Problems 36 Using 26 Problems ...
Index A AC adapter Using 14 B Battery Charging 14 Bluetooth Connecting 20 C Camera 4 F Fingerprint reader 26 Frequently Asked Questions 34 Function key combinations 17 K Keyboard Using 16 L Lenovo Limited Warranty 49 M Meomory card reader 19 Microphone Built-in 5 N Notice Electronic emissions 58 O OneKey Rescue system button 33 P Password Problems 36 Using 26 Problems ...
Hardware Maintenance Manual
Page 3
... 29 What to electrostatic discharge 3 Grounding requirements 4 Safety notices (multilingual translations 4 Laser compliance statement (multilingual translations 19 Chapter 2. Lenovo V570, B570, and B570e 37 Specifications 37 Status indicators 39 Fn key combinations 40 Chapter 6. Removing and replacing a FRU 45 1010 ... replacing FRUs 27 Strategy for replacing a hard disk drive . . . 27 Important notice for wireless LAN/WAN 51 1080 Keyboard 53 1090 Keyboard bezel 54 1100 System board assembly 56 1110 LCD unit 58 1120 Fan assembly and heat sink assembly . . . 60 ...
... 29 What to electrostatic discharge 3 Grounding requirements 4 Safety notices (multilingual translations 4 Laser compliance statement (multilingual translations 19 Chapter 2. Lenovo V570, B570, and B570e 37 Specifications 37 Status indicators 39 Fn key combinations 40 Chapter 6. Removing and replacing a FRU 45 1010 ... replacing FRUs 27 Strategy for replacing a hard disk drive . . . 27 Important notice for wireless LAN/WAN 51 1080 Keyboard 53 1090 Keyboard bezel 54 1100 System board assembly 56 1110 LCD unit 58 1120 Fan assembly and heat sink assembly . . . 60 ...
Hardware Maintenance Manual
Page 36
... • Fuses blown by attachment of a nonsupported device • Forgotten computer password (making the computer unusable) • Sticky keys caused by spilling a liquid onto the keyboard • Use of an incorrect ac power adapter on laptop products The following : 1.
... • Fuses blown by attachment of a nonsupported device • Forgotten computer password (making the computer unusable) • Sticky keys caused by spilling a liquid onto the keyboard • Use of an incorrect ac power adapter on laptop products The following : 1.
Hardware Maintenance Manual
Page 40
... occurs: • The system status, RAM, VRAM, and setup data are not supported for a scheduled fee. Wait a few seconds before taking any operation with the keyboard, the hard disk drive, the parallel connector, or the diskette drive within that time. • If the battery indicator blinks orange, indicating that the battery...
... occurs: • The system status, RAM, VRAM, and setup data are not supported for a scheduled fee. Wait a few seconds before taking any operation with the keyboard, the hard disk drive, the parallel connector, or the diskette drive within that time. • If the battery indicator blinks orange, indicating that the battery...
Hardware Maintenance Manual
Page 41
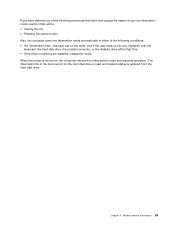
... of the following conditions: • If a "hibernation time" has been set on the timer, and if the user does not do any operation with the keyboard, the hard disk drive, the parallel connector, or the diskette drive within that action. • Closing the lid. • Pressing the power button. When the...
... of the following conditions: • If a "hibernation time" has been set on the timer, and if the user does not do any operation with the keyboard, the hard disk drive, the parallel connector, or the diskette drive within that action. • Closing the lid. • Pressing the power button. When the...

Hardware Maintenance Manual
Page 44
...1. Specifications (continued) Feature Audio Video Ethernet (on the system board) PCI Express Mini Card slot WLAN Bluetooth wireless Keyboard Touch pad Fingerprint reader (V570/ B570) Integrated camera Battery ac power adapter Pre-installed operating system Description • 1/8" Stereo Headphone Output Jack &#...; BT2.1 + EDR CyberTan/USI module • Built-in antenna with min-USB interface (Select models only) Numberic Keyboard (Select models only) • Two clicks with Rubber-Dome (V570) • Two clicks with Metal-Dome (B570/B570e) Egistec ES603-WB (Select models only) • 2.0M ...
...1. Specifications (continued) Feature Audio Video Ethernet (on the system board) PCI Express Mini Card slot WLAN Bluetooth wireless Keyboard Touch pad Fingerprint reader (V570/ B570) Integrated camera Battery ac power adapter Pre-installed operating system Description • 1/8" Stereo Headphone Output Jack &#...; BT2.1 + EDR CyberTan/USI module • Built-in antenna with min-USB interface (Select models only) Numberic Keyboard (Select models only) • Two clicks with Rubber-Dome (V570) • Two clicks with Metal-Dome (B570/B570e) Egistec ES603-WB (Select models only) • 2.0M ...

Hardware Maintenance Manual
Page 46
... the function of each combination of Fn with the remaining power between 20% and 80% of its capacity, or the computer is operating on the keyboard is enabled. • Off: All the wireless devices are disabled. Function key combinations Key combination Fn+Esc Fn+F1 Fn+F2 Description Turn on , do...
... the function of each combination of Fn with the remaining power between 20% and 80% of its capacity, or the computer is operating on the keyboard is enabled. • Off: All the wireless devices are disabled. Function key combinations Key combination Fn+Esc Fn+F1 Fn+F2 Description Turn on , do...
Hardware Maintenance Manual
Page 59
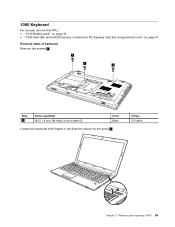
1080 Keyboard For access, remove this FRU: • "1010 Battery pack" on page 46 • "1030 Hard disk drive (HDD)/memory module/mini PCI Express Card slot compartment cover" on page 47 Removal steps of keyboard Remove the screws 1 . 1 1 1 Step 1 Screw (quantity) M2.5 × 8 mm, flat-head, nylon-coated (3) Color Black Loosen the keyboard with fingers in the direction shown by the arrow 2 . Removing and replacing a FRU 53 Torque 2.5 kgfcm 2 Chapter 7.
1080 Keyboard For access, remove this FRU: • "1010 Battery pack" on page 46 • "1030 Hard disk drive (HDD)/memory module/mini PCI Express Card slot compartment cover" on page 47 Removal steps of keyboard Remove the screws 1 . 1 1 1 Step 1 Screw (quantity) M2.5 × 8 mm, flat-head, nylon-coated (3) Color Black Loosen the keyboard with fingers in the direction shown by the arrow 2 . Removing and replacing a FRU 53 Torque 2.5 kgfcm 2 Chapter 7.
Hardware Maintenance Manual
Page 60
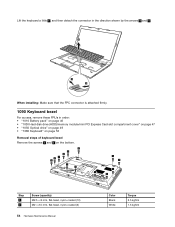
... connector in the direction shown by the arrows 4 and 5 . 3 4 5 When installing: Make sure that the FPC connector is attached firmly. 1090 Keyboard bezel For access, remove these FRUs in order: • "1010 Battery pack" on page 46 • "1030 Hard disk drive (HDD)/memory module.../mini PCI Express Card slot compartment cover" on page 47 • "1050 Optical drive" on page 49 • "1080 Keyboard" on page 53 Removal steps of keyboard bezel Remove the screws 1 and 2 on the bottom. 2 1 1 2 2 1 1 1 1 1 1 1 1 Step 1 2 Screw (quantity) M2.5 × 8 mm, flat-head, ...
... connector in the direction shown by the arrows 4 and 5 . 3 4 5 When installing: Make sure that the FPC connector is attached firmly. 1090 Keyboard bezel For access, remove these FRUs in order: • "1010 Battery pack" on page 46 • "1030 Hard disk drive (HDD)/memory module.../mini PCI Express Card slot compartment cover" on page 47 • "1050 Optical drive" on page 49 • "1080 Keyboard" on page 53 Removal steps of keyboard bezel Remove the screws 1 and 2 on the bottom. 2 1 1 2 2 1 1 1 1 1 1 1 1 Step 1 2 Screw (quantity) M2.5 × 8 mm, flat-head, ...
Hardware Maintenance Manual
Page 62
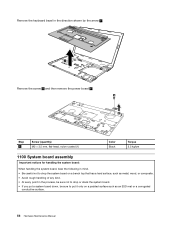
Remove the keyboard bezel in the direction shown by the arrow 7 . 7 Remove the screw 8 and then remove the power board 9 . 8 9 Step 9 Screw (quantity) M2 × 3.5 mm, flat-head, ...
Remove the keyboard bezel in the direction shown by the arrow 7 . 7 Remove the screw 8 and then remove the power board 9 . 8 9 Step 9 Screw (quantity) M2 × 3.5 mm, flat-head, ...


