
(English) Rack Installation Instructions
Page 1
... that you read and understand the documentation that comes with the rack cabinet for the server and review the guidelines in this publication before you can obtain a Portable Document Format (PDF) version from the Lenovo® Support Web site at: http://www.lenovo.com/ThinkServerUserGuides CAUTION: Be sure to read and understand all the...
... that you read and understand the documentation that comes with the rack cabinet for the server and review the guidelines in this publication before you can obtain a Portable Document Format (PDF) version from the Lenovo® Support Web site at: http://www.lenovo.com/ThinkServerUserGuides CAUTION: Be sure to read and understand all the...
(English) Rack Installation Instructions
Page 2
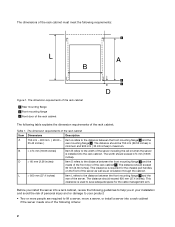
...66 inches) Item B refers to help you in maximum. Before you install the server into a rack cabinet, review the following requirements: Figure 1. Item A refers to the distance between the front mounting flange 2 and the rear of the rack cabinet 3 . L > 950 mm (37.4 inches) Item L refers to ... flange 2 and the inside of the front door of the server. The distance should exceed 474 mm (18.66 inches). D > 60 mm (2.36 inches) Item D refers to lift a server, move a server, or install a server into the rack cabinet. This clearance is required for the cable management arm. ...
...66 inches) Item B refers to help you in maximum. Before you install the server into a rack cabinet, review the following requirements: Figure 1. Item A refers to the distance between the front mounting flange 2 and the rear of the rack cabinet 3 . L > 950 mm (37.4 inches) Item L refers to ... flange 2 and the inside of the front door of the server. The distance should exceed 474 mm (18.66 inches). D > 60 mm (2.36 inches) Item D refers to lift a server, move a server, or install a server into the rack cabinet. This clearance is required for the cable management arm. ...

(English) Rack Installation Instructions
Page 3
... overload the electrical outlet when you properly manage all attached devices and the server. The server is 2U or larger. ("U" is the unit of the server is rated above or below an installed server in the rack cabinet. • Connect all power cords to proper electrical outlets and refer...the room air temperature is equivalent to help ensure proper air circulation. • Install the server only in a rack cabinet with the rack cabinet for defining the vertical space used by your rack cabinet. The weight of measurement for cabling information to 4.445 cm or 1.75 inches.) -...
... overload the electrical outlet when you properly manage all attached devices and the server. The server is 2U or larger. ("U" is the unit of the server is rated above or below an installed server in the rack cabinet. • Connect all power cords to proper electrical outlets and refer...the room air temperature is equivalent to help ensure proper air circulation. • Install the server only in a rack cabinet with the rack cabinet for defining the vertical space used by your rack cabinet. The weight of measurement for cabling information to 4.445 cm or 1.75 inches.) -...

(English) Rack Installation Instructions
Page 4
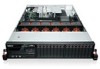
Parts in grey. Contact your server and lay all the parts from the rail kit package shipped with your place of this section for more information about the cable management arm. &#... to the later part of purchase if any part is missing or damaged. Notes: • An optional cable management arm can help you begin the rack installation, remove all the parts on a working surface. Figure 2.
Parts in grey. Contact your server and lay all the parts from the rail kit package shipped with your place of this section for more information about the cable management arm. &#... to the later part of purchase if any part is missing or damaged. Notes: • An optional cable management arm can help you begin the rack installation, remove all the parts on a working surface. Figure 2.

(English) Rack Installation Instructions
Page 6
... in a mounting flange are aligned with the rack cabinet. Figure 5. Measure the rack before reading and understanding the "Guidelines" on the rear end of the right slide rail to the mounting area so that the tabs on page 1 . To install the server into groups by doing the following : 1. ...mounting flange, refer to the documentation that comes with the corresponding holes in the figure until the rear end of the rack cabinet, select a proper rack mounting area for the server. Install the rail kit by measuring marks. On a rear mounting flange of the right side of the right slide...
... in a mounting flange are aligned with the rack cabinet. Figure 5. Measure the rack before reading and understanding the "Guidelines" on the rear end of the right slide rail to the mounting area so that the tabs on page 1 . To install the server into groups by doing the following : 1. ...mounting flange, refer to the documentation that comes with the corresponding holes in the figure until the rear end of the rack cabinet, select a proper rack mounting area for the server. Install the rail kit by measuring marks. On a rear mounting flange of the right side of the right slide...

(English) Rack Installation Instructions
Page 13
Figure 15. Sliding the inner rails with the server into the rack cabinet 13 Gently slide the inner rails with the server into the rack cabinet 2 . CAUTION: To avoid injury to release the inner rails. 4. Lift the latch 1 on both sides to fingers, keep hands free from the latch area when the latch approaches the outer rail.
Figure 15. Sliding the inner rails with the server into the rack cabinet 13 Gently slide the inner rails with the server into the rack cabinet 2 . CAUTION: To avoid injury to release the inner rails. 4. Lift the latch 1 on both sides to fingers, keep hands free from the latch area when the latch approaches the outer rail.

(English) Rack Installation Instructions
Page 14
Other company, product, or service names may be trademarks or service marks of the server. Securing the server to the rack cabinet with an M6 x 16 screw on both . 5. Secure the server to the rack cabinet Trademarks Lenovo and the Lenovo logo are trademarks of Lenovo in the United States, other countries, or both sides of the front of others. 14 Figure 16.
Other company, product, or service names may be trademarks or service marks of the server. Securing the server to the rack cabinet with an M6 x 16 screw on both . 5. Secure the server to the rack cabinet Trademarks Lenovo and the Lenovo logo are trademarks of Lenovo in the United States, other countries, or both sides of the front of others. 14 Figure 16.