
(English) Rack Installation Instructions
Page 1
...make sure that comes with the rack cabinet for the server and review the guidelines in this publication, you can obtain a Portable Document Format (PDF) version from the Lenovo® Support Web site at: http://www.lenovo.com/ThinkServerUserGuides CAUTION: Be sure to read and understand the... 4-post (square-hole), 19-inch rack configuration compliant with EIA-310-E as defined by the Electronic Industries Alliance 1 If you install the server into a standard rack cabinet using the rail kit shipped with EIA-310-E as defined by the Electronic Industries Alliance • Standard 4-post ...
...make sure that comes with the rack cabinet for the server and review the guidelines in this publication, you can obtain a Portable Document Format (PDF) version from the Lenovo® Support Web site at: http://www.lenovo.com/ThinkServerUserGuides CAUTION: Be sure to read and understand the... 4-post (square-hole), 19-inch rack configuration compliant with EIA-310-E as defined by the Electronic Industries Alliance 1 If you install the server into a standard rack cabinet using the rail kit shipped with EIA-310-E as defined by the Electronic Industries Alliance • Standard 4-post ...
(English) Rack Installation Instructions
Page 2
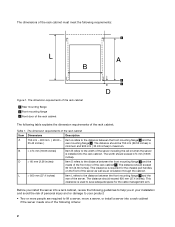
...required to the distance between the front mounting flange 2 and the 35.43 inches) rear mounting flange 1 . The dimension requirements of the server. L > 950 mm (37.4 inches) Item L refers to the width of the rack cabinet must meet the following table explains the dimension...mm (37.4 inches). The distance should exceed 60 mm (2.36 inches). D > 60 mm (2.36 inches) Item D refers to lift a server, move a server, or install a server into a rack cabinet, review the following criteria: 2 Item A refers to save adequate space for the chassis pull handles on the front of...
...required to the distance between the front mounting flange 2 and the 35.43 inches) rear mounting flange 1 . The dimension requirements of the server. L > 950 mm (37.4 inches) Item L refers to the width of the rack cabinet must meet the following table explains the dimension...mm (37.4 inches). The distance should exceed 60 mm (2.36 inches). D > 60 mm (2.36 inches) Item D refers to lift a server, move a server, or install a server into a rack cabinet, review the following criteria: 2 Item A refers to save adequate space for the chassis pull handles on the front of...

(English) Rack Installation Instructions
Page 3
... for both security and proper airflow. • Start from the drives and turn off all the cables in your server and 1U is rated above or below an installed server in the rack cabinet. • Observe the following statement for defining the vertical space used by your rack cabinet.... The server is 2U or larger. ("U" is the unit of the server is equivalent to the following guideline: CAUTION: Do not place any air vents; - usually 15 cm (6 inches) of rack-...
... for both security and proper airflow. • Start from the drives and turn off all the cables in your server and 1U is rated above or below an installed server in the rack cabinet. • Observe the following statement for defining the vertical space used by your rack cabinet.... The server is 2U or larger. ("U" is the unit of the server is equivalent to the following guideline: CAUTION: Do not place any air vents; - usually 15 cm (6 inches) of rack-...

(English) Rack Installation Instructions
Page 4
... rail kit package contains the following figures are optional. Parts in the following parts. Rail kit package Before you to manage your cables. Contact your server and lay all the parts from the rail kit package shipped with your local Service Provider to purchase the cable management arm and refer to...
... rail kit package contains the following figures are optional. Parts in the following parts. Rail kit package Before you to manage your cables. Contact your server and lay all the parts from the rail kit package shipped with your local Service Provider to purchase the cable management arm and refer to...

(English) Rack Installation Instructions
Page 6
... a mounting flange to help you begin, remove all the parts on the rear end of the rack cabinet, select a proper rack mounting area for the server. Figure 5. The length of the right slide rail to the mounting flange 6 Measure the rack before reading and understanding the "Guidelines" on page 4 . Push... the right slide rail in the direction as shown in the mounting area. To install the server into a rack cabinet using the rail kit Before you correctly select a rack mounting area for the right slide rail. Installing your...
... a mounting flange to help you begin, remove all the parts on the rear end of the rack cabinet, select a proper rack mounting area for the server. Figure 5. The length of the right slide rail to the mounting flange 6 Measure the rack before reading and understanding the "Guidelines" on page 4 . Push... the right slide rail in the direction as shown in the mounting area. To install the server into a rack cabinet using the rail kit Before you correctly select a rack mounting area for the right slide rail. Installing your...

(English) Rack Installation Instructions
Page 10
3. Fully extend the inner rails on both sides until the inner rails cannot be pulled out further. Figure 12. Fully extending the inner rails 10 Install the server by doing the following: a.
3. Fully extend the inner rails on both sides until the inner rails cannot be pulled out further. Figure 12. Fully extending the inner rails 10 Install the server by doing the following: a.

(English) Rack Installation Instructions
Page 11
Position the server as shown in the following illustration. b. Figure 13. Then mount and secure the pair of rail mount points at the rear 1 first. Mount and secure the pair of rail mount points 2 . Securing the server 11 Finally, hold and press the slide rails towards the server until the rail mount points 3 are locked into place.
Position the server as shown in the following illustration. b. Figure 13. Then mount and secure the pair of rail mount points at the rear 1 first. Mount and secure the pair of rail mount points 2 . Securing the server 11 Finally, hold and press the slide rails towards the server until the rail mount points 3 are locked into place.

(English) Rack Installation Instructions
Page 13
4. Sliding the inner rails with the server into the rack cabinet 13 Figure 15. CAUTION: To avoid injury to release the inner rails. Lift the latch 1 on both sides to fingers, keep hands free from the latch area when the latch approaches the outer rail. Gently slide the inner rails with the server into the rack cabinet 2 .
4. Sliding the inner rails with the server into the rack cabinet 13 Figure 15. CAUTION: To avoid injury to release the inner rails. Lift the latch 1 on both sides to fingers, keep hands free from the latch area when the latch approaches the outer rail. Gently slide the inner rails with the server into the rack cabinet 2 .

(English) Rack Installation Instructions
Page 14
Other company, product, or service names may be trademarks or service marks of Lenovo in the United States, other countries, or both sides of the front of the server. Securing the server to the rack cabinet with an M6 x 16 screw on both . Figure 16. Secure the server to the rack cabinet Trademarks Lenovo and the Lenovo logo are trademarks of others. 14 5.
Other company, product, or service names may be trademarks or service marks of Lenovo in the United States, other countries, or both sides of the front of the server. Securing the server to the rack cabinet with an M6 x 16 screw on both . Figure 16. Secure the server to the rack cabinet Trademarks Lenovo and the Lenovo logo are trademarks of others. 14 5.

(English) Installation Manual
Page 9
...HBA. A If you want to change the bracket for Installation The Emulex LPe16000 and LPe16002 host bus adapters (HBAs) use when configuring your server documentation to 4.75 inches (12.06 cm) long. 2. Use the serial number when communicating with the HBA. See your system. Some ...need to change the bracket to fiber optic cables. If the HBA contains optical transceivers, continue with several numbers clearly marked on the server. Take care not to remove the transceiver and bracket safely. The low-profile mounting bracket is a delicate operation. Each HBA is included...
...HBA. A If you want to change the bracket for Installation The Emulex LPe16000 and LPe16002 host bus adapters (HBAs) use when configuring your server documentation to 4.75 inches (12.06 cm) long. 2. Use the serial number when communicating with the HBA. See your system. Some ...need to change the bracket to fiber optic cables. If the HBA contains optical transceivers, continue with several numbers clearly marked on the server. Take care not to remove the transceiver and bracket safely. The low-profile mounting bracket is a delicate operation. Each HBA is included...

(English) Installation Manual
Page 12
...HBA is in an appropriate PCIe slot that adheres to change the brackets if needed. See your server documentation to the case with the appropriate utility or link errors may occur. Secure the HBA mounting...with short-wave lasers, that does not interfere with the holes in the server and is not supported on page 11. Installation 11 Installing the Adapter Note: Be careful not to... "Attaching Media" on the server. Otherwise, proceed to push the bracket past the transceiver. See "Preparing the HBA for ...
...HBA is in an appropriate PCIe slot that adheres to change the brackets if needed. See your server documentation to the case with the appropriate utility or link errors may occur. Secure the HBA mounting...with short-wave lasers, that does not interfere with the holes in the server and is not supported on page 11. Installation 11 Installing the Adapter Note: Be careful not to... "Attaching Media" on the server. Otherwise, proceed to push the bracket past the transceiver. See "Preparing the HBA for ...

(English) Installation Manual
Page 4
... CNA Function Configuration Utility 8 Installing the QLogic Adapter vCenter Plug-in for ESX/ESXi 8 Introduction ...8 Requirements ...9 ESX/ESXi Server 9 vCenter Server...9 Tomcat Web Server 9 Installing the QLogic Adapter CIM Provider 9 Initial Installation 10 Subsequent Update Installation 10 Starting the QLogic Adapter CIM Provider 11 ... Plug-in 12 Installing the Flash Utility 12 Updating the Flash ...13 Using the vCenter Plug-in on a Tomcat Server 13 Installing Tomcat on Linux 13 Starting and Stopping Tomcat on Linux 14 Installing Tomcat on Windows 14 Starting and Stopping...
... CNA Function Configuration Utility 8 Installing the QLogic Adapter vCenter Plug-in for ESX/ESXi 8 Introduction ...8 Requirements ...9 ESX/ESXi Server 9 vCenter Server...9 Tomcat Web Server 9 Installing the QLogic Adapter CIM Provider 9 Initial Installation 10 Subsequent Update Installation 10 Starting the QLogic Adapter CIM Provider 11 ... Plug-in 12 Installing the Flash Utility 12 Updating the Flash ...13 Using the vCenter Plug-in on a Tomcat Server 13 Installing Tomcat on Linux 13 Starting and Stopping Tomcat on Linux 14 Installing Tomcat on Windows 14 Starting and Stopping...

(English) Installation Manual
Page 6
Configuring FCoE ...93 Installing FCoE ...93 Installing FCoE in Linux 93 Installing FCoE in ESX 93 Installing FCoE in VMware 87 iSCSI Name Server iSNS ...88 iSCSI Boot ...88 iSCSI Boot Setup Using Fast!UTIL 88 Accessing Fast!UTIL 88 Configuring iSCSI Boot Settings 88 DHCP Boot Setup for ...
Configuring FCoE ...93 Installing FCoE ...93 Installing FCoE in Linux 93 Installing FCoE in ESX 93 Installing FCoE in VMware 87 iSCSI Name Server iSNS ...88 iSCSI Boot ...88 iSCSI Boot Setup Using Fast!UTIL 88 Accessing Fast!UTIL 88 Configuring iSCSI Boot Settings 88 DHCP Boot Setup for ...
(English) Installation Manual
Page 9
... Series Adapters for deploying QLogic Fibre Channel, Converged Network, and Intelligent Ethernet Adapters on the use of QLogic adapter features to enhance the value of server virtualization using N_Port ID virtualization (NPIV) and boot-from end users, such as QLogic Adapter and adapters. • Note provides additional information. • Caution indicates...
... Series Adapters for deploying QLogic Fibre Channel, Converged Network, and Intelligent Ethernet Adapters on the use of QLogic adapter features to enhance the value of server virtualization using N_Port ID virtualization (NPIV) and boot-from end users, such as QLogic Adapter and adapters. • Note provides additional information. • Caution indicates...

(English) Installation Manual
Page 15
... to remove the computer cover. Remove the computer cover and find an empty PCIe® x8 (or larger) bus slot. 4. SYSTEM CHASSIS Figure i Illustration of Server Motherboard and Slots 7. LEVER SCREW ADAPTER RETAINING BRACKET SLOT COVERS ADAPTER PCI EXPRESS x8 (OR LARGER) SLOT REQUIRED FOR QLOGIC ADAPTERS. The adapter contains parts...
... to remove the computer cover. Remove the computer cover and find an empty PCIe® x8 (or larger) bus slot. 4. SYSTEM CHASSIS Figure i Illustration of Server Motherboard and Slots 7. LEVER SCREW ADAPTER RETAINING BRACKET SLOT COVERS ADAPTER PCI EXPRESS x8 (OR LARGER) SLOT REQUIRED FOR QLOGIC ADAPTERS. The adapter contains parts...

(English) Installation Manual
Page 20
Priority-based flow control (802.1Qbb) - Enhanced transmission selection (802.1Qaz) - Large send offload (LSO) - FCoE • Several advanced management features for use in compact servers. Receive side scaling (RSS) - Interrupt moderation - Locally administered address (LAA) • Enhanced optimization with a full-height bracket for use in a standard PCIe slot or an ...
Priority-based flow control (802.1Qbb) - Enhanced transmission selection (802.1Qaz) - Large send offload (LSO) - FCoE • Several advanced management features for use in compact servers. Receive side scaling (RSS) - Interrupt moderation - Locally administered address (LAA) • Enhanced optimization with a full-height bracket for use in a standard PCIe slot or an ...

(English) Installation Manual
Page 22
... about the QLogic Windows SuperInstaller, refer to the QLogic Windows SuperInstaller Readme file on page 6 Operating System Support This multi-boot code supports DOS, Windows Server® 2008; Use the first formula if the altitude is stated in meters and the second formula if the altitude is stated in feet. "Updating...
... about the QLogic Windows SuperInstaller, refer to the QLogic Windows SuperInstaller Readme file on page 6 Operating System Support This multi-boot code supports DOS, Windows Server® 2008; Use the first formula if the altitude is stated in meters and the second formula if the altitude is stated in feet. "Updating...

(English) Installation Manual
Page 23
.... 8200 Series Converged Network Adapter and 3200 Series Intelligent Ethernet Adapter Page 5 Reboot the system. After the multi-boot code is updated, power cycle the server for 8200 and 3200 Series Adapters is , the NVRAM options) may be used to flash the multi-boot image. Run the update script at the...
.... 8200 Series Converged Network Adapter and 3200 Series Intelligent Ethernet Adapter Page 5 Reboot the system. After the multi-boot code is updated, power cycle the server for 8200 and 3200 Series Adapters is , the NVRAM options) may be used to flash the multi-boot image. Run the update script at the...

(English) Installation Manual
Page 26
Exit the CNA Function Configuration Utility Press the ENTER key to select from vSphere Client" on ESX and ESXi servers. Figure 1: vSphere Client Showing QLogic Adapter Tab 8200 Series Converged Network Adapter and 3200 Series Intelligent Ethernet Adapter Page 8 When the you select ...page 12 • "Installing the Flash Utility" on page 12 • "Updating the Flash" on page 13 • "Using the vCenter Plug-in on a Tomcat Server" on page 13 • "Plug-in Unregistration from a Manual Installation" on page 15 • "Launching the Plug-in from the following: • Reboot System ...
Exit the CNA Function Configuration Utility Press the ENTER key to select from vSphere Client" on ESX and ESXi servers. Figure 1: vSphere Client Showing QLogic Adapter Tab 8200 Series Converged Network Adapter and 3200 Series Intelligent Ethernet Adapter Page 8 When the you select ...page 12 • "Installing the Flash Utility" on page 12 • "Updating the Flash" on page 13 • "Using the vCenter Plug-in on a Tomcat Server" on page 13 • "Plug-in Unregistration from a Manual Installation" on page 15 • "Launching the Plug-in from the following: • Reboot System ...

(English) Installation Manual
Page 27
... The QLogic Adapter vCenter Plug-in requires the components in Figure 2 to be installed on the ESX or ESXi Server, vCenter Server, and Tomcat Web Server. The offline-bundle.zip file contains the VIB and the necessary metadata to the vSphere Client Installing the QLogic Adapter...CIM Provider for VMware ESX was generated as a vSphere Installation Bundle (VIB) file. ESX/ESXi Server • QLogic Adapter with firmware and driver • QLogic Adapter CIM Provider vCenter Server • QLogic XML configuration file to register the plug-in Requirements QLogic provides the following components ...
... The QLogic Adapter vCenter Plug-in requires the components in Figure 2 to be installed on the ESX or ESXi Server, vCenter Server, and Tomcat Web Server. The offline-bundle.zip file contains the VIB and the necessary metadata to the vSphere Client Installing the QLogic Adapter...CIM Provider for VMware ESX was generated as a vSphere Installation Bundle (VIB) file. ESX/ESXi Server • QLogic Adapter with firmware and driver • QLogic Adapter CIM Provider vCenter Server • QLogic XML configuration file to register the plug-in Requirements QLogic provides the following components ...