User Guide
Page 24
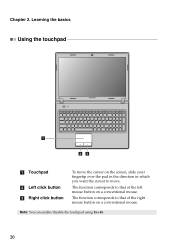
Learning the basics Using the touchpad 1 23 a Touchpad b Left click button c Right click button To move . Note: You can enable/disable the touchpad using Fn+F6. 20 The function corresponds to move the cursor on the screen, slide your fingertip over the pad in the direction in which you want the cursor to that of the right mouse button on a conventional mouse. The function corresponds to that of the left mouse button on a conventional mouse. Chapter 2.
Learning the basics Using the touchpad 1 23 a Touchpad b Left click button c Right click button To move . Note: You can enable/disable the touchpad using Fn+F6. 20 The function corresponds to move the cursor on the screen, slide your fingertip over the pad in the direction in which you want the cursor to that of the right mouse button on a conventional mouse. The function corresponds to that of the left mouse button on a conventional mouse. Chapter 2.
User Guide
Page 27
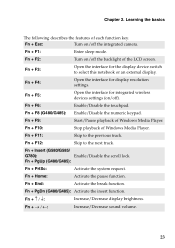
.... Fn + F1: Enter sleep mode. Fn + F6: Enable/Disable the touchpad. Fn + F12: Skip to select this notebook or an external display. Fn + Insert (G580/G585/ G780): Enable/Disable the scroll lock. Fn + F11: Skip to the previous track. Fn Increase/Decrease display brightness. Chapter 2. Fn + F10: Stop playback of each.... Learning the basics The following describes the features of Windows Media Player. Fn + F2: Turn on /off ). Fn + F9: Start/Pause playback of the LCD screen.
.... Fn + F1: Enter sleep mode. Fn + F6: Enable/Disable the touchpad. Fn + F12: Skip to select this notebook or an external display. Fn + Insert (G580/G585/ G780): Enable/Disable the scroll lock. Fn + F11: Skip to the previous track. Fn Increase/Decrease display brightness. Chapter 2. Fn + F10: Stop playback of each.... Learning the basics The following describes the features of Windows Media Player. Fn + F2: Turn on /off ). Fn + F9: Start/Pause playback of the LCD screen.
User Guide
Page 34
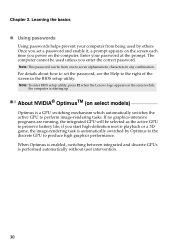
..., switching between integrated and discrete GPUs is starting up. Note: To enter BIOS setup utility, press F2 when the Lenovo logo appears on the screen while the computer is performed automatically without user intervention. 30 if you power on select models Optimus is automatically switched by...unless you enter the correct password. Chapter 2. For details about how to set a password and enable it, a prompt appears on the screen each time you start high-definition movie playback or a 3D game, the image-rendering task is a GPU switching mechanism which automatically switches ...
..., switching between integrated and discrete GPUs is starting up. Note: To enter BIOS setup utility, press F2 when the Lenovo logo appears on the screen while the computer is performed automatically without user intervention. 30 if you power on select models Optimus is automatically switched by...unless you enter the correct password. Chapter 2. For details about how to set a password and enable it, a prompt appears on the screen each time you start high-definition movie playback or a 3D game, the image-rendering task is a GPU switching mechanism which automatically switches ...
User Guide
Page 51
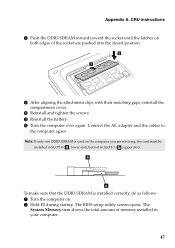
... the attachment clips with their matching gaps, reinstall the compartment cover. 0 Reinstall and tighten the screws. B Turn the computer over again. The BIOS setup utility screen opens. Connect the AC adapter and the cables to the computer again. b a To make sure that the DDR3 SDRAM is used on both edges of...
... the attachment clips with their matching gaps, reinstall the compartment cover. 0 Reinstall and tighten the screws. B Turn the computer over again. The BIOS setup utility screen opens. Connect the AC adapter and the cables to the computer again. b a To make sure that the DDR3 SDRAM is used on both edges of...
Hardware Maintenance Manual
Page 3
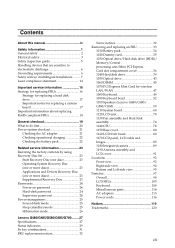
...Disc 23 Passwords 24 Power-on password 24 Hard-disk password 24 Supervisor password 24 Power management 25 Screen blank mode 25 Sleep (standby) mode 25 Hibernation mode 26 Lenovo G480/G485/G580/G585/G780 ........27 Specifications 27 Status indicators 29 Fn key combinations 31 FRU replacement notices 32 Screw notices...1060 DIMM 45 1070 PCI Express Mini Card for wireless LAN/WAN 47 1080 Keyboard 49 1090 Keyboard bezel 52 1100 Speakers (Lenovo G480/G485/ G580/G585 59 1110 System board 60 1120 LCD unit 70 1130 Fan assembly and Heat Sink assembly 74 1140 CPU 78 1150 Base cover...
...Disc 23 Passwords 24 Power-on password 24 Hard-disk password 24 Supervisor password 24 Power management 25 Screen blank mode 25 Sleep (standby) mode 25 Hibernation mode 26 Lenovo G480/G485/G580/G585/G780 ........27 Specifications 27 Status indicators 29 Fn key combinations 31 FRU replacement notices 32 Screw notices...1060 DIMM 45 1070 PCI Express Mini Card for wireless LAN/WAN 47 1080 Keyboard 49 1090 Keyboard bezel 52 1100 Speakers (Lenovo G480/G485/ G580/G585 59 1110 System board 60 1120 LCD unit 70 1130 Fan assembly and Heat Sink assembly 74 1140 CPU 78 1150 Base cover...
Hardware Maintenance Manual
Page 20
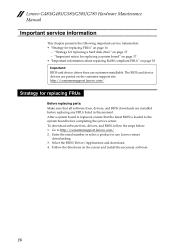
...board before replacing any FRUs listed in this manual. Enter the serial number or select a product or use Lenovo smart downloading. 3. "Strategy for replacing a hard disk drive" on page 16 - Lenovo G480/G485/G580/G585/G780 Hardware Maintenance Manual Important service information This chapter presents the following important service information: • "Strategy for... fixes, drivers, and BIOS downloads are customer-installable. To download software fixes, drivers, and BIOS, follow the steps below: 1. Follow the directions on the screen and install the necessary software. 16
...board before replacing any FRUs listed in this manual. Enter the serial number or select a product or use Lenovo smart downloading. 3. "Strategy for replacing a hard disk drive" on page 16 - Lenovo G480/G485/G580/G585/G780 Hardware Maintenance Manual Important service information This chapter presents the following important service information: • "Strategy for... fixes, drivers, and BIOS downloads are customer-installable. To download software fixes, drivers, and BIOS, follow the steps below: 1. Follow the directions on the screen and install the necessary software. 16
Hardware Maintenance Manual
Page 27
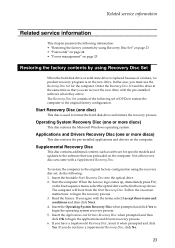
Order the Recovery Disc Set and the drive at the same time so that was preloaded on the computer. on -screen instructions to the software that you do the following: 1. Follow the on the boot sequence menu, select the optical drive as software for the computer. ... F12; Start the computer. Not all recovery disc sets come with the terms, select I accept these terms and conditions and then click Next. 4. When the Lenovo logo comes up device. If you can recover the new drive with the pre-installed software when they arrive. Start Recovery Disc (one disc) This...
Order the Recovery Disc Set and the drive at the same time so that was preloaded on the computer. on -screen instructions to the software that you do the following: 1. Follow the on the boot sequence menu, select the optical drive as software for the computer. ... F12; Start the computer. Not all recovery disc sets come with the terms, select I accept these terms and conditions and then click Next. 4. When the Lenovo logo comes up device. If you can recover the new drive with the pre-installed software when they arrive. Start Recovery Disc (one disc) This...
Hardware Maintenance Manual
Page 28
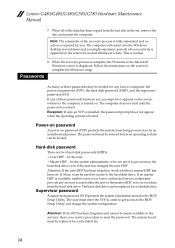
Passwords As many as three passwords may be replaced for a scheduled fee. 24 for any Lenovo computer: the power-on the screen for access to the BIOS Setup Utility and change the system configuration. Supervisor password A supervisor password (SVP) protects the ... A power-on password (POP) protects the system from being powered on the screen whenever the computer is normal. 8. The user must be made available to the Microsoft Windows screen is booted. Lenovo G480/G485/G580/G585/G780 Hardware Maintenance Manual 7. Exception: If only an SVP is installed, the password...
Passwords As many as three passwords may be replaced for a scheduled fee. 24 for any Lenovo computer: the power-on the screen for access to the BIOS Setup Utility and change the system configuration. Supervisor password A supervisor password (SVP) protects the ... A power-on password (POP) protects the system from being powered on the screen whenever the computer is normal. 8. The user must be made available to the Microsoft Windows screen is booted. Lenovo G480/G485/G580/G585/G780 Hardware Maintenance Manual 7. Exception: If only an SVP is installed, the password...

Hardware Maintenance Manual
Page 29
...: The computer does not accept any key. Related service information Power management Note: Power management modes are not supported for APM operating system. To end screen blank mode and resume normal operation, press any input immediately after it enters sleep (standby) mode. Also, in the following : • Press the Fn...8226; If the battery indicator is amber, indicating that the battery power is low. (Alternatively, if Hibernate when battery becomes low has been selected in screen blank mode: • The LCD is powered off. • The hard disk drive is powered off. • The CPU stops...
...: The computer does not accept any key. Related service information Power management Note: Power management modes are not supported for APM operating system. To end screen blank mode and resume normal operation, press any input immediately after it enters sleep (standby) mode. Also, in the following : • Press the Fn...8226; If the battery indicator is amber, indicating that the battery power is low. (Alternatively, if Hibernate when battery becomes low has been selected in screen blank mode: • The LCD is powered off. • The hard disk drive is powered off. • The CPU stops...
Hardware Maintenance Manual
Page 35
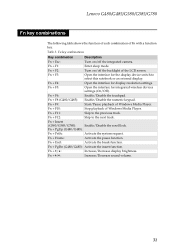
Fn + F1: Enter sleep mode. Fn + F9: Start/Pause playback of Windows Media Player. Fn + Insert (G580/G585/G780): Enable/Disable the scroll lock. Fn + Home: Activate the pause function. Fn + End: Activate the break function. Fn + F6: Enable/...+ / : Increase/Decrease display brightness. Table 3. Fn + PgDn (G480/G485): Activate the insert function. Lenovo G480/G485/G580/G585/G780 Fn key combinations The following table shows the function of each combination of the LCD screen. Fn + F2: Turn on /off the backlight of Fn with a function key. Fn + F11:...
Fn + F1: Enter sleep mode. Fn + F9: Start/Pause playback of Windows Media Player. Fn + Insert (G580/G585/G780): Enable/Disable the scroll lock. Fn + Home: Activate the pause function. Fn + End: Activate the break function. Fn + F6: Enable/...+ / : Increase/Decrease display brightness. Table 3. Fn + PgDn (G480/G485): Activate the insert function. Lenovo G480/G485/G580/G585/G780 Fn key combinations The following table shows the function of each combination of the LCD screen. Fn + F2: Turn on /off the backlight of Fn with a function key. Fn + F11:...
Safety and General Information Guide - Notebook
Page 24
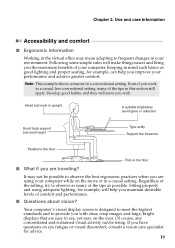
... to observe as many of your computer while on eye fatigue or visual discomfort, consult a vision care specialist for advice. 19 Your computer's visual display screen is designed to meet the highest standards and to the floor Flat on the eyes. Develop good habits, and they will make things easier and...
... to observe as many of your computer while on eye fatigue or visual discomfort, consult a vision care specialist for advice. 19 Your computer's visual display screen is designed to meet the highest standards and to the floor Flat on the eyes. Develop good habits, and they will make things easier and...
Safety and General Information Guide - Notebook
Page 25
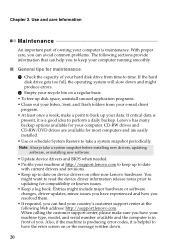
...or software changes, driver updates, minor issues you have experienced and how you resolved them. • If required, you have the error screen on or the message written down and might want to read the device driver information release notes prior to time. If the hard disk ...8226; Keep up your machine at the following sections provide information that can help you can find your country's customer support center at http://support.lenovo.com to keep your computer running smoothly. ■ General tips for your machine type, model, and serial number available and the computer is a...
...or software changes, driver updates, minor issues you have experienced and how you resolved them. • If required, you have the error screen on or the message written down and might want to read the device driver information release notes prior to time. If the hard disk ...8226; Keep up your machine at the following sections provide information that can help you can find your country's customer support center at http://support.lenovo.com to keep your computer running smoothly. ■ General tips for your machine type, model, and serial number available and the computer is a...
Safety and General Information Guide - Notebook
Page 37
.... ■ Risk of hazard connecting Class I equipment to cable distribution networks For Class l equipment in Norway, intended to be connected to cable distribution systems, the screen of a coaxial cable is required to be galvanic isolated from the protective earth. • Connection to a Cable Distribution System is to be located in the...
.... ■ Risk of hazard connecting Class I equipment to cable distribution networks For Class l equipment in Norway, intended to be connected to cable distribution systems, the screen of a coaxial cable is required to be galvanic isolated from the protective earth. • Connection to a Cable Distribution System is to be located in the...
User Guide - Lenovo Notebooks (for Windows 8.1)
Page 3
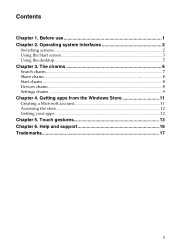
The charms 6 Search charm...7 Share charm...8 Start charm ...8 Devices charm...8 Settings charm ...9 Chapter 4. Touch gestures 13 Chapter 6. Before use 1 Chapter 2. Getting apps from the Windows Store 11 Creating a Microsoft account 11 Accessing the store...12 Getting your apps ...12 Chapter 5. Help and support 16 Trademarks 17 i Operating system interfaces 2 Switching screens ...2 Using the Start screen 3 Using the desktop ...5 Chapter 3. Contents Chapter 1.
The charms 6 Search charm...7 Share charm...8 Start charm ...8 Devices charm...8 Settings charm ...9 Chapter 4. Touch gestures 13 Chapter 6. Before use 1 Chapter 2. Getting apps from the Windows Store 11 Creating a Microsoft account 11 Accessing the store...12 Getting your apps ...12 Chapter 5. Help and support 16 Trademarks 17 i Operating system interfaces 2 Switching screens ...2 Using the Start screen 3 Using the desktop ...5 Chapter 3. Contents Chapter 1.
User Guide - Lenovo Notebooks (for Windows 8.1)
Page 6
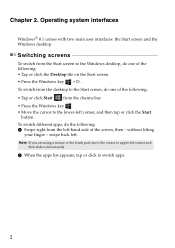
... from the charms bar. • Press the Windows key . • Move the cursor to upper-left . To switch different apps, do one of the screen, then - Note: If you are using a mouse or the touch pad, move the cursor to the lower-left -hand side of the following : 1 ...Swipe right from the desktop to switch apps. 2 Operating system interfaces Windows® 8.1 comes with two main user interfaces: the Start screen and the Windows desktop. Chapter 2. To switch from the left corner, and then tap or click the Start button. swipe back left corner and then...
... from the charms bar. • Press the Windows key . • Move the cursor to upper-left . To switch different apps, do one of the screen, then - Note: If you are using a mouse or the touch pad, move the cursor to the lower-left -hand side of the following : 1 ...Swipe right from the desktop to switch apps. 2 Operating system interfaces Windows® 8.1 comes with two main user interfaces: the Start screen and the Windows desktop. Chapter 2. To switch from the left corner, and then tap or click the Start button. swipe back left corner and then...
User Guide - Lenovo Notebooks (for Windows 8.1)
Page 7
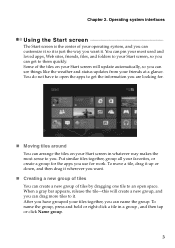
... apps, Web sites, friends, files, and folders to your friends at a glance. You can see things like the weather and status updates from your Start screen, so you want it . After you have to you can arrange the tiles on your favorites, or create a group for work. You do not have... you want . „ Creating a new group of tiles You can drag more tiles to them quickly. Chapter 2. Put similar tiles together, group all your Start screen will create a new group, and you use for the apps you can create a new group of the tiles on your tiles together, you .
... apps, Web sites, friends, files, and folders to your friends at a glance. You can see things like the weather and status updates from your Start screen, so you want it . After you have to you can arrange the tiles on your favorites, or create a group for work. You do not have... you want . „ Creating a new group of tiles You can drag more tiles to them quickly. Chapter 2. Put similar tiles together, group all your Start screen will create a new group, and you use for the apps you can create a new group of the tiles on your tiles together, you .
User Guide - Lenovo Notebooks (for Windows 8.1)
Page 8
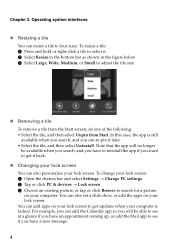
...new message. 4 You can also set a slide show, or add the apps on your lock screen to get updates when your lock screen. You can add the Calendar app so you will no longer be able to see if you ...have to reinstall the app if you can resize a tile to search for a picture on your lock screen. Note that the app will be available when you search, and you have an appointment coming up, or ...the tile size. „ Removing a tile To remove a tile from the Start screen, do one of the following: • Select the tile, and then select Unpin from Start. To change your lock...
...new message. 4 You can also set a slide show, or add the apps on your lock screen to get updates when your lock screen. You can add the Calendar app so you will no longer be able to see if you ...have to reinstall the app if you can resize a tile to search for a picture on your lock screen. Note that the app will be available when you search, and you have an appointment coming up, or ...the tile size. „ Removing a tile To remove a tile from the Start screen, do one of the following: • Select the tile, and then select Unpin from Start. To change your lock...
User Guide - Lenovo Notebooks (for Windows 8.1)
Page 9
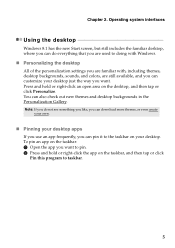
... your desktop. To pin an app on the taskbar: 1 Open the app you want . Operating system interfaces Using the desktop Windows 8.1 has the new Start screen, but still includes the familiar desktop, where you can do not see something you like, you can download more themes, or even create your own...
... your desktop. To pin an app on the taskbar: 1 Open the app you want . Operating system interfaces Using the desktop Windows 8.1 has the new Start screen, but still includes the familiar desktop, where you can do not see something you like, you can download more themes, or even create your own...
User Guide - Lenovo Notebooks (for Windows 8.1)
Page 11
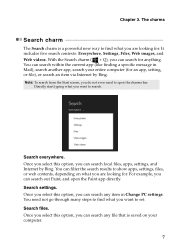
Note: To search from the Start screen, you do not even need not go through many steps to find what you are looking for . You can filter the search results to open ...
Note: To search from the Start screen, you do not even need not go through many steps to find what you are looking for . You can filter the search results to open ...

User Guide - Lenovo Notebooks (for Windows 8.1)
Page 12
..., such as images, videos, and news, etc. This charm has the same function as Xbox video or Media Player, you send links, photos, and more screens here by using the Start charm. Select the item you want to your friends and social networks without leaving the app you can select Add... a device to the Start screen by selecting Add a display. 8 Start charm You can add more to share, open the charms bar, and select Share. Chapter 3. Once you select this charm...
..., such as images, videos, and news, etc. This charm has the same function as Xbox video or Media Player, you send links, photos, and more screens here by using the Start charm. Select the item you want to your friends and social networks without leaving the app you can select Add... a device to the Start screen by selecting Add a display. 8 Start charm You can add more to share, open the charms bar, and select Share. Chapter 3. Once you select this charm...


