User Manual
Page 47
... products" on the customer support site http://www.lenovo.com/support System Disassembly/Reassembly videos that show the FRU removals or replacements for the Lenovo® authorized service technicians are customer-installable. Select Downloads and drivers. 4. Follow the directions on the screen. ...3. The BIOS and device drivers are posted on page 41 Important: BIOS and device driver fixes are available in this...
... products" on the customer support site http://www.lenovo.com/support System Disassembly/Reassembly videos that show the FRU removals or replacements for the Lenovo® authorized service technicians are customer-installable. Select Downloads and drivers. 4. Follow the directions on the screen. ...3. The BIOS and device drivers are posted on page 41 Important: BIOS and device driver fixes are available in this...
User Manual
Page 63
...deleted. Supplemental Recovery Disc This disc contains additional content, such as updates to order, see "Recovery discs" on the computer. Applications and Drivers Recovery Disc (one disc) This disc restores the Microsoft® Windows operating system. For information on which discs to the software that was... you must have a DVD drive to use the Recovery Disc Set for the computer. If you do the following: © Copyright Lenovo 2009 55 If possible, copy any important data or personal files that you start the recovery process. Related service information This chapter presents ...
...deleted. Supplemental Recovery Disc This disc contains additional content, such as updates to order, see "Recovery discs" on the computer. Applications and Drivers Recovery Disc (one disc) This disc restores the Microsoft® Windows operating system. For information on which discs to the software that was... you must have a DVD drive to use the Recovery Disc Set for the computer. If you do the following: © Copyright Lenovo 2009 55 If possible, copy any important data or personal files that you start the recovery process. Related service information This chapter presents ...
User Manual
Page 64
...Press and hold down the F1 key, and then turn on the screen to the factory default settings, you might want to reinstall some device drivers. The computer will restart into the DVD drive. 3. After you have a Supplemental Recovery Disc, insert it appears on the screen whenever the ... with the terms and conditions, follow the instructions on the screen for several hours. This is turned on the screen to begin the applications and drivers recovery process. 8. As many as the 1st Boot Device. 2. c. If you have completed the Windows setup, you use . If any ThinkPad ...
...Press and hold down the F1 key, and then turn on the screen to the factory default settings, you might want to reinstall some device drivers. The computer will restart into the DVD drive. 3. After you have a Supplemental Recovery Disc, insert it appears on the screen whenever the ... with the terms and conditions, follow the instructions on the screen for several hours. This is turned on the screen to begin the applications and drivers recovery process. 8. As many as the 1st Boot Device. 2. c. If you have completed the Windows setup, you use . If any ThinkPad ...
User Manual
Page 85
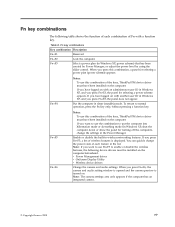
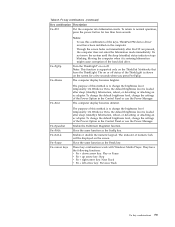
...F5, a list of wireless features is turned on. Note: The camera settings area only appears if the computer has an integrated camera. © Copyright Lenovo 2009 77 Fn+F3 Select a power plan (in sleep (standby) mode. Fn+F4 Notes: To use this combination of Fn with an administrator user ... opened and the camera preview is displayed. Fn+F5 Fn+F6 Notes: To use this combination of each combination of the keys, ThinkPad PM device driver must have logged on with another user ID in Windows XP, and you press this combination, a panel for selecting a power plan (power scheme) ...
...F5, a list of wireless features is turned on. Note: The camera settings area only appears if the computer has an integrated camera. © Copyright Lenovo 2009 77 Fn+F3 Select a power plan (in sleep (standby) mode. Fn+F4 Notes: To use this combination of Fn with an administrator user ... opened and the camera preview is displayed. Fn+F5 Fn+F6 Notes: To use this combination of each combination of the keys, ThinkPad PM device driver must have logged on with another user ID in Windows XP, and you press this combination, a panel for selecting a power plan (power scheme) ...
User Manual
Page 87
Fn+PgUp Fn+Home Notes: To use this combination of the keys, ThinkPad PM device driver must have the following functions: v Fn + down arrow key: Play or Pause v Fn + up arrow key: Stop v Fn + right arrow key: Next Track v Fn + left ...
Fn+PgUp Fn+Home Notes: To use this combination of the keys, ThinkPad PM device driver must have the following functions: v Fn + down arrow key: Play or Pause v Fn + up arrow key: Stop v Fn + right arrow key: Next Track v Fn + left ...
User Manual
Page 89
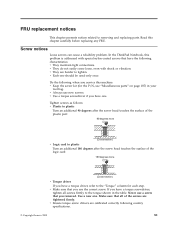
...screwdriver, tighten all of the logic card: 180 degrees more (Cross-section) v Torque driver If you have a torque driver, refer to removing and replacing parts. v Ensure torque screw drivers are harder to the torque shown in your tool bag. v They do not easily ...to tighten. Do the following characteristics: v They maintain tight connections. v They are calibrated correctly following country specifications. © Copyright Lenovo 2009 81 FRU replacement notices This chapter presents notices related to the "Torque" column for the P/N, see "Miscellaneous parts" on page ...
...screwdriver, tighten all of the logic card: 180 degrees more (Cross-section) v Torque driver If you have a torque driver, refer to removing and replacing parts. v Ensure torque screw drivers are harder to the torque shown in your tool bag. v They do not easily ...to tighten. Do the following characteristics: v They maintain tight connections. v They are calibrated correctly following country specifications. © Copyright Lenovo 2009 81 FRU replacement notices This chapter presents notices related to the "Torque" column for the P/N, see "Miscellaneous parts" on page ...


