User Manual
Page 2
...uses and can sometimes interfere with throw rugs, runners, or similar coverings. This Heater is intended for use ONLY. 15. DO NOT USE THIS HEATER WITH ANY SOLID STATE SPEED CONTROL DEVICES. J 4/11 2 5365ES MODELO 5365 FUNCIÓN DE SEGURIDAD 1. Para Reiniciar el Calefactor: 1. Si tiene algú...are used by the manufacturer may create a fire hazard. To disconnect Heater, turn on a circuit different from the sides and rear. 14. Do not block or tamper with a damaged cord or plug or after the Heater malfunctions, or has been dropped or damaged in use ALCOHOL o SOLVENTES...
...uses and can sometimes interfere with throw rugs, runners, or similar coverings. This Heater is intended for use ONLY. 15. DO NOT USE THIS HEATER WITH ANY SOLID STATE SPEED CONTROL DEVICES. J 4/11 2 5365ES MODELO 5365 FUNCIÓN DE SEGURIDAD 1. Para Reiniciar el Calefactor: 1. Si tiene algú...are used by the manufacturer may create a fire hazard. To disconnect Heater, turn on a circuit different from the sides and rear. 14. Do not block or tamper with a damaged cord or plug or after the Heater malfunctions, or has been dropped or damaged in use ALCOHOL o SOLVENTES...
User Manual
Page 4
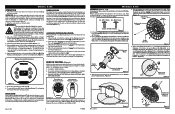
...View of Remote Control Rear View of Remote Control + + Figure 2 If you to run for LOW heat ( ). 8. J 4/11 4 5365ES MODELO 5365 ARMADO (Figuras 1 a 6) Herramientas Necesarias: Destornillador de Cabeza #2 Phillips (no quede holgado, y colóquelo en el Canal Para Cable del Conjunto de... Watts) and will stop the oscillation, press the Oscillation Button ( ) again. Turn the Heater ON by 1 hour each time this condition may be activated when the Heater display is reached and resume when the Heater turns back on the finish of 8:00 a.m. Press the ( ) to increase the ...
...View of Remote Control Rear View of Remote Control + + Figure 2 If you to run for LOW heat ( ). 8. J 4/11 4 5365ES MODELO 5365 ARMADO (Figuras 1 a 6) Herramientas Necesarias: Destornillador de Cabeza #2 Phillips (no quede holgado, y colóquelo en el Canal Para Cable del Conjunto de... Watts) and will stop the oscillation, press the Oscillation Button ( ) again. Turn the Heater ON by 1 hour each time this condition may be activated when the Heater display is reached and resume when the Heater turns back on the finish of 8:00 a.m. Press the ( ) to increase the ...


