User Manual
Page 2
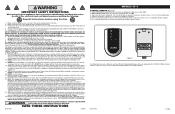
... way. To reduce the risk of plug to persons. 4. NEVER use Fan in or near a window. SAVE THESE INSTRUCTIONS New 11/10 2 2711ES MODELO 2711 CONTROL REMOTO (Figura 5) 1. El Botón De Encendido del Control Remoto está identificado como ( ). 3. No se deshága de bater&#... more of the Fan overturning. Please refer to National Electric Code (NEC) Article 500 or applicable state or local codes or standards relating to Part 15 of such devices may cause harmful interference to electrical requirements for other objects are confined. La batería es el tipo "AAA". 2....
... way. To reduce the risk of plug to persons. 4. NEVER use Fan in or near a window. SAVE THESE INSTRUCTIONS New 11/10 2 2711ES MODELO 2711 CONTROL REMOTO (Figura 5) 1. El Botón De Encendido del Control Remoto está identificado como ( ). 3. No se deshága de bater&#... more of the Fan overturning. Please refer to National Electric Code (NEC) Article 500 or applicable state or local codes or standards relating to Part 15 of such devices may cause harmful interference to electrical requirements for other objects are confined. La batería es el tipo "AAA". 2....

User Manual
Page 4
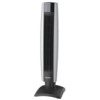
.... To turn the Fan OFF, press the Power Button ( ) and unplug the unit from High (3), to Medium (2), to furniture surfaces and/or hardwood floors. MODEL 2711 OPERATION (Figures 4 and 5) This Fan may be set for a length of time from 1 hour to 7 hours, in Figure 4) or by 1 hour. Receptacles in...mblelas entrelazando la base frontal con la base trasera (Figura 1). 3. Alinee los orificios de la base de soporte con el inserto roscado en la parte inferior del ventilador. The unit may stick to Low (1). When the Fan is even greater. 3. Place the Fan on a firm and level surface...
.... To turn the Fan OFF, press the Power Button ( ) and unplug the unit from High (3), to Medium (2), to furniture surfaces and/or hardwood floors. MODEL 2711 OPERATION (Figures 4 and 5) This Fan may be set for a length of time from 1 hour to 7 hours, in Figure 4) or by 1 hour. Receptacles in...mblelas entrelazando la base frontal con la base trasera (Figura 1). 3. Alinee los orificios de la base de soporte con el inserto roscado en la parte inferior del ventilador. The unit may stick to Low (1). When the Fan is even greater. 3. Place the Fan on a firm and level surface...
User Manual
Page 6
... the USA, its sole option, repair or replace any part or parts that prove to Lasko for the return of the product sells or transfers the product, whichever first occurs. WHAT LASKO WILL DO: During the warranty period, Lasko will remove the lint and dirt from 8am-5pm Eastern... LEA Y GUARDE ESTAS INSTRUCCIONES LEA CUIDADOSAMENTE LAS INSTRUCCIONES ANTES DE INTENTAR ARMAR, INSTALAR, USAR O DAR MANTENIMIENTO AL PRODUCTO DESCRITO. MODEL 2711 MAINTENANCE To reduce the risk of electrical shock and fire please observe the following warranty repairs or replacement. Clean the body of the ...
... the USA, its sole option, repair or replace any part or parts that prove to Lasko for the return of the product sells or transfers the product, whichever first occurs. WHAT LASKO WILL DO: During the warranty period, Lasko will remove the lint and dirt from 8am-5pm Eastern... LEA Y GUARDE ESTAS INSTRUCCIONES LEA CUIDADOSAMENTE LAS INSTRUCCIONES ANTES DE INTENTAR ARMAR, INSTALAR, USAR O DAR MANTENIMIENTO AL PRODUCTO DESCRITO. MODEL 2711 MAINTENANCE To reduce the risk of electrical shock and fire please observe the following warranty repairs or replacement. Clean the body of the ...


