
Owner's Manual
Page 2
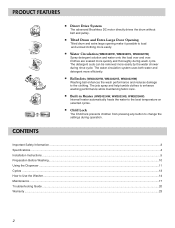
... pulley. ■ Tilted Drum and Extra Large Door Opening Tilted drum and extra large opening make it possible to Use the Washer...14 Maintenance ...17 Troubleshooting Guide ...20 Warranty ...23 2
... pulley. ■ Tilted Drum and Extra Large Door Opening Tilted drum and extra large opening make it possible to Use the Washer...14 Maintenance ...17 Troubleshooting Guide ...20 Warranty ...23 2
Owner's Manual
Page 20
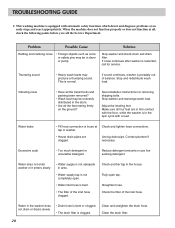
... filter of the inlet hose clogged. See Installation Instructions for service. Reduce detergent amounts or use low sudsing detergent. Clean and straighten the drain hose. TROUBLESHOOTING GUIDE ✽ This washing machine is equipped with a load. Solution Stop washer and check drum and drain filter. If sound continues, washer is normal. Straighten...
... filter of the inlet hose clogged. See Installation Instructions for service. Reduce detergent amounts or use low sudsing detergent. Clean and straighten the drain hose. TROUBLESHOOTING GUIDE ✽ This washing machine is equipped with a load. Solution Stop washer and check drum and drain filter. If sound continues, washer is normal. Straighten...
Owner's Manual
Page 21
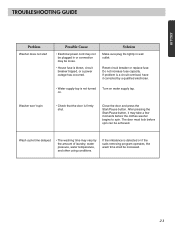
.... Do not increase fuse capacity. Close the door and press the Start/Pause button. If the imbalance is not turned on water supply tap. ENGLISH TROUBLESHOOTING GUIDE Problem Washer does not start Possible Cause • Electrical power cord may not be plugged in wall outlet.
.... Do not increase fuse capacity. Close the door and press the Start/Pause button. If the imbalance is not turned on water supply tap. ENGLISH TROUBLESHOOTING GUIDE Problem Washer does not start Possible Cause • Electrical power cord may not be plugged in wall outlet.
Owner's Manual
Page 22
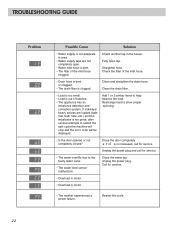
.... • The drain filter is out of the inlet hose clogged. Call for service. Rearrange load to help balance the load. Close the water tap. TROUBLESHOOTING GUIDE Problem Possible Cause Solution • Water supply is not adequate in area. • Water supply taps are loaded (bath mat, bath robe, etc.) and...
.... • The drain filter is out of the inlet hose clogged. Call for service. Rearrange load to help balance the load. Close the water tap. TROUBLESHOOTING GUIDE Problem Possible Cause Solution • Water supply is not adequate in area. • Water supply taps are loaded (bath mat, bath robe, etc.) and...
Service Manual
Page 3
... 32 10. INSTALLATION ...8 5. WIRING DIAGRAM / PROGRAM CHART 15 7. ERROR DISPLAY ...20 8. EXPLODED VIEW ...40 10-1. SPECIFICATIONS ...3 2. OPERATION ...11 6. QC TEST MODE...19 7-3. FAULT DIAGNOSIS AND TROUBLESHOOTING 25 9. DRUM & TUB ASSEMBLY 41 10-3. CABINET & CONTROL PANEL ASSEMBLY 40 10-2. PARTS IDENTIFICATION ...7 4. DISPENSER ASSEMBLY 42 2 DIAGNOSIS AND SOLUTION FOR ABNORMAL OPERATION 22 8-2. CONTENTS...
... 32 10. INSTALLATION ...8 5. WIRING DIAGRAM / PROGRAM CHART 15 7. ERROR DISPLAY ...20 8. EXPLODED VIEW ...40 10-1. SPECIFICATIONS ...3 2. OPERATION ...11 6. QC TEST MODE...19 7-3. FAULT DIAGNOSIS AND TROUBLESHOOTING 25 9. DRUM & TUB ASSEMBLY 41 10-3. CABINET & CONTROL PANEL ASSEMBLY 40 10-2. PARTS IDENTIFICATION ...7 4. DISPENSER ASSEMBLY 42 2 DIAGNOSIS AND SOLUTION FOR ABNORMAL OPERATION 22 8-2. CONTENTS...
Service Manual
Page 9
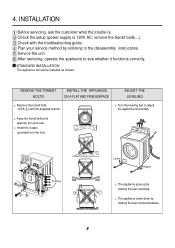
... appliance should be installed as follows: REMOVE THE TRANSIT BOLTS INSTALL THE APPLIANCE ON A FLAT AND FIRM SURFACE Remove the transit bolts (4 EA: ) with the troubleshooting guide. Insert the 4 caps (provided) into the hole. 4. INSTALLATION Before servicing, ask the customer what the trouble is 120V AC, remove the transit bolts....). Service...
... appliance should be installed as follows: REMOVE THE TRANSIT BOLTS INSTALL THE APPLIANCE ON A FLAT AND FIRM SURFACE Remove the transit bolts (4 EA: ) with the troubleshooting guide. Insert the 4 caps (provided) into the hole. 4. INSTALLATION Before servicing, ask the customer what the trouble is 120V AC, remove the transit bolts....). Service...
Service Manual
Page 20
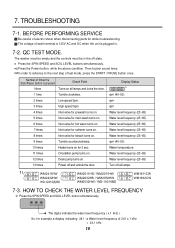
QC TEST MODE. So, for while troubleshooting. 7. The voltage of 241 x.1 kHz = 24.1 kHz 19 Display Status rpm (40~50) rpm rpm Water level frequency (25~65) Water level frequency (25~65) .... 12 times Drain pump turns on all lamps. WM2411HW WM2432HW WD-12210(5)BD WM2011HS / WM2011HW WM2032HS / WM2032HW WM0532HW / WD-10210BD WM1811CW WM1832CW 7-3. The digits indicate the water level frequency ( x.1 kHz ). TROUBLESHOOTING 7-1. Then buzzer sound twice. ¤ØIn order to advance to the next step of times the Start/Pause button is...
QC TEST MODE. So, for while troubleshooting. 7. The voltage of 241 x.1 kHz = 24.1 kHz 19 Display Status rpm (40~50) rpm rpm Water level frequency (25~65) Water level frequency (25~65) .... 12 times Drain pump turns on all lamps. WM2411HW WM2432HW WD-12210(5)BD WM2011HS / WM2011HW WM2032HS / WM2032HW WM0532HW / WD-10210BD WM1811CW WM1832CW 7-3. The digits indicate the water level frequency ( x.1 kHz ). TROUBLESHOOTING 7-1. Then buzzer sound twice. ¤ØIn order to advance to the next step of times the Start/Pause button is...

Service Manual
Page 26
NO POWER Connector Is the supplied voltage 120V AC? NO Is wire of electric shock if disconnecting parts while troubleshooting. 2. Is the voltage between the 2 FILTER ASSEMBLY connectors 120V AC? YES NO Replace MAIN PWB ASSEMBLY. YES Is the LED(1) on the PWB ...loose? YES Reconnect. NO Replace the MAIN PWB ASSEMBLY. 25 8-2.FAULT DIAGNOSIS AND TROUBLESHOOTING CAUTION 1. If you replace the MAIN PWB ASSEMBLY, reinsert the connectors correctly. YES NO Check the fuse or reset the circuit breaker. Are the ...
NO POWER Connector Is the supplied voltage 120V AC? NO Is wire of electric shock if disconnecting parts while troubleshooting. 2. Is the voltage between the 2 FILTER ASSEMBLY connectors 120V AC? YES NO Replace MAIN PWB ASSEMBLY. YES Is the LED(1) on the PWB ...loose? YES Reconnect. NO Replace the MAIN PWB ASSEMBLY. 25 8-2.FAULT DIAGNOSIS AND TROUBLESHOOTING CAUTION 1. If you replace the MAIN PWB ASSEMBLY, reinsert the connectors correctly. YES NO Check the fuse or reset the circuit breaker. Are the ...

