
Owner's Manual
Page 2
... not being provided by the manufacturer. Operate the display only from dropping or pushing objects into the display's cabinet openings. They may result in the specifications of time. There are Dangerous High Voltages inside . It can cause electric shock. 1 Keep children from a power source indicated in potential electrical shock or fire...
... not being provided by the manufacturer. Operate the display only from dropping or pushing objects into the display's cabinet openings. They may result in the specifications of time. There are Dangerous High Voltages inside . It can cause electric shock. 1 Keep children from a power source indicated in potential electrical shock or fire...
Owner's Manual
Page 5
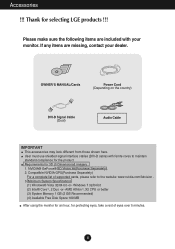
.../Cards Power Cord (Depending on the country) DVI-D Signal Cable (Dual) Audio Cable IMPORTANT This accessories may look different from those shown here. Minimum System Specifications (1) Windows® Vista 32/64 bit -or- Please make sure the following items are missing, contact your monitor. Compatible NVIDIA GPU(Purchase Separately) For a complete...
.../Cards Power Cord (Depending on the country) DVI-D Signal Cable (Dual) Audio Cable IMPORTANT This accessories may look different from those shown here. Minimum System Specifications (1) Windows® Vista 32/64 bit -or- Please make sure the following items are missing, contact your monitor. Compatible NVIDIA GPU(Purchase Separately) For a complete...
Owner's Manual
Page 18
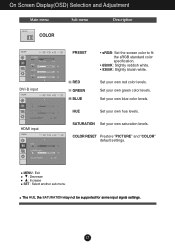
... and Adjustment Main menu Sub menu Description COLOR DVI-D input HDMI input PRESET • sRGB: Set the screen color to fit the sRGB standard color specification. • 6500K: Slightly reddish white. • 9300K: Slightly bluish white. SATURATION Set your own saturation levels.
... and Adjustment Main menu Sub menu Description COLOR DVI-D input HDMI input PRESET • sRGB: Set the screen color to fit the sRGB standard color specification. • 6500K: Slightly reddish white. • 9300K: Slightly bluish white. SATURATION Set your own saturation levels.

Owner's Manual
Page 21
... at any key on the keyboard to bring up the screen. • Try to the power outlet. properly to turn on the PC. See the 'Specifications' section of the • Check and see an "OUT OF • This message appears when the signal from the RANGE" message on the screen? G Do...
... at any key on the keyboard to bring up the screen. • Try to the power outlet. properly to turn on the PC. See the 'Specifications' section of the • Check and see an "OUT OF • This message appears when the signal from the RANGE" message on the screen? G Do...

Owner's Manual
Page 23
Vertical Freq. Specifications Display Sync Input Video Input Resolution Plug&Play Power Consumption Dimensions & Weight 58.4 cm (23.0 inch) Flat Panel Active matrix-TFT LCD Anti-Glare coating ...
Vertical Freq. Specifications Display Sync Input Video Input Resolution Plug&Play Power Consumption Dimensions & Weight 58.4 cm (23.0 inch) Flat Panel Active matrix-TFT LCD Anti-Glare coating ...

Owner's Manual
Page 24
Specifications Preset Modes (Resolution) - DVI-D(Digital) INPUT Display Modes (Resolution) 1 640 x 350 2 720 x 400 3 640 x 480 4 640 x 480 5 800 x 600 6 800 x 600 7 1024 x 768 8 1024 x 768 9 ...
Specifications Preset Modes (Resolution) - DVI-D(Digital) INPUT Display Modes (Resolution) 1 640 x 350 2 720 x 400 3 640 x 480 4 640 x 480 5 800 x 600 6 800 x 600 7 1024 x 768 8 1024 x 768 9 ...

Owner's Manual
Page 25
Place the monitor face down on the soft cloth. 2. To disconnect the Stand Base from the Stand Body, unfold the screw handle and turn it to remove. 24 Installing the Wall mount plate This monitor satisfies the specifications of the Wall mount plate or the interchange device. 1. Pull out the Stand Base to the left. 3.
Place the monitor face down on the soft cloth. 2. To disconnect the Stand Base from the Stand Body, unfold the screw handle and turn it to remove. 24 Installing the Wall mount plate This monitor satisfies the specifications of the Wall mount plate or the interchange device. 1. Pull out the Stand Base to the left. 3.
Owner's Manual
Page 26
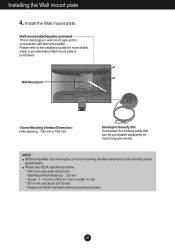
... separately at most computer stores. NOTE VESA compatible only with Wall mount plate. Kensington Security Slot Connected to screw mounting interface dimensions and mounting screw specifications Please use VESA standard wall mount pad and screws. 25 Installing the Wall mount plate .4 Install the Wall mount plate. Screw : 4.0 mm x Pitch 0.7 mm x Length...
... separately at most computer stores. NOTE VESA compatible only with Wall mount plate. Kensington Security Slot Connected to screw mounting interface dimensions and mounting screw specifications Please use VESA standard wall mount pad and screws. 25 Installing the Wall mount plate .4 Install the Wall mount plate. Screw : 4.0 mm x Pitch 0.7 mm x Length...

Specification
Page 2
3D LCD MONITOR W2363D PANEL SPECIFICATION Screen Size 23" Class (23.0" diagonal) Panel Type TN Aspect Ratio 16:9 Resolution 1920 x 1080p Brightness (cd/m2) 400 Contrast Ratio (DFC) 70,000:1 Response ...
3D LCD MONITOR W2363D PANEL SPECIFICATION Screen Size 23" Class (23.0" diagonal) Panel Type TN Aspect Ratio 16:9 Resolution 1920 x 1080p Brightness (cd/m2) 400 Contrast Ratio (DFC) 70,000:1 Response ...
