
Owner's Manual
Page 1
LCD MONITOR MODELS W2363D www.lg.com ENGLISH OWNER'S MANUAL LCD MONITOR Please read this manual carefully before operating your set and retain it for future reference.
LCD MONITOR MODELS W2363D www.lg.com ENGLISH OWNER'S MANUAL LCD MONITOR Please read this manual carefully before operating your set and retain it for future reference.

Owner's Manual
Page 4
When shipping the unit to prevent scratching. On Disposal (Only, Hg lamp used LCD Monitor) The fluorescent lamp used in one direction only. Too much moisture may cause electrical shock. Use a slightly damp (not wet) cloth. When cleaning the product, ...
When shipping the unit to prevent scratching. On Disposal (Only, Hg lamp used LCD Monitor) The fluorescent lamp used in one direction only. Too much moisture may cause electrical shock. Use a slightly damp (not wet) cloth. When cleaning the product, ...
Owner's Manual
Page 5
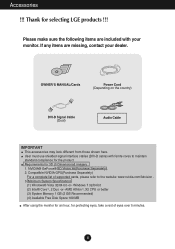
...Signal Cable (Dual) Audio Cable IMPORTANT This accessories may look different from those shown here. Please make sure the following items are missing, contact your monitor. If any items are included with ferrite cores to the website: www.nvidia.com/3dvision . 3. Requirements for selecting LGE products !!! NVIDIA®... 5 minutes. 4 AMD AthlonTM, X2 CPU or better (3) System Memory 1 GB (2 GB Recommended) (4) Available Free Disk Space 100 MB After using the monitor for an hour, for the product. User must use shielded signal interface cables (DVI-D cable) with your dealer.
...Signal Cable (Dual) Audio Cable IMPORTANT This accessories may look different from those shown here. Please make sure the following items are missing, contact your monitor. If any items are included with ferrite cores to the website: www.nvidia.com/3dvision . 3. Requirements for selecting LGE products !!! NVIDIA®... 5 minutes. 4 AMD AthlonTM, X2 CPU or better (3) System Memory 1 GB (2 GB Recommended) (4) Available Free Disk Space 100 MB After using the monitor for an hour, for the product. User must use shielded signal interface cables (DVI-D cable) with your dealer.

Owner's Manual
Page 6
Connecting and Disassembling the stand 1. Make sure you push the Stand Base until the end. Place the monitor face down on the soft cloth. 2. Stand Body Stand Base Good Connection The Stand Base may fall and get damaged or cause injury. Assemble the Stand Base into the Stand Body in the correct direction. Bad Connection 5 Connecting the Display Before setting up the monitor, ensure that the power to the monitor, the computer system, and other attached devices is turned off.
Connecting and Disassembling the stand 1. Make sure you push the Stand Base until the end. Place the monitor face down on the soft cloth. 2. Stand Body Stand Base Good Connection The Stand Base may fall and get damaged or cause injury. Assemble the Stand Base into the Stand Body in the correct direction. Bad Connection 5 Connecting the Display Before setting up the monitor, ensure that the power to the monitor, the computer system, and other attached devices is turned off.

Owner's Manual
Page 7
... Base. Turn the screw to the right to fix the Stand Body to the left. Then fold the screw handle flat. 5. Once assembled take the monitor up carefully and face the front side. 6. IMPORTANT This picture depicts the general model of connection. Screw Turn the screw by using the screw handle...
... Base. Turn the screw to the right to fix the Stand Body to the left. Then fold the screw handle flat. 5. Once assembled take the monitor up carefully and face the front side. 6. IMPORTANT This picture depicts the general model of connection. Screw Turn the screw by using the screw handle...

Owner's Manual
Page 8
Adjust the position of the panel in between the head of the monitor and the stand body. Tilt Range: -5˚ to the monitor, the computer system, and other attached devices is recommended that the power to 15˚ -5 15 Do not touch or press the ...in various ways for maximum comfort. Positioning your finger(s). Connecting the Display Before setting up the monitor, ensure that in order to maintain an ergonomic and comfortable viewing position, the forward tilt angle of the monitor should not exceed 5 degrees. 7 You can hurt your display After installation, adjust the angle ...
Adjust the position of the panel in between the head of the monitor and the stand body. Tilt Range: -5˚ to the monitor, the computer system, and other attached devices is recommended that the power to 15˚ -5 15 Do not touch or press the ...in various ways for maximum comfort. Positioning your finger(s). Connecting the Display Before setting up the monitor, ensure that in order to maintain an ergonomic and comfortable viewing position, the forward tilt angle of the monitor should not exceed 5 degrees. 7 You can hurt your display After installation, adjust the angle ...

Owner's Manual
Page 9
... may differ from the view as shown. Headphone/Earphone output PC Speaker Out/Line out 3. Press the Power Button ( ) on the front panel to the monitor, the computer system, and other attached devices is a simplified representation of the signal cable. Connecting the Display Connecting with the PC/AV equipment 1. Before setting...
... may differ from the view as shown. Headphone/Earphone output PC Speaker Out/Line out 3. Press the Power Button ( ) on the front panel to the monitor, the computer system, and other attached devices is a simplified representation of the signal cable. Connecting the Display Connecting with the PC/AV equipment 1. Before setting...

Owner's Manual
Page 14
... displayed on the screen. Set this for live sound effect. But, the response speed of the display can be slower than the output of the monitor. It is frame buffer memory?
... displayed on the screen. Set this for live sound effect. But, the response speed of the display can be slower than the output of the monitor. It is frame buffer memory?

Owner's Manual
Page 16
Listed below are the icons, icon names, and icon descriptions of the all items shown on the monitor may differ from the manual. 15 Press the MENU Button, then the main menu of selecting and adjusting an item using the OSD system. On Screen Display(OSD) Selection and Adjustment You were introduced to select sub-menu Button Tip Icons Sub-menus NOTE OSD (On Screen Display) menu languages on the Menu. Main Menu Menu Name MENU SET : Exit : Adjust (Decrease/Increase) : Enter : Select another sub-menu : Restart to the procedure of the OSD appears.
Listed below are the icons, icon names, and icon descriptions of the all items shown on the monitor may differ from the manual. 15 Press the MENU Button, then the main menu of selecting and adjusting an item using the OSD system. On Screen Display(OSD) Selection and Adjustment You were introduced to select sub-menu Button Tip Icons Sub-menus NOTE OSD (On Screen Display) menu languages on the Menu. Main Menu Menu Name MENU SET : Exit : Adjust (Decrease/Increase) : Enter : Select another sub-menu : Restart to the procedure of the OSD appears.

Owner's Manual
Page 17
... contrast of the screen. MENU : Exit : Decrease : Increase SET : Select another sub-menu When operating 3D screen, BRIGHTNESS, CONTRAST function is the darkest screen the monitor can set the off set ? If you select 'HIGH', the screen will be bright and if you select 'LOW', the screen will be dark. * Off... menu Description PICTURE DVI-D input HDMI input BRIGHTNESS To adjust the brightness of the screen. GAMMA Set your own gamma value: -50 / 0 / 50 On the monitor, high gamma values display whitish images and low gamma values display blackish images.
... contrast of the screen. MENU : Exit : Decrease : Increase SET : Select another sub-menu When operating 3D screen, BRIGHTNESS, CONTRAST function is the darkest screen the monitor can set the off set ? If you select 'HIGH', the screen will be bright and if you select 'LOW', the screen will be dark. * Off... menu Description PICTURE DVI-D input HDMI input BRIGHTNESS To adjust the brightness of the screen. GAMMA Set your own gamma value: -50 / 0 / 50 On the monitor, high gamma values display whitish images and low gamma values display blackish images.

Owner's Manual
Page 20
... that may occur at any time, the power indicator will go off. If you set OFF, you set OFF, it is maintained regardless of the monitor to set range, LED would response according to reset immediately. Press the , buttons to the value of headphone/Earphone.
... that may occur at any time, the power indicator will go off. If you set OFF, you set OFF, it is maintained regardless of the monitor to set range, LED would response according to reset immediately. Press the , buttons to the value of headphone/Earphone.

Owner's Manual
Page 22
... set to interlace mode and if yes, change it to the recommend resolution. IMPORTANT Check Control Panel --> Display --> Settings and see an "Unrecognized monitor, Plug&Play (VESA DDC) monitor found" message? The setting method can also download the driver from the display driver CD (or diskette) that comes with your display. G The... (true color) at Control Panel - Do you installed the display driver? • Be sure to install the display driver from our web site: http://www.lg.com. • Make sure to check if the video card supports Plug&Play function. Settings.
... set to interlace mode and if yes, change it to the recommend resolution. IMPORTANT Check Control Panel --> Display --> Settings and see an "Unrecognized monitor, Plug&Play (VESA DDC) monitor found" message? The setting method can also download the driver from the display driver CD (or diskette) that comes with your display. G The... (true color) at Control Panel - Do you installed the display driver? • Be sure to install the display driver from our web site: http://www.lg.com. • Make sure to check if the video card supports Plug&Play function. Settings.

Owner's Manual
Page 25
Place the monitor face down on the soft cloth. 2. To disconnect the Stand Base from the Stand Body, unfold the screw handle and turn it to remove. 24 Pull out the Stand Base to the left. 3. Installing the Wall mount plate This monitor satisfies the specifications of the Wall mount plate or the interchange device. 1.
Place the monitor face down on the soft cloth. 2. To disconnect the Stand Base from the Stand Body, unfold the screw handle and turn it to remove. 24 Pull out the Stand Base to the left. 3. Installing the Wall mount plate This monitor satisfies the specifications of the Wall mount plate or the interchange device. 1.

Specification
Page 1
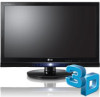
3D LCD MONITOR W2363D 23" CLASS 23.0" diagonal HIGHLIGHTS 3D Ready 120Hz Refresh Rate Full HD... Ratio Control • Auto Bright * 2 HDMI™ Inputs Is it superior picture quality over standard HDTV. The LG W2363D monitor supports compatibility with NVIDIA® 3D VISION™* and features a refresh rate of stereoscopic 3D video images may cause ...discomfort such as headaches, dizziness or nausea. The monitor also features Full HD resolution, an ultra-fast 3ms response time, a 70,000:1 contrast ratio that displays...
3D LCD MONITOR W2363D 23" CLASS 23.0" diagonal HIGHLIGHTS 3D Ready 120Hz Refresh Rate Full HD... Ratio Control • Auto Bright * 2 HDMI™ Inputs Is it superior picture quality over standard HDTV. The LG W2363D monitor supports compatibility with NVIDIA® 3D VISION™* and features a refresh rate of stereoscopic 3D video images may cause ...discomfort such as headaches, dizziness or nausea. The monitor also features Full HD resolution, an ultra-fast 3ms response time, a 70,000:1 contrast ratio that displays...

Specification
Page 2
3D LCD MONITOR W2363D PANEL SPECIFICATION Screen Size 23" Class (23.0" diagonal) Panel Type TN Aspect Ratio 16:9 Resolution 1920 x 1080p Brightness (cd/m2) 400 Contrast Ratio (DFC) 70,...
3D LCD MONITOR W2363D PANEL SPECIFICATION Screen Size 23" Class (23.0" diagonal) Panel Type TN Aspect Ratio 16:9 Resolution 1920 x 1080p Brightness (cd/m2) 400 Contrast Ratio (DFC) 70,...


