
User Guide
Page 3
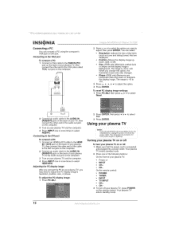
...dry cloth only. 7 Do not block any ventilation openings. Your NS-PDP42 represents the state of a high-quality Insignia product. 07-287 NS-PDP50 English Only.fm Page 3 Wednesday, July 1l, 2007 12:05 PM Insignia NS-PDP50 50" Plasma TV-720P Contents Introduction 3 Safety information 3 Feat... 25 Specifications 26 Programming the remote control 26 Remote control codes 26 One-Year Limited Warranty 31 Introduction _iiiiii_Jiij[!_ INSIGNIA _ii!!iiiiiiiii_ii_ Congratulations on your plasma TV near water. 6 Clean the cabinet with the manufacturer's instructions. Note ...
...dry cloth only. 7 Do not block any ventilation openings. Your NS-PDP42 represents the state of a high-quality Insignia product. 07-287 NS-PDP50 English Only.fm Page 3 Wednesday, July 1l, 2007 12:05 PM Insignia NS-PDP50 50" Plasma TV-720P Contents Introduction 3 Safety information 3 Feat... 25 Specifications 26 Programming the remote control 26 Remote control codes 26 One-Year Limited Warranty 31 Introduction _iiiiii_Jiij[!_ INSIGNIA _ii!!iiiiiiiii_ii_ Congratulations on your plasma TV near water. 6 Clean the cabinet with the manufacturer's instructions. Note ...

User Guide
Page 4
...the antenna or cable system is grounded to provide some protection against voltage surges and built-up static charges. The plug must remain readily operable. ns{ _aNS-PDPS050 Pass-_aYV/20P 18 If an outside antenna or cable system is connected to your plasma TV, make sure that you connect ...cord • Round 75 ohm cable • Eye-bolts (2) • Bolts (2) • Wall brackets (2) • This user guide 07-287NS-PDP50 English Only.fm Page 4 Wednesday, July 1 l, 2007 12:05 PM INSIGNIA iii Do not install near any way, such as the power-supply cord or plug is damaged, liquid has been...
...the antenna or cable system is grounded to provide some protection against voltage surges and built-up static charges. The plug must remain readily operable. ns{ _aNS-PDPS050 Pass-_aYV/20P 18 If an outside antenna or cable system is connected to your plasma TV, make sure that you connect ...cord • Round 75 ohm cable • Eye-bolts (2) • Bolts (2) • Wall brackets (2) • This user guide 07-287NS-PDP50 English Only.fm Page 4 Wednesday, July 1 l, 2007 12:05 PM INSIGNIA iii Do not install near any way, such as the power-supply cord or plug is damaged, liquid has been...

User Guide
Page 5
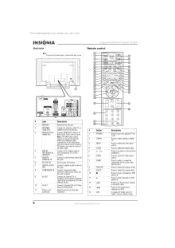
... L MONO for a standard AV or S-Video # Component Description device to the audio jacks i for a standard _ 1 Remote control Receivessignals from the remote sensor control. ;7 07-287 NS-PDP50 English Only.fm Page 5 Wednesday, July 11, 2007 12:05 PM i;]_i_/,-_i_ _IQ D D Front Note If your plasma TV is off, this LED is... the video for sound. O---O ENTER _) MENU O--4!) INPUT ©--O ©---® i jack. When you turn your plasma TV is off . Note: An S-Video cable does not ,; iNSiGNiA ;_ii!i!iiii}i i IOH -- @ T II ° ! +!1 AUDIO VOL =@ ®!
... L MONO for a standard AV or S-Video # Component Description device to the audio jacks i for a standard _ 1 Remote control Receivessignals from the remote sensor control. ;7 07-287 NS-PDP50 English Only.fm Page 5 Wednesday, July 11, 2007 12:05 PM i;]_i_/,-_i_ _IQ D D Front Note If your plasma TV is off, this LED is... the video for sound. O---O ENTER _) MENU O--4!) INPUT ©--O ©---® i jack. When you turn your plasma TV is off . Note: An S-Video cable does not ,; iNSiGNiA ;_ii!i!iiii}i i IOH -- @ T II ° ! +!1 AUDIO VOL =@ ®!
User Guide
Page 6
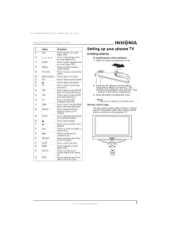
.... In analog TV mode, press to select the video input source. A DVI cable does not carry sound. 7 07-287 NS-PDP50 English Only.fm Page 6 Wednesday, July 1l, 2007 12:05 PM _iiiii/i_i!i) INSIGNIA _iJiiii_iJ/i Back jacks Note To access the back jacks, remove the jack cover. Is < _ _ ' < 2_I_1 I I,_ I -,_ Pressto go the...
.... In analog TV mode, press to select the video input source. A DVI cable does not carry sound. 7 07-287 NS-PDP50 English Only.fm Page 6 Wednesday, July 1l, 2007 12:05 PM _iiiii/i_i!i) INSIGNIA _iJiiii_iJ/i Back jacks Note To access the back jacks, remove the jack cover. Is < _ _ ' < 2_I_1 I I,_ I -,_ Pressto go the...
User Guide
Page 7
iNSiGNiA ;_ii!!i!iiii}i # Button i Description Setting up your plasma TV 15 EXIT Press to display information about the channel you plasma TV. 29 PC ADJ Press .... playback. 32 _1 Press to go to the previously selected channel. 19 VOL+/VOL- 20 N...u.m...b..e..i 5uitons Press to sta_ iecoiiing ..3..] .......I..I i.e..s..s...t.o...p..a..u..s..e..v..N...eotape oi iisc ; 07-287 NS-PDP50 English Only.tin Page 7 Wednesday, July 11, 2007 12:05 PM i;]_i_/,-_i_ _IQ ©P D D Iiiiiii_!i]! i6 ........... 17 ENTER P..i.e..s.s.....t.o..
iNSiGNiA ;_ii!!i!iiii}i # Button i Description Setting up your plasma TV 15 EXIT Press to display information about the channel you plasma TV. 29 PC ADJ Press .... playback. 32 _1 Press to go to the previously selected channel. 19 VOL+/VOL- 20 N...u.m...b..e..i 5uitons Press to sta_ iecoiiing ..3..] .......I..I i.e..s..s...t.o...p..a..u..s..e..v..N...eotape oi iisc ; 07-287 NS-PDP50 English Only.tin Page 7 Wednesday, July 11, 2007 12:05 PM i;]_i_/,-_i_ _IQ ©P D D Iiiiiii_!i]! i6 ........... 17 ENTER P..i.e..s.s.....t.o..

User Guide
Page 8
Is < 2_I_1 I _I,_ _ ' < I',_,,3" To bundle the cables: 1 Hold the cable management bracket with both hands, then pull it in the direction shown to remove it. Connect all the device you bundle the cables for all external devices and the power cord. 07-287 NS-PDP50 English Only.fm Page 8 Wednesday, July 1l, 2007 12:05 PM _iiiii/i_i!i) INSIGNIA _iiiiii_iii Bundling cables You plasma TV has a cable management bracket that lets you install.
Is < 2_I_1 I _I,_ _ ' < I',_,,3" To bundle the cables: 1 Hold the cable management bracket with both hands, then pull it in the direction shown to remove it. Connect all the device you bundle the cables for all external devices and the power cord. 07-287 NS-PDP50 English Only.fm Page 8 Wednesday, July 1l, 2007 12:05 PM _iiiii/i_i!i) INSIGNIA _iiiiii_iii Bundling cables You plasma TV has a cable management bracket that lets you install.

User Guide
Page 9
07-287 NS-PDP50 English Only.fm Page 9 Wednesday, July 1l, 2007 12:05 PM i;]_i_/hih _IQ D Connecting an antenna or cable TV Analog and digital TV signals ... corresponding jacks on the external device. 3 Turn on your plasma TV and the device. 4 Press INPUT one or more times to select AVl or AV2. iNSiGNiA ;_ii!!i!iiiiiii Connecting a standard AN device To connect a standard A/V device: 1 Connect the video (yellow), right audio (red), and left audio (white) plugs on a standard A/V cable...
07-287 NS-PDP50 English Only.fm Page 9 Wednesday, July 1l, 2007 12:05 PM i;]_i_/hih _IQ D Connecting an antenna or cable TV Analog and digital TV signals ... corresponding jacks on the external device. 3 Turn on your plasma TV and the device. 4 Press INPUT one or more times to select AVl or AV2. iNSiGNiA ;_ii!!i!iiiiiii Connecting a standard AN device To connect a standard A/V device: 1 Connect the video (yellow), right audio (red), and left audio (white) plugs on a standard A/V cable...
User Guide
Page 10
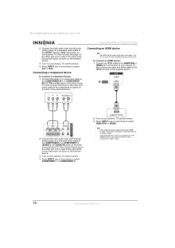
iNSiGNiA Connect the right audio (red) and left audio (white) plugs on a standard audio cable to the AV IN1 (back) or AV2 (side) jacks on your ... device. 3 Press INPUT one or more times to 1280 x 720p. v ;],k/ Connecting an HDMI device Note An HDMI cable carries both video and audio. 7 07-287 NS-PDP50 EnglishOnly.fm Page l0 Wednesday, July II, 2007 12:05 PM _iiii/i]i[iii! You do not need to set to select COMPONENT 1 or COMPONENT 2. L__J...
iNSiGNiA Connect the right audio (red) and left audio (white) plugs on a standard audio cable to the AV IN1 (back) or AV2 (side) jacks on your ... device. 3 Press INPUT one or more times to 1280 x 720p. v ;],k/ Connecting an HDMI device Note An HDMI cable carries both video and audio. 7 07-287 NS-PDP50 EnglishOnly.fm Page l0 Wednesday, July II, 2007 12:05 PM _iiii/i]i[iii! You do not need to set to select COMPONENT 1 or COMPONENT 2. L__J...

User Guide
Page 11
The jack uses a laser that could damage your plasma TV's speakers. For more times to 1280 x 720p. 07-287 NS-PDP50 EnglishOnly.fm Page ll Wednesday, July II, 2007 12:05 PM i;]_i_/hih _IQ D Connecting a DVI device To connect a DVI device: 1 Connect an HDMI-to-... I/DVI jack on the back of your TV, then connect the other end of the cable to 1280 x 720p. '\ )' Turn off " on the external device. iNSiGNiA ;_ii!!i!iiiiiii a digital audio device Warning Do not look into the DIGITAL AUDIO OUT jack. To connect a digital audio device: 1 Connect a digital optical cable to...
The jack uses a laser that could damage your plasma TV's speakers. For more times to 1280 x 720p. 07-287 NS-PDP50 EnglishOnly.fm Page ll Wednesday, July II, 2007 12:05 PM i;]_i_/hih _IQ D Connecting a DVI device To connect a DVI device: 1 Connect an HDMI-to-... I/DVI jack on the back of your TV, then connect the other end of the cable to 1280 x 720p. '\ )' Turn off " on the external device. iNSiGNiA ;_ii!!i!iiiiiii a digital audio device Warning Do not look into the DIGITAL AUDIO OUT jack. To connect a digital audio device: 1 Connect a digital optical cable to...
User Guide
Page 12
... TV and the computer. 4 Press INPUT one or more times to adjust the option. 4 Press ENTER. 7 07-287 NS-PDP50 EnglishOnly.fm Page 12 Wednesday, July II, 2007 12:05 PM iii!i]i[iiiii{ii iNSiGNiA _iiii_ii]i Connecting a PC You can select: • Resolution-Adjusts the size of the items (such as icons and...
... TV and the computer. 4 Press INPUT one or more times to adjust the option. 4 Press ENTER. 7 07-287 NS-PDP50 EnglishOnly.fm Page 12 Wednesday, July II, 2007 12:05 PM iii!i]i[iiiii{ii iNSiGNiA _iiii_ii]i Connecting a PC You can select: • Resolution-Adjusts the size of the items (such as icons and...
User Guide
Page 13
.... The EZ Scan menu opens. 3 Press ENTER to select the video source. Note Make sure that have devices connected to select EZ Scan. 07-287 NS-PDP50 EnglishOnly.fm Page 13 Wednesday, July II, 2007 12:05 PM Selecting the video input source To select the video input source: • Press TUNER... go to the next higher or lower channel. • Or, press the number buttons for the channel you let your antenna or cable connection changes. iNSiGNiA ;_ii!!i!iiiiiii To adjust the volume: • Press VOL+ or VOL- The SETUP menu opens.
.... The EZ Scan menu opens. 3 Press ENTER to select the video source. Note Make sure that have devices connected to select EZ Scan. 07-287 NS-PDP50 EnglishOnly.fm Page 13 Wednesday, July II, 2007 12:05 PM Selecting the video input source To select the video input source: • Press TUNER... go to the next higher or lower channel. • Or, press the number buttons for the channel you let your antenna or cable connection changes. iNSiGNiA ;_ii!!i!iiiiiii To adjust the volume: • Press VOL+ or VOL- The SETUP menu opens.
User Guide
Page 14
... the channel list are in black, Channels that have been deleted are in the channel list. 07-287 NS-PDP50 EnglishOnly.fm Page 14 Wednesday, July II, 2007 12:05 PM _iiiii/i_i!i) INSIGNIA _iiiiii_iii Creating the channel list manually When you manually create the channel list, you add or delete the channels...
... the channel list are in black, Channels that have been deleted are in the channel list. 07-287 NS-PDP50 EnglishOnly.fm Page 14 Wednesday, July II, 2007 12:05 PM _iiiii/i_i!i) INSIGNIA _iiiiii_iii Creating the channel list manually When you manually create the channel list, you add or delete the channels...

User Guide
Page 15
The VIDEO menu opens. Note You can select: • Contrast-Increases the picture level to adjust the white areas of the picture. iNSiGNiA ;_ii!!i!iiiiiii 4 Press _, then press A or T to select the option you want to adjust. Selecting a preset color temperature mode To select a preset color ... EZ Picture. !iiiiiii!_ii! Decreases the brightness to add more light to dark areas of the picture. The VIDEO menu opens. ® 07-287 NS-PDP50 EnglishOnly.fm Page 15 Wednesday, July II, 2007 12:05 PM i;]_i_/,-_i_ _iq D D Selecting the picture mode You can select Daylight, Normal,...
The VIDEO menu opens. Note You can select: • Contrast-Increases the picture level to adjust the white areas of the picture. iNSiGNiA ;_ii!!i!iiiiiii 4 Press _, then press A or T to select the option you want to adjust. Selecting a preset color temperature mode To select a preset color ... EZ Picture. !iiiiiii!_ii! Decreases the brightness to add more light to dark areas of the picture. The VIDEO menu opens. ® 07-287 NS-PDP50 EnglishOnly.fm Page 15 Wednesday, July II, 2007 12:05 PM i;]_i_/,-_i_ _iq D D Selecting the picture mode You can select Daylight, Normal,...
User Guide
Page 16
® 07-287 NS-PDP50 EnglishOnly.fm Page 16 Wednesday, July II, 2007 12:05 PM INSIGNIA ii Creating a custom color temperature mode To create a custom color temperature mode: 1 Press MENU, then press A or T to select VIDEO. Is < 2_I_1 I ,I,_ _ ' < I',_,,3" The VIDEO menu opens.
® 07-287 NS-PDP50 EnglishOnly.fm Page 16 Wednesday, July II, 2007 12:05 PM INSIGNIA ii Creating a custom color temperature mode To create a custom color temperature mode: 1 Press MENU, then press A or T to select VIDEO. Is < 2_I_1 I ,I,_ _ ' < I',_,,3" The VIDEO menu opens.

User Guide
Page 17
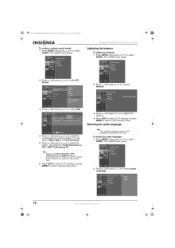
.... 2 Press _,, then press A or T to select Advanced. 3 Press _, then press A or T to select Black Level. 4 Press _, then press A or T to the previous menu. iNSiGNiA ;_ii!!i!iiiiiii To restore video settings: 1 Press MENU, then press A or _, to the previous menu. The VIDEO menu opens. 3 Press _,, then press A or T to select... 5 Press EXIT to return to TV viewing, or press MENU to return to select VIDEO. Selecting Low makes the picture darker. ® 07-287 NS-PDP50 EnglishOnly.fm Page 17 Wednesday, July II, 2007 12:05 PM Press _, then press A or T to select Video Reset. 3 Press _-
.... 2 Press _,, then press A or T to select Advanced. 3 Press _, then press A or T to select Black Level. 4 Press _, then press A or T to the previous menu. iNSiGNiA ;_ii!!i!iiiiiii To restore video settings: 1 Press MENU, then press A or _, to the previous menu. The VIDEO menu opens. 3 Press _,, then press A or T to select... 5 Press EXIT to return to TV viewing, or press MENU to return to select VIDEO. Selecting Low makes the picture darker. ® 07-287 NS-PDP50 EnglishOnly.fm Page 17 Wednesday, July II, 2007 12:05 PM Press _, then press A or T to select Video Reset. 3 Press _-
User Guide
Page 18
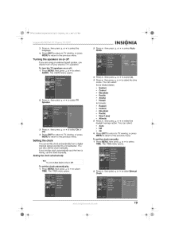
... you want to select AUDIO. To select the audio language: 1 Press MENU, then press A or T to 0. ® 07-287 NS-PDP50 EnglishOnly.fm Page 18 Wednesday, July II, 2007 12:05 PM _iiiii/i_i!i) INSIGNIA _iiiiii_iii To create a custom sound mode: 1 Press MENU, then press A or T to the previous menu. 3 Press _, then press...
... you want to select AUDIO. To select the audio language: 1 Press MENU, then press A or T to 0. ® 07-287 NS-PDP50 EnglishOnly.fm Page 18 Wednesday, July II, 2007 12:05 PM _iiiii/i_i!i) INSIGNIA _iiiiii_iii To create a custom sound mode: 1 Press MENU, then press A or T to the previous menu. 3 Press _, then press...
User Guide
Page 19
... also set the clock automatically from a digital channel signal provided by a broadcaster. The TIME menu opens. 2 Press _-, then press A or v to select the time zones. iNSiGNiA ;_ii!!i!iiiiiii 2 Press _, then press A or T to select Auto Clock. 3 Press _-, then press A or T to select On. 4 Press _, then press A or... T to select AUDIO. You can set the clock manually. To set the clock manually. To turn off your plasma TV's speakers. ® 07-287 NS-PDP50 EnglishOnly.fm Page 19 Wednesday, July II, 2007 12:05 PM 3 Press P-, then press A or T to select the language. 4 Press EXIT to...
... also set the clock automatically from a digital channel signal provided by a broadcaster. The TIME menu opens. 2 Press _-, then press A or v to select the time zones. iNSiGNiA ;_ii!!i!iiiiiii 2 Press _, then press A or T to select Auto Clock. 3 Press _-, then press A or T to select On. 4 Press _, then press A or... T to select AUDIO. You can set the clock manually. To set the clock manually. To turn off your plasma TV's speakers. ® 07-287 NS-PDP50 EnglishOnly.fm Page 19 Wednesday, July II, 2007 12:05 PM 3 Press P-, then press A or T to select the language. 4 Press EXIT to...

User Guide
Page 20
... on before it turns off your plasma TV to tune to when it turns off . ® 07-287 NS-PDP50 English Only.fm Page 20 Wednesday, July II, 2007 12:05 PM _iiiii/i_i!i) INSIGNIA _iiiiii_iii 3 Press _,, then press 4 or _ to select Year, Date, or Time. 4 Press _, then press A or T to set the...
... on before it turns off your plasma TV to tune to when it turns off . ® 07-287 NS-PDP50 English Only.fm Page 20 Wednesday, July II, 2007 12:05 PM _iiiii/i_i!i) INSIGNIA _iiiiii_iii 3 Press _,, then press 4 or _ to select Year, Date, or Time. 4 Press _, then press A or T to set the...

User Guide
Page 21
... DTV signal strength: 1 Press MENU, then press A or T to fill the screen. iNSiGNiA ;_ii!!i!iiiiiii Zoom 2-Extends the image vertically, and crops the top and bottom of the image. Selecting the on the video input source. ® 07-287 NS-PDP50 English Only.fm Page 21 Wednesday, July II, 2007 12:05 PM...
... DTV signal strength: 1 Press MENU, then press A or T to fill the screen. iNSiGNiA ;_ii!!i!iiiiiii Zoom 2-Extends the image vertically, and crops the top and bottom of the image. Selecting the on the video input source. ® 07-287 NS-PDP50 English Only.fm Page 21 Wednesday, July II, 2007 12:05 PM...

User Guide
Page 22
... _ to select Custom. 4 Press A or T to select the style you want to the previous menu. ® 07-287 NS-PDP50 English Only.fm Page 22 Wednesday, July II, 2007 12:05 PM _iiiii/i_i!i) INSIGNIA _iiiiii_iii 2 Press _,, then press A or T to select DTV Signal. 3 Press EXIT to return to TV viewing, or press...
... _ to select Custom. 4 Press A or T to select the style you want to the previous menu. ® 07-287 NS-PDP50 English Only.fm Page 22 Wednesday, July II, 2007 12:05 PM _iiiii/i_i!i) INSIGNIA _iiiiii_iii 2 Press _,, then press A or T to select DTV Signal. 3 Press EXIT to return to TV viewing, or press...