Owner's Manual
Page 2
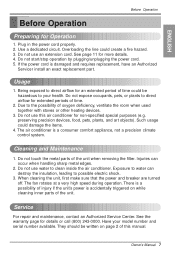
...by young children or invalids without supervision. • Young children should be supervised to ensure that they do not play with the air conditioner. • If the power cord requires replacement, have an Authorized Servicer install an exact replacement part. • Installation work ...Code by qualified and authorized personnel only. 2 Room Air Conditioner PRECAUTION • Contact an Authorized Service Center for use and maintain your air conditioner properly. Call 1-800-243-0000 to locate the nearest ASC. • This air conditioner is not intended for repair or maintenance of this ...
...by young children or invalids without supervision. • Young children should be supervised to ensure that they do not play with the air conditioner. • If the power cord requires replacement, have an Authorized Servicer install an exact replacement part. • Installation work ...Code by qualified and authorized personnel only. 2 Room Air Conditioner PRECAUTION • Contact an Authorized Service Center for use and maintain your air conditioner properly. Call 1-800-243-0000 to locate the nearest ASC. • This air conditioner is not intended for repair or maintenance of this ...
Owner's Manual
Page 4
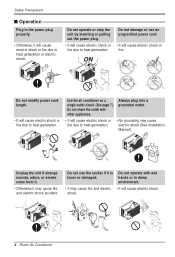
... due to heat generation or electric shock. Do not use an unspecified power cord. • It will cause electric shock or fire. Use the air conditioner on a single outlet circuit. (See page 7.) Do not share the outlet with wet hands or in the power plug properly. • Otherwise,... it is loose or damaged. shock. 4 Room Air Conditioner ON Do not modify power cord length. • It will cause electric shock or fire due to heat generation. Safety Precautions s Operation Plug in damp...
... due to heat generation or electric shock. Do not use an unspecified power cord. • It will cause electric shock or fire. Use the air conditioner on a single outlet circuit. (See page 7.) Do not share the outlet with wet hands or in the power plug properly. • Otherwise,... it is loose or damaged. shock. 4 Room Air Conditioner ON Do not modify power cord length. • It will cause electric shock or fire due to heat generation. Safety Precautions s Operation Plug in damp...
Owner's Manual
Page 5
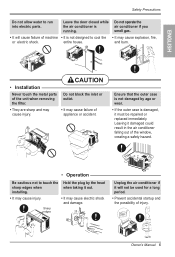
...; It may cause injury. • It may cause failure of appliance or accident. Leave the door closed while the air conditioner is damaged, it damaged could result in the air conditioner falling out of injury. Leaving it must be used for a long period. • Prevent accidental startup and the possibility... the unit when removing the filter. • They are sharp and may cause explosion, fire, or electric shock. Do not operate the air conditioner if you smell gas. • It will not be repaired or replaced immediately. Safety Precautions Do not allow water to cool the •...
...; It may cause injury. • It may cause failure of appliance or accident. Leave the door closed while the air conditioner is damaged, it damaged could result in the air conditioner falling out of injury. Leaving it must be used for a long period. • Prevent accidental startup and the possibility... the unit when removing the filter. • They are sharp and may cause explosion, fire, or electric shock. Do not operate the air conditioner if you smell gas. • It will not be repaired or replaced immediately. Safety Precautions Do not allow water to cool the •...

Owner's Manual
Page 6
...plant. Do not use the remote if the batteries have leaked. Do not clean the air conditioner with clean water. Do not put a pet or house plant where it will be pressed. • There is an air conditioner, not a precision refrigeration system. Clean it every two weeks. • Operation without ..., wash it well with water. • Water may enter the unit and degrade the insulation. If you sick. health hazards. 6 Room Air Conditioner Safety Precautions Do not place heavy object on the power cord and take care so that the cord should not be exposed to clean. It...
...plant. Do not use the remote if the batteries have leaked. Do not clean the air conditioner with clean water. Do not put a pet or house plant where it will be pressed. • There is an air conditioner, not a precision refrigeration system. Clean it every two weeks. • Operation without ..., wash it well with water. • Water may enter the unit and degrade the insulation. If you sick. health hazards. 6 Room Air Conditioner Safety Precautions Do not place heavy object on the power cord and take care so that the cord should not be exposed to clean. It...
Owner's Manual
Page 7
...3. The fan rotates at a very high speed during operation. Service For repair and maintenance, contact an Authorized Service Center. The air conditioner is damaged and requires replacement, have an Authorized Servicer install an exact replacement part. They should be hazardous to direct airflow for ...power cord properly. 2. Do not use water to the possibility of the unit when removing the filter. Due to clean inside the air conditioner. Such usage could create a fire hazard. 3. Exposure to water can occur when handling sharp metal edges. 2. When cleaning the unit...
...3. The fan rotates at a very high speed during operation. Service For repair and maintenance, contact an Authorized Service Center. The air conditioner is damaged and requires replacement, have an Authorized Servicer install an exact replacement part. They should be hazardous to direct airflow for ...power cord properly. 2. Do not use water to the possibility of the unit when removing the filter. Due to clean inside the air conditioner. Such usage could create a fire hazard. 3. Exposure to water can occur when handling sharp metal edges. 2. When cleaning the unit...
Owner's Manual
Page 12
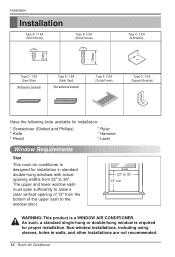
...: This product is required for installation in walls, and other installations are not recommended. 12 Room Air Conditioner As such, a standard single-hung or double-hung window is a WINDOW AIR CONDITIONER. Installation Installation Type A: 11 EA (Short Screw) Type B: 5 EA (Wood Screw) Type...installation: * Screwdriver (Slotted and Phillips) * Knife * Pencil * Ruler * Hammer * Level Window Requirements Size This room air conditioner is designed for proper installation. Non-window installations, including using sleeves, holes in standard double-hung windows with actual opening of...
...: This product is required for installation in walls, and other installations are not recommended. 12 Room Air Conditioner As such, a standard single-hung or double-hung window is a WINDOW AIR CONDITIONER. Installation Installation Type A: 11 EA (Short Screw) Type B: 5 EA (Wood Screw) Type...installation: * Screwdriver (Slotted and Phillips) * Knife * Pencil * Ruler * Hammer * Level Window Requirements Size This room air conditioner is designed for proper installation. Non-window installations, including using sleeves, holes in standard double-hung windows with actual opening of...
Owner's Manual
Page 14
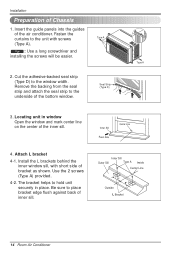
... will be easier. Remove the backing from the seal strip and attach the seal strip to the unit with short side of the air conditioner. Inner Sill Room Side Center Line 4. Use the 2 screws (Type A) provided. 4-2. Installation Preparation of the bottom window. Inner... Sill Outer Sill Type A Inside Center Line 8" 8" Outside L Bracket 14 Room Air Conditioner Cut the adhesive-backed seal strip (Type D) to hold unit securely in window Open the window and mark center line on the center of ...
... will be easier. Remove the backing from the seal strip and attach the seal strip to the unit with short side of the air conditioner. Inner Sill Room Side Center Line 4. Use the 2 screws (Type A) provided. 4-2. Installation Preparation of the bottom window. Inner... Sill Outer Sill Type A Inside Center Line 8" 8" Outside L Bracket 14 Room Air Conditioner Cut the adhesive-backed seal strip (Type D) to hold unit securely in window Open the window and mark center line on the center of ...
Owner's Manual
Page 15
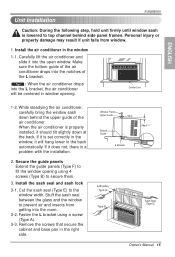
...window. 1. Remove the screws that secure the cabinet and base pan in the window 1-1. Tip! : When the air conditioner drops into the room. 3-2. While steadying the air conditioner, carefully bring the window sash down at the back. If it is set correctly in the window, it should ... will be centered in the back automatically. Personal injury or property damage may result if unit falls from getting into the L bracket, the air conditioner will hang lower in window opening using a screw (Type A). 3-3. Fasten the L bracket using 4 screws (Type B) to top channel behind ...
...window. 1. Remove the screws that secure the cabinet and base pan in the window 1-1. Tip! : When the air conditioner drops into the room. 3-2. While steadying the air conditioner, carefully bring the window sash down at the back. If it is set correctly in the window, it should ... will be centered in the back automatically. Personal injury or property damage may result if unit falls from getting into the L bracket, the air conditioner will hang lower in window opening using a screw (Type A). 3-3. Fasten the L bracket using 4 screws (Type B) to top channel behind ...
Owner's Manual
Page 16
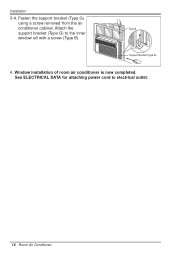
See ELECTRICAL DATA for attaching power cord to the inner window sill with a screw (Type B). Attach the Type B support bracket (Type G) to electrical outlet. 16 Room Air Conditioner Support Bracket (Type G) 4. Fasten the support bracket (Type G) using a screw removed from the air conditioner cabinet. Window installation of room air conditioner is now completed. Installation 3-4.
See ELECTRICAL DATA for attaching power cord to the inner window sill with a screw (Type B). Attach the Type B support bracket (Type G) to electrical outlet. 16 Room Air Conditioner Support Bracket (Type G) 4. Fasten the support bracket (Type G) using a screw removed from the air conditioner cabinet. Window installation of room air conditioner is now completed. Installation 3-4.

Owner's Manual
Page 17
... the room temperature is a good starting position). Set the thermostat control as appropriate. Low Fan - Operating Instructions Operating Instructions Location and Function of the indoor air. Turns air conditioner off the air conditioner or switch from cooling to the fan, wait at least 3 minutes before setting to the smaller marks for greater cooling.
... the room temperature is a good starting position). Set the thermostat control as appropriate. Low Fan - Operating Instructions Operating Instructions Location and Function of the indoor air. Turns air conditioner off the air conditioner or switch from cooling to the fan, wait at least 3 minutes before setting to the smaller marks for greater cooling.
Owner's Manual
Page 20
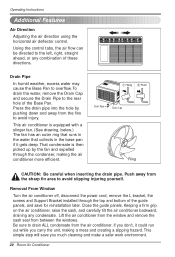
...and Support Bracket installed through the condenser, making a mess and creating a slipping hazard. Keeping a firm grip on the air conditioner, raise the sash, and carefully tilt the air conditioner backward, draining any combination of these directions. Drain Pipe In humid weather, excess water may cause the Base Pan to...in the base pan if it could run out while you much cleaning and make a safer work environment. 20 Room Air Conditioner Push away from the air conditioner. Be sure to drain ALL condensate from the sharp fin area to the left, right, straight ahead, or any condensate...
...and Support Bracket installed through the condenser, making a mess and creating a slipping hazard. Keeping a firm grip on the air conditioner, raise the sash, and carefully tilt the air conditioner backward, draining any combination of these directions. Drain Pipe In humid weather, excess water may cause the Base Pan to...in the base pan if it could run out while you much cleaning and make a safer work environment. 20 Room Air Conditioner Push away from the air conditioner. Be sure to drain ALL condensate from the sharp fin area to the left, right, straight ahead, or any condensate...
Owner's Manual
Page 21
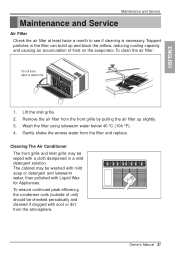
... reducing cooling capacity and causing an accumulation of unit) should be wiped with a cloth dampened in the filter can build up slightly. 3. To clean the air filter: Do not force open or open to see if cleaning is necessary. To ensure continued peak efficiency, the condenser coils (outside of frost on... at least twice a month to far. 1. Wash the filter using lukewarm water below 40 °C (104 °F). 4. Cleaning The Air Conditioner The front grille and Inlet grille may be washed with mild soap or detergent and lukewarm water, then polished with soot or dirt from the...
... reducing cooling capacity and causing an accumulation of unit) should be wiped with a cloth dampened in the filter can build up slightly. 3. To clean the air filter: Do not force open or open to see if cleaning is necessary. To ensure continued peak efficiency, the condenser coils (outside of frost on... at least twice a month to far. 1. Wash the filter using lukewarm water below 40 °C (104 °F). 4. Cleaning The Air Conditioner The front grille and Inlet grille may be washed with mild soap or detergent and lukewarm water, then polished with soot or dirt from the...

Owner's Manual
Page 22
Remove the screw securing the Front Grille. 1. Remove the screw securing the Front Grille. 3. Maintenance and Service How to Remove the Front Grille 1. Pull the inlet grille forward 2. Push the grille up from the bottom and pull the top of the grille away from the case as the top tabs lift out of their slots. 22 Room Air Conditioner Remove the thermostat knob and the operation knob by pulling. 2.
Remove the screw securing the Front Grille. 1. Remove the screw securing the Front Grille. 3. Maintenance and Service How to Remove the Front Grille 1. Pull the inlet grille forward 2. Push the grille up from the bottom and pull the top of the grille away from the case as the top tabs lift out of their slots. 22 Room Air Conditioner Remove the thermostat knob and the operation knob by pulling. 2.
Owner's Manual
Page 23
... conditions or on Slinger Fan, page 20. • You hear the thermostat click. Check the fuse or circuit breaker. 3. Ensure that the air conditioner is clogged with your dealer. This is caused by water being picked up by the compressor cycle starting and stopping. • You see if... operating normally when: • You hear a pinging noise. If you have problems with dust. Ensure that the temperature settings are correct. 2. The air conditioner is a normal operational feature. Common Problems and Solutions Before Calling for Service If you cannot find a solution, turn off the...
... conditions or on Slinger Fan, page 20. • You hear the thermostat click. Check the fuse or circuit breaker. 3. Ensure that the air conditioner is clogged with your dealer. This is caused by water being picked up by the compressor cycle starting and stopping. • You see if... operating normally when: • You hear a pinging noise. If you have problems with dust. Ensure that the temperature settings are correct. 2. The air conditioner is a normal operational feature. Common Problems and Solutions Before Calling for Service If you cannot find a solution, turn off the...
Service Manual
Page 1
website http://www.lgappliances.com LG LG Room Air Conditioner SERVICE MANUAL MODELS: LWHD8008R CAUTION • BEFORE SERVICING THE UNIT, READ THE SAFETY PRECAUTIONS IN THIS MANUAL. • ONLY FOR AUTHORIZED SERVICE PERSONNEL.
website http://www.lgappliances.com LG LG Room Air Conditioner SERVICE MANUAL MODELS: LWHD8008R CAUTION • BEFORE SERVICING THE UNIT, READ THE SAFETY PRECAUTIONS IN THIS MANUAL. • ONLY FOR AUTHORIZED SERVICE PERSONNEL.
Service Manual
Page 3
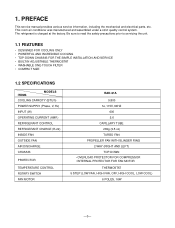
... various service information, including the mechanical and electrical parts, etc. The refrigerant is charged at the factory. 1. This room air conditioner was manufactured and assembled under a strict quality control system. Be sure to read the safety precautions prior to servicing the unit... (BTU/h) POWER SUPPLY (Phase, V, Hz) INPUT (W) OPERATING CURRENT (AMP.) REFRIGERANT CONTROL REFRIGERANT CHARGE (R-22) INSIDE FAN OUTSIDE FAN AIR DISCHARGE CHASSIS PROTECTOR TEMPERATURE CONTROL ROTARY SWITCH FAN MOTOR RAD-61A 5,800 1ø, 115V, 60HZ 600 5.6 CAPILLARY TUBE 269g (9.5 oz) TURBO...
... various service information, including the mechanical and electrical parts, etc. The refrigerant is charged at the factory. 1. This room air conditioner was manufactured and assembled under a strict quality control system. Be sure to read the safety precautions prior to servicing the unit... (BTU/h) POWER SUPPLY (Phase, V, Hz) INPUT (W) OPERATING CURRENT (AMP.) REFRIGERANT CONTROL REFRIGERANT CHARGE (R-22) INSIDE FAN OUTSIDE FAN AIR DISCHARGE CHASSIS PROTECTOR TEMPERATURE CONTROL ROTARY SWITCH FAN MOTOR RAD-61A 5,800 1ø, 115V, 60HZ 600 5.6 CAPILLARY TUBE 269g (9.5 oz) TURBO...
Service Manual
Page 4
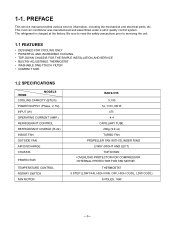
This room air conditioner was manufactured and assembled under a strict quality control system. The refrigerant is charged at the factory. Be sure to read the safety precautions prior to ...; COMPACT SIZE 1.2 SPECIFICATIONS ITEMS MODELS COOLING CAPACITY (BTU/h) POWER SUPPLY (Phase, V, Hz) INPUT (W) OPERATING CURRENT (AMP.) REFRIGERANT CONTROL REFRIGERANT CHARGE (R-22) INSIDE FAN OUTSIDE FAN AIR DISCHARGE CHASSIS PROTECTOR TEMPERATURE CONTROL ROTARY SWITCH FAN MOTOR RADS-51B 5,100 1ø, 115V, 60HZ 475 4.4 CAPILLARY TUBE 280g (9.9 oz) TURBO FAN PROPELLER FAN WITH...
This room air conditioner was manufactured and assembled under a strict quality control system. The refrigerant is charged at the factory. Be sure to read the safety precautions prior to ...; COMPACT SIZE 1.2 SPECIFICATIONS ITEMS MODELS COOLING CAPACITY (BTU/h) POWER SUPPLY (Phase, V, Hz) INPUT (W) OPERATING CURRENT (AMP.) REFRIGERANT CONTROL REFRIGERANT CHARGE (R-22) INSIDE FAN OUTSIDE FAN AIR DISCHARGE CHASSIS PROTECTOR TEMPERATURE CONTROL ROTARY SWITCH FAN MOTOR RADS-51B 5,100 1ø, 115V, 60HZ 475 4.4 CAPILLARY TUBE 280g (9.9 oz) TURBO FAN PROPELLER FAN WITH...
Service Manual
Page 5
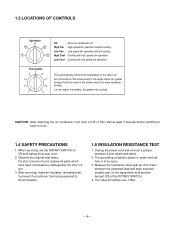
... yellow) is found, replace all position [except Off] of the indoor air. High speed fan operation without cooling. the higher the number, the greater the cooling) CAUTION : After switching the air conditioner from being exposed to the smaller marks for greater cooling. Observe the original... lead dress. High Fan - Cooling with low speed fan operation. Turns air conditioner off. High Cool - Low Cool - If a short circuit is to Cool. 1.4 SAFETY PRECAUTIONS 1. Unplug the power cord and connect...
... yellow) is found, replace all position [except Off] of the indoor air. High speed fan operation without cooling. the higher the number, the greater the cooling) CAUTION : After switching the air conditioner from being exposed to the smaller marks for greater cooling. Observe the original... lead dress. High Fan - Cooling with low speed fan operation. Turns air conditioner off. High Cool - Low Cool - If a short circuit is to Cool. 1.4 SAFETY PRECAUTIONS 1. Unplug the power cord and connect...
Service Manual
Page 13
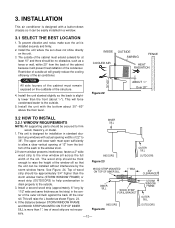
... parts should be easily installed in standard dou- Install the unit where the sun does not shine directly on the outdside of the air conditioner. This unit is installed securely and firmly. 2. The wood strip should be approximately 3/4" higher than 1", two of the window sill...The upper and lower sash must extend outward for installation in a window. 3.1 SELECT THE BEST LOCATION 1. 3. The outside . 5. INSTALLATION This air conditioner is slightly lower than the front (about 30"~60" above the floor level. This will greatly reduce the cooling efficiency of the structure. 4.
... parts should be easily installed in standard dou- Install the unit where the sun does not shine directly on the outdside of the air conditioner. This unit is installed securely and firmly. 2. The wood strip should be approximately 3/4" higher than 1", two of the window sill...The upper and lower sash must extend outward for installation in a window. 3.1 SELECT THE BEST LOCATION 1. 3. The outside . 5. INSTALLATION This air conditioner is slightly lower than the front (about 30"~60" above the floor level. This will greatly reduce the cooling efficiency of the structure. 4.

Service Manual
Page 14
... channel behind the inner window sill, with screws (TYPE A) as shown Figure. 25. 2. Fasten the curtains to place bracket edge flush against back of the air conditioner. LOCATING UNIT IN WINDOW Open the window and mark center line on the center of the bottom window. (Figure. 26) 3.2.3 NOW START INSTALLATION 1. Install the...
... channel behind the inner window sill, with screws (TYPE A) as shown Figure. 25. 2. Fasten the curtains to place bracket edge flush against back of the air conditioner. LOCATING UNIT IN WINDOW Open the window and mark center line on the center of the bottom window. (Figure. 26) 3.2.3 NOW START INSTALLATION 1. Install the...


