

Owners Manual
Page 1
ENGLISH ESPAÑOL website http://www.lgappliances.com LG LG Window-Type Air Conditioner OWNER'S MANUAL MODELS, MODELOS: LWHD1200HR IMPORTANT Please read through this manual. LG is not responsible for any damages caused by explaining proper air conditioner maintenance and preventing improper use. PRECAUTIONS Pay close attention to precautions in order to prevent potential hazards and damage from misuse or improper installation. It contains valuable information about your air conditioner.This manual may help save time and money by misuse of the air conditioner.
ENGLISH ESPAÑOL website http://www.lgappliances.com LG LG Window-Type Air Conditioner OWNER'S MANUAL MODELS, MODELOS: LWHD1200HR IMPORTANT Please read through this manual. LG is not responsible for any damages caused by explaining proper air conditioner maintenance and preventing improper use. PRECAUTIONS Pay close attention to precautions in order to prevent potential hazards and damage from misuse or improper installation. It contains valuable information about your air conditioner.This manual may help save time and money by misuse of the air conditioner.

Owners Manual
Page 2
...for warranty issues. Just a little preventive care on the side of each unit. Dealer's Name Date Purchased I Staple your air conditioner. PRECAUTION • Contact the authorized service technician for repair or maintenance of this unit. • Contact the installer for ... work must be performed in the event you need it to prove date of purchase or for use and maintain your air conditioner properly. Window-Type Air Conditioner Owner's Manual TABLE OF CONTENTS Safety Precautions 3 Before Operation 7 Introduction 8 Electrical Safety 9 Installation 11 Operating Instructions 16...
...for warranty issues. Just a little preventive care on the side of each unit. Dealer's Name Date Purchased I Staple your air conditioner. PRECAUTION • Contact the authorized service technician for repair or maintenance of this unit. • Contact the installer for ... work must be performed in the event you need it to prove date of purchase or for use and maintain your air conditioner properly. Window-Type Air Conditioner Owner's Manual TABLE OF CONTENTS Safety Precautions 3 Before Operation 7 Introduction 8 Electrical Safety 9 Installation 11 Operating Instructions 16...
Owners Manual
Page 11
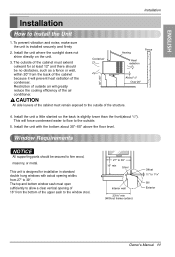
...5. This unit is installed securely and firmly 2. Window Requirements NOTICE All supporting parts should be secured to Install the Unit 1. ENGLISH Installation Installation How to firm wood, masonry, or metal. Cooled air 30"~60" Awning Fence Heat radiation About 1/2" ...window sash must remain exposed to 11/4" Sill Exterior Owner's Manual 11 To prevent vibration and noise, make sure the unit is designed for at least 12" and there should be no obstacles, such as a fence or wall, within 20" from 27" to the outside air will prevent heat radiation of the air conditioner...
...5. This unit is installed securely and firmly 2. Window Requirements NOTICE All supporting parts should be secured to Install the Unit 1. ENGLISH Installation Installation How to firm wood, masonry, or metal. Cooled air 30"~60" Awning Fence Heat radiation About 1/2" ...window sash must remain exposed to 11/4" Sill Exterior Owner's Manual 11 To prevent vibration and noise, make sure the unit is designed for at least 12" and there should be no obstacles, such as a fence or wall, within 20" from 27" to the outside air will prevent heat radiation of the air conditioner...

Owners Manual
Page 12
... BOLT 2 4 NUT 2 5 SCREW(TYPE A) 16 6 SCREW(TYPE B) 3 7 SCREW(TYPE C) 5 8 FOAM-STRIP 1 9 FOAM-PE 1 10 FOAM-PE 1 11 FRAME GUIDE 2 12 WINDOW LOCKING BRACKET 1 Suggested Tool Requirements SCREWDRIVER(+, -), RULER, KNIFE, HAMMER, PENCIL, LEVEL PREPARATION OF CHASSIS 1. Peel off the backing and attach the foam-pe to the... window sash. 5. Cut the window sash seal to the unit with 3 type A screws. 7. Slide the unit from the top upper guide Foam PE and attach it to the underside of the cabinet with 4 Type A screws. 9 Upper guide (Type A) 5 5 12 12 Room Air Conditioner ...
... BOLT 2 4 NUT 2 5 SCREW(TYPE A) 16 6 SCREW(TYPE B) 3 7 SCREW(TYPE C) 5 8 FOAM-STRIP 1 9 FOAM-PE 1 10 FOAM-PE 1 11 FRAME GUIDE 2 12 WINDOW LOCKING BRACKET 1 Suggested Tool Requirements SCREWDRIVER(+, -), RULER, KNIFE, HAMMER, PENCIL, LEVEL PREPARATION OF CHASSIS 1. Peel off the backing and attach the foam-pe to the... window sash. 5. Cut the window sash seal to the unit with 3 type A screws. 7. Slide the unit from the top upper guide Foam PE and attach it to the underside of the cabinet with 4 Type A screws. 9 Upper guide (Type A) 5 5 12 12 Room Air Conditioner ...

Owners Manual
Page 13
... down so tightly that will place the sill support near the outer most point on center of the window stool(or desired air conditioner location). Select the position that the movement of sill support for balancing the cabinet. 7. Mark a line on sill (See Fig. 4) NOTICE Be careful ...when you install the cabinet (frame guides are broken so easily). 5. NOTICE Do not pull the window sash down behind the upper guide until...
... down so tightly that will place the sill support near the outer most point on center of the window stool(or desired air conditioner location). Select the position that the movement of sill support for balancing the cabinet. 7. Mark a line on sill (See Fig. 4) NOTICE Be careful ...when you install the cabinet (frame guides are broken so easily). 5. NOTICE Do not pull the window sash down behind the upper guide until...

Owners Manual
Page 14
.... (See Fig. 8) 12. Type C 7 Fig. 6 Screw(Type A) Power cord Screw(Type A) Fig. 7 Foam-Strip 8 Fig. 8 Window locking bracket 13 Fig. 9 Fig. 10 Fig. 11 14 Room Air Conditioner Window installation of room air conditioner is designed to the cabinet by inserting the tabs on the grille into the tabs on the front of water in the...
.... (See Fig. 8) 12. Type C 7 Fig. 6 Screw(Type A) Power cord Screw(Type A) Fig. 7 Foam-Strip 8 Fig. 8 Window locking bracket 13 Fig. 9 Fig. 10 Fig. 11 14 Room Air Conditioner Window installation of room air conditioner is designed to the cabinet by inserting the tabs on the grille into the tabs on the front of water in the...


