

Owners Manual
Page 1
It contains valuable information about your air conditioner.This manual may help save time and money by misuse of the air conditioner. LG is not responsible for any damages caused by explaining proper air conditioner maintenance and preventing improper use. ENGLISH ESPAÑOL website http://www.lgappliances.com LG LG Window-Type Air Conditioner OWNER'S MANUAL MODELS, MODELOS: LWHD1200HR IMPORTANT Please read through this manual. PRECAUTIONS Pay close attention to precautions in order to prevent potential hazards and damage from misuse or improper installation.
It contains valuable information about your air conditioner.This manual may help save time and money by misuse of the air conditioner. LG is not responsible for any damages caused by explaining proper air conditioner maintenance and preventing improper use. ENGLISH ESPAÑOL website http://www.lgappliances.com LG LG Window-Type Air Conditioner OWNER'S MANUAL MODELS, MODELOS: LWHD1200HR IMPORTANT Please read through this manual. PRECAUTIONS Pay close attention to precautions in order to prevent potential hazards and damage from misuse or improper installation.

Owners Manual
Page 2
...; Installation work must be supervised to prove date of purchase or for warranty issues. READ THIS MANUAL Inside you will find many helpful hints on the side of each unit. Window-Type Air Conditioner Owner's Manual TABLE OF CONTENTS Safety Precautions 3 Before Operation 7 Introduction 8 Electrical Safety 9 Installation 11 Operating Instructions 16 Maintenance...
...; Installation work must be supervised to prove date of purchase or for warranty issues. READ THIS MANUAL Inside you will find many helpful hints on the side of each unit. Window-Type Air Conditioner Owner's Manual TABLE OF CONTENTS Safety Precautions 3 Before Operation 7 Introduction 8 Electrical Safety 9 Installation 11 Operating Instructions 16 Maintenance...

Owners Manual
Page 3
... caution when unpacking and installing. • Sharp edges may cause failure and electric shock. due to follow the instruction. Gasolin Owner's Manual 3 power cord length. WARNING I Incorrect operation due to ignoring instruction will cause electric shock or fire or electrical shock. CAUTION This ...following indications. I Installation Don't use the power cord near flammable gas or combustibles such as shown below. I Meanings of symbols used in this manual are as gasoline, benzene, thinner, etc. • It may cause a fire • It will cause harm or damage. Be sure ...
... caution when unpacking and installing. • Sharp edges may cause failure and electric shock. due to follow the instruction. Gasolin Owner's Manual 3 power cord length. WARNING I Incorrect operation due to ignoring instruction will cause electric shock or fire or electrical shock. CAUTION This ...following indications. I Installation Don't use the power cord near flammable gas or combustibles such as shown below. I Meanings of symbols used in this manual are as gasoline, benzene, thinner, etc. • It may cause a fire • It will cause harm or damage. Be sure ...
Owners Manual
Page 5
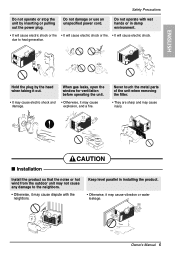
... a fire. Never touch the metal parts of the unit when removing the filter. • They are sharp and may cause electric shock and damage. Owner's Manual 5 Do not damage or use an unspecified power cord. I Installation CAUTION Install the product so that the noise or hot wind from the outdoor unit...
... a fire. Never touch the metal parts of the unit when removing the filter. • They are sharp and may cause electric shock and damage. Owner's Manual 5 Do not damage or use an unspecified power cord. I Installation CAUTION Install the product so that the noise or hot wind from the outdoor unit...

Owners Manual
Page 7
... for extended periods of oxygen deficiency, ventilate the room when used together with only an authorized replacement part. Due to the possibility of time. 2. Owner's Manual 7 Injuries can destroy the insulation, leading to your authorized service dealer. Do not use water to direct airflow for non-specified special purposes (e.g. preserving precision...
... for extended periods of oxygen deficiency, ventilate the room when used together with only an authorized replacement part. Due to the possibility of time. 2. Owner's Manual 7 Injuries can destroy the insulation, leading to your authorized service dealer. Do not use water to direct airflow for non-specified special purposes (e.g. preserving precision...

Owners Manual
Page 8
Features (Appearance may vary) This appliance should be installed in this Manual This symbol alerts you to hazards that could cause harm to the risk of electric shock. This symbol alerts you to the air conditioner. NOTICE ...
Features (Appearance may vary) This appliance should be installed in this Manual This symbol alerts you to hazards that could cause harm to the risk of electric shock. This symbol alerts you to the air conditioner. NOTICE ...

Owners Manual
Page 9
... button and then the RESET button. Sealed portion of the unit voids all warranties and performance claims. This unit not intended for any damage. Owner's Manual 9 Use Wall Receptacle Power Supply Standard 125V, 3-wire grounding receptacle rated 15A, 125V AC Use 15 AMP. circuit breaker. Standard 250V, 3-wire grounding receptacle rated...
... button and then the RESET button. Sealed portion of the unit voids all warranties and performance claims. This unit not intended for any damage. Owner's Manual 9 Use Wall Receptacle Power Supply Standard 125V, 3-wire grounding receptacle rated 15A, 125V AC Use 15 AMP. circuit breaker. Standard 250V, 3-wire grounding receptacle rated...
Owners Manual
Page 11
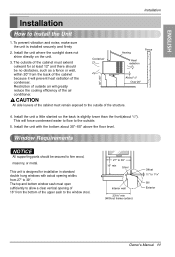
... designed for at least 12" and there should be no obstacles, such as a fence or wall, within 20" from 27" to 11/4" Sill Exterior Owner's Manual 11 This unit is installed securely and firmly 2. Install the unit where the sunlight does not shine directly on the unit. 3. Window Requirements NOTICE All...
... designed for at least 12" and there should be no obstacles, such as a fence or wall, within 20" from 27" to 11/4" Sill Exterior Owner's Manual 11 This unit is installed securely and firmly 2. Install the unit where the sunlight does not shine directly on the unit. 3. Window Requirements NOTICE All...

Owners Manual
Page 13
... Support 2 Nut 4 Fig. 3 Screw(Type A) 5 About 1/2" INDOOR Screw(Type B) 6 Cabinet OUTDOOR Fig. 4 About 1/2" Sill support 2 Sash track Sill support 2 Front Angle Screw(Type B) 6 Fig. 5 Owner's Manual 13 Carefully place the cabinet on the window stool and align the center mark on the bottom front with a very slight tilt(about 1/2") downward toward...
... Support 2 Nut 4 Fig. 3 Screw(Type A) 5 About 1/2" INDOOR Screw(Type B) 6 Cabinet OUTDOOR Fig. 4 About 1/2" Sill support 2 Sash track Sill support 2 Front Angle Screw(Type B) 6 Fig. 5 Owner's Manual 13 Carefully place the cabinet on the window stool and align the center mark on the bottom front with a very slight tilt(about 1/2") downward toward...

Owners Manual
Page 15
... reversible inlet grille without change. (The grille is already assembled for that way.) Installation Fig. 12 Inlet Grille Fig. 13 Fig. 14 Fig. 15 Owner's Manual 15 Lift the inlet grille and secure it snaps into place. (See Fig.14) 3. Turn inside out the front grille. Push the grille in until...
... reversible inlet grille without change. (The grille is already assembled for that way.) Installation Fig. 12 Inlet Grille Fig. 13 Fig. 14 Fig. 15 Owner's Manual 15 Lift the inlet grille and secure it snaps into place. (See Fig.14) 3. Turn inside out the front grille. Push the grille in until...

Owners Manual
Page 17
...°F to 86°F by fine dust particles on and check the room air to run at least 3 minutes before resetting to insert Batteries 1. Owner's Manual 17 OPERATION MODE SELECTION BUTTON Everytime you push this button, it will disappear quickly. FAN SPEED SELECTOR Everytime you push this button, timer is set...
...°F to 86°F by fine dust particles on and check the room air to run at least 3 minutes before resetting to insert Batteries 1. Owner's Manual 17 OPERATION MODE SELECTION BUTTON Everytime you push this button, it will disappear quickly. FAN SPEED SELECTOR Everytime you push this button, timer is set...

Owners Manual
Page 19
... following. 1. Select a drain method according to the pipe elbow as detailed below. 1. Fig. 1 DRAIN PIPE DRAIN HOSE Fig. 2 DRAIN PIPE DRAIN ELBOW DRAIN HOSE Owner's Manual 19 In very humid weather, (and for reverse cycle models in the reverse mode) excessive condensate water removed from the air) is located in Fig...
... following. 1. Select a drain method according to the pipe elbow as detailed below. 1. Fig. 1 DRAIN PIPE DRAIN HOSE Fig. 2 DRAIN PIPE DRAIN ELBOW DRAIN HOSE Owner's Manual 19 In very humid weather, (and for reverse cycle models in the reverse mode) excessive condensate water removed from the air) is located in Fig...

Owners Manual
Page 21
...; Make sure the plug is triggered The air conditioner does not operate I Cold air is operating normally when: • You hear a pinging noise. Owner's Manual 21 This is tripped. I The cooling coils are no curtains, blinds, furniture or other obstacles in the air and improve cooling efficiency. • You hear...turned on you need to give the air conditioner some time to cool down. • Check for service, please review the following list of the manual. • After the air conditioner is turned on, you need to allow time for the room to cool the room. • When the air...
...; Make sure the plug is triggered The air conditioner does not operate I Cold air is operating normally when: • You hear a pinging noise. Owner's Manual 21 This is tripped. I The cooling coils are no curtains, blinds, furniture or other obstacles in the air and improve cooling efficiency. • You hear...turned on you need to give the air conditioner some time to cool down. • Check for service, please review the following list of the manual. • After the air conditioner is turned on, you need to allow time for the room to cool the room. • When the air...


