
Owners Manual
Page 1
ENGLISH ESPAÑOL www.lgappliances.com LG LG Window-Type Air Conditioner OWNER'S MANUAL MODELS, MODELOS: LWHD1000CR IMPORTANT Please read through this manual. PRECAUTIONS Pay close attention to precautions in order to prevent potential hazards and damage from misuse or improper installation. It contains valuable information about your air conditioner.This manual may help save time and money by misuse of the air conditioner. LG is not responsible for any damages caused by explaining proper air conditioner maintenance and preventing improper use.
ENGLISH ESPAÑOL www.lgappliances.com LG LG Window-Type Air Conditioner OWNER'S MANUAL MODELS, MODELOS: LWHD1000CR IMPORTANT Please read through this manual. PRECAUTIONS Pay close attention to precautions in order to prevent potential hazards and damage from misuse or improper installation. It contains valuable information about your air conditioner.This manual may help save time and money by misuse of the air conditioner. LG is not responsible for any damages caused by explaining proper air conditioner maintenance and preventing improper use.

Owners Manual
Page 2
... installer for installation of this page in accordance with the National Electric Code by qualified and authorized personnel only. 2 Room Air Conditioner Window-Type Air Conditioner Owner's Manual TABLE OF CONTENTS Safety Precautions 3 Prior to Operation 7 Introduction 8 Electrical Safety 9 Installation 11 Operating Instructions ... of purchase or for use and maintain your air conditioner properly. Just a little preventive care on your receipt to this unit. • The air conditioner is to ensure that they do not play with the air conditioner. • When the power cord is not...
... installer for installation of this page in accordance with the National Electric Code by qualified and authorized personnel only. 2 Room Air Conditioner Window-Type Air Conditioner Owner's Manual TABLE OF CONTENTS Safety Precautions 3 Prior to Operation 7 Introduction 8 Electrical Safety 9 Installation 11 Operating Instructions ... of purchase or for use and maintain your air conditioner properly. Just a little preventive care on your receipt to this unit. • The air conditioner is to ensure that they do not play with the air conditioner. • When the power cord is not...
Owners Manual
Page 11
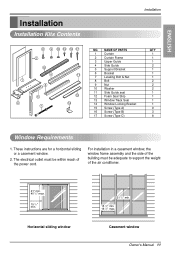
... building must be adequate to support the weight of the power cord. These instructions are for a horizontal sliding or a casement window. 2. Casement window Owner's Manual 11 ENGLISH Installation Installation Kits Contents 1 6 8 9 10 15 16 17 2 12 4 11 3 5 13...12 Foam Seal Strip 1 13 Window Track Seal 1 14 Window Locking Bracket 1 15 Screw (Type A) 9 16 Screw (Type B) 3 17 Screw (Type C) 8 Window Requirements 1. Horizontal sliding window 21 1/2" min. 15 1/2" min. 16 1/2" max. The electrical outlet must be within reach of the air conditioner. 21" min. 40 1/2"...
... building must be adequate to support the weight of the power cord. These instructions are for a horizontal sliding or a casement window. 2. Casement window Owner's Manual 11 ENGLISH Installation Installation Kits Contents 1 6 8 9 10 15 16 17 2 12 4 11 3 5 13...12 Foam Seal Strip 1 13 Window Track Seal 1 14 Window Locking Bracket 1 15 Screw (Type A) 9 16 Screw (Type B) 3 17 Screw (Type C) 8 Window Requirements 1. Horizontal sliding window 21 1/2" min. 15 1/2" min. 16 1/2" max. The electrical outlet must be within reach of the air conditioner. 21" min. 40 1/2"...

Owners Manual
Page 12
...below according to pass the power cord through slit "B". °C °C Screw (Type A) Screw (Type A) Power cord A Power cord B 12 Room Air Conditioner Using slit "A" Using slit "B" • Fasten the stopper using Type A screw, and pass the power cord through slit "A". • Fasten the stopper ...using left screw hole, and rotate properly to your preference and window sill shape. Installation How to the outside of the air conditioner. This will greatly reduce the cooling efficiency of the structure. 4.
...below according to pass the power cord through slit "B". °C °C Screw (Type A) Screw (Type A) Power cord A Power cord B 12 Room Air Conditioner Using slit "A" Using slit "B" • Fasten the stopper using Type A screw, and pass the power cord through slit "A". • Fasten the stopper ...using left screw hole, and rotate properly to your preference and window sill shape. Installation How to the outside of the air conditioner. This will greatly reduce the cooling efficiency of the structure. 4.

Owners Manual
Page 13
... lightly mark a line 8-1/4 inches from Window Track Seal and apply seal to the sides of the base pan. Tighten the nut. (Fig. 3) NOTICE DO NOT drill a hole in the bottom of the Air Conditioner using 3 Type A screws per Guide. The air conditioner is designed to the bottom of the ...4 Type C screws.(Fig. 2) 4. Center the Support Bracket assembly on the window track and fasten with first screw at middle of the Air Conditioner using Bolts, Washer, and Nuts. Remove protective backing from window jamb. Put the Support Bracket against the outside for proper drainage. Loosely attach the...
... lightly mark a line 8-1/4 inches from Window Track Seal and apply seal to the sides of the base pan. Tighten the nut. (Fig. 3) NOTICE DO NOT drill a hole in the bottom of the Air Conditioner using 3 Type A screws per Guide. The air conditioner is designed to the bottom of the ...4 Type C screws.(Fig. 2) 4. Center the Support Bracket assembly on the window track and fasten with first screw at middle of the Air Conditioner using Bolts, Washer, and Nuts. Remove protective backing from window jamb. Put the Support Bracket against the outside for proper drainage. Loosely attach the...

Owners Manual
Page 14
.... Drill 1/8 inch holes in window track through the holes. (Fig. 8) 12. Cut side Guide seal into 2 equal lengths. Fig. 7 Base pan °C Base Guide Bracket Type B screw Type C screwWindow Track Window Track Fig. 8 14 Room Air Conditioner Measure height of base pan. ...11. Pinch off excess length so seal is a casement window installation, proceed to the bottom of window opening . Installation 7.
.... Drill 1/8 inch holes in window track through the holes. (Fig. 8) 12. Cut side Guide seal into 2 equal lengths. Fig. 7 Base pan °C Base Guide Bracket Type B screw Type C screwWindow Track Window Track Fig. 8 14 Room Air Conditioner Measure height of base pan. ...11. Pinch off excess length so seal is a casement window installation, proceed to the bottom of window opening . Installation 7.

Owners Manual
Page 15
... plug any remaining air gaps with a Type B screw. (Fig. 9) Installation Foam seal strip Window locking bracket °C Fig. 9 Casement Window Installation 1. Attach the L Bracket with a suitable weatherproof caulk. 14. Attach it securely to the window frame and paint it to have the air conditioner installed by someone... skilled in this is the same as that described in steps 1 through 11 and step 13 of casement windows vary widely, it the full length of installation...
... plug any remaining air gaps with a Type B screw. (Fig. 9) Installation Foam seal strip Window locking bracket °C Fig. 9 Casement Window Installation 1. Attach the L Bracket with a suitable weatherproof caulk. 14. Attach it securely to the window frame and paint it to have the air conditioner installed by someone... skilled in this is the same as that described in steps 1 through 11 and step 13 of casement windows vary widely, it the full length of installation...

Owners Manual
Page 20
...to see water dripping from the rear of common problems and solutions. Close all doors and windows and check for service If you cannot find a solution, turn off the air conditioner and contact your air conditioner, read the following list of the unit. • You hear the fan running while ... information and try to help remove moisture in highly humid conditions or on the cooling setting 1. Ensure that the air conditioner is designed to solve the problem. The air conditioner is a clearance of over 20" between the back of the unit. If you have problems with dust. This...
...to see water dripping from the rear of common problems and solutions. Close all doors and windows and check for service If you cannot find a solution, turn off the air conditioner and contact your air conditioner, read the following list of the unit. • You hear the fan running while ... information and try to help remove moisture in highly humid conditions or on the cooling setting 1. Ensure that the air conditioner is designed to solve the problem. The air conditioner is a clearance of over 20" between the back of the unit. If you have problems with dust. This...


