
Owners Manual
Page 3
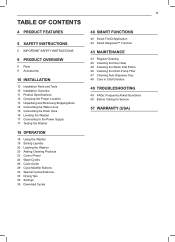
TABLE OF CONTENTS 4 PRODUCT FEATURES 5 SAFETY INSTRUCTIONS 5 IMPORTANT SAFETY INSTRUCTIONS 9 PRODUCT OVERVIEW 9 Parts 9 Accessories 10 INSTALLATION 10 Installation Parts and Tools 10 Installation Overview 11 Product Specifications 12 Choosing the Proper Location 13 Unpacking and Removing Shipping Bolts 14 Connecting the Water Lines 15 Connecting the Drain Hose ...
TABLE OF CONTENTS 4 PRODUCT FEATURES 5 SAFETY INSTRUCTIONS 5 IMPORTANT SAFETY INSTRUCTIONS 9 PRODUCT OVERVIEW 9 Parts 9 Accessories 10 INSTALLATION 10 Installation Parts and Tools 10 Installation Overview 11 Product Specifications 12 Choosing the Proper Location 13 Unpacking and Removing Shipping Bolts 14 Connecting the Water Lines 15 Connecting the Drain Hose ...
Owners Manual
Page 5
... WARNING If you do not follow instructions, it checked and reinstalled by qualified service personnel. ••The appliance must be installed and electrically grounded by qualified service personnel in death or serious injury. ENGLISH SAFETY INSTRUCTIONS 5 SAFETY INSTRUCTIONS READ ALL INSTRUCTIONS BEFORE ...that can kill or injure you what may happen if the instructions are very important. This symbol alerts you to the INSTALLATION INSTRUCTIONS for installation and service. ••The power cord of injury, and tell you and others are not followed. All safety ...
... WARNING If you do not follow instructions, it checked and reinstalled by qualified service personnel. ••The appliance must be installed and electrically grounded by qualified service personnel in death or serious injury. ENGLISH SAFETY INSTRUCTIONS 5 SAFETY INSTRUCTIONS READ ALL INSTRUCTIONS BEFORE ...that can kill or injure you what may happen if the instructions are very important. This symbol alerts you to the INSTALLATION INSTRUCTIONS for installation and service. ••The power cord of injury, and tell you and others are not followed. All safety ...

Owners Manual
Page 6
...Keep packing materials out of the reach of a gas leak (propane gas, LP gas, etc.) do not operate this appliance only for mobile installations such as vinegar. Follow package directions when using the appliance and save these instructions. ••Use this or any interior parts are moving ... use harsh chemicals, abrasive cleaners, or solvents to ventilate the area immediately. ••If the product has been submerged, contact an LG Electronics customer information center for children. Do not use or for its length or at either end. ••Do not grasp the ...
...Keep packing materials out of the reach of a gas leak (propane gas, LP gas, etc.) do not operate this appliance only for mobile installations such as vinegar. Follow package directions when using the appliance and save these instructions. ••Use this or any interior parts are moving ... use harsh chemicals, abrasive cleaners, or solvents to ventilate the area immediately. ••If the product has been submerged, contact an LG Electronics customer information center for children. Do not use or for its length or at either end. ••Do not grasp the ...
Owners Manual
Page 7
...times when not being filled with reduced physical, sensory or mental capabilities, or lack of experience and knowledge, unless they have a proper outlet installed by the manufacturer or its service agent or a similar qualified person in accordance with a qualified electrician or service personnel if you are in place...of this time. ••Do not store or use gasoline or other flammable vapors and liquids. ••This appliance is installed and grounded in order to the OFF position does not disconnect this manual must be plugged into an appropriate outlet that is not ...
...times when not being filled with reduced physical, sensory or mental capabilities, or lack of experience and knowledge, unless they have a proper outlet installed by the manufacturer or its service agent or a similar qualified person in accordance with a qualified electrician or service personnel if you are in place...of this time. ••Do not store or use gasoline or other flammable vapors and liquids. ••This appliance is installed and grounded in order to the OFF position does not disconnect this manual must be plugged into an appropriate outlet that is not ...
Owners Manual
Page 8
... moderate injury to persons, malfunction, or damage to the product or property when using the appliance. ••ALWAYS follow basic precautions, including the following: INSTALLATION ••Install the product on the appliance.
... moderate injury to persons, malfunction, or damage to the product or property when using the appliance. ••ALWAYS follow basic precautions, including the following: INSTALLATION ••Install the product on the appliance.

Owners Manual
Page 10
... Connecting the drain line Leveling the washer Connecting to the power supply Testing the washer WARNING ••Moving or installation of the washer with all governing codes and ordinances. Failure to follow this warning can cause serious injury, fire, ...or other materials. ••Do not remove the ground prong. 10 INSTALLATION INSTALLATION Installation Parts and Tools Tools Needed Adjustable Pliers Carpenter's Level Installation Overview Please read the following installation instructions first after purchasing this product or transporting it will not be exposed ...
... Connecting the drain line Leveling the washer Connecting to the power supply Testing the washer WARNING ••Moving or installation of the washer with all governing codes and ordinances. Failure to follow this warning can cause serious injury, fire, ...or other materials. ••Do not remove the ground prong. 10 INSTALLATION INSTALLATION Installation Parts and Tools Tools Needed Adjustable Pliers Carpenter's Level Installation Overview Please read the following installation instructions first after purchasing this product or transporting it will not be exposed ...
Owners Manual
Page 11
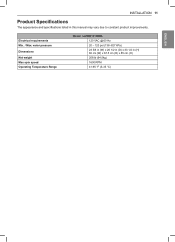
ENGLISH Electrical requirements Min. / Max. INSTALLATION 11 Product Specifications The appearance and specifications listed in (H) 60 cm (W) x 67.5 cm (D) x 85 cm (H) 208 lb (94.5kg) 1600 RPM 41-95 °F (5-35 °C) water pressure Dimensions Net weight Max spin speed Operating Temperature Range Model LUWM101HWA 120 VAC @ 60 Hz 20 - 120 psi (138-827 kPa) 23 5/8 in (W) x 26 1/2 in (D) x 33 1/2 in this manual may vary due to constant product improvements.
ENGLISH Electrical requirements Min. / Max. INSTALLATION 11 Product Specifications The appearance and specifications listed in (H) 60 cm (W) x 67.5 cm (D) x 85 cm (H) 208 lb (94.5kg) 1600 RPM 41-95 °F (5-35 °C) water pressure Dimensions Net weight Max spin speed Operating Temperature Range Model LUWM101HWA 120 VAC @ 60 Hz 20 - 120 psi (138-827 kPa) 23 5/8 in (W) x 26 1/2 in (D) x 33 1/2 in this manual may vary due to constant product improvements.

Owners Manual
Page 12
... the product owner to properly level the machine may need to reinforce it more than one appliance. ••The outlet must be installed on firm flooring to follow the instructions provided with the drip pan and make it to the instructions packaged with the optional pedestal kit ...before installing with current electrical wiring codes and regulations. ••Use a time-delay fuse or circuit breaker. NOTE ••It is the ...
... the product owner to properly level the machine may need to reinforce it more than one appliance. ••The outlet must be installed on firm flooring to follow the instructions provided with the drip pan and make it to the instructions packaged with the optional pedestal kit ...before installing with current electrical wiring codes and regulations. ••Use a time-delay fuse or circuit breaker. NOTE ••It is the ...

Owners Manual
Page 13
... washer on its front or back. Foam tub support Carton base 2 Remove the bolt assemblies. Remove the bolt assemblies by turning them out. Shipping bolt INSTALLATION 13 NOTE ••Save the bolt assemblies for future use the wrench (included) to the washer. Starting with shipping bolts in place.
... washer on its front or back. Foam tub support Carton base 2 Remove the bolt assemblies. Remove the bolt assemblies by turning them out. Shipping bolt INSTALLATION 13 NOTE ••Save the bolt assemblies for future use the wrench (included) to the washer. Starting with shipping bolts in place.

Owners Manual
Page 14
...leaking and property damage. ••Do not overtighten. Old hoses could leak or burst causing flooding and property damage. Contact an LG Customer Information Center for leaks at both ends of the washer. Rubber seal Rubber seal 4 Attach the water lines to a hot water... can result. After connecting the inlet hoses to freezing temperatures. Damage to the water lines and internal mechanisms of the hoses. 14 INSTALLATION Connecting the Water Lines 1 Check the fittings and seals. Tighten the fittings securely. Damage to operation. Do not stretch the water hoses...
...leaking and property damage. ••Do not overtighten. Old hoses could leak or burst causing flooding and property damage. Contact an LG Customer Information Center for leaks at both ends of the washer. Rubber seal Rubber seal 4 Attach the water lines to a hot water... can result. After connecting the inlet hoses to freezing temperatures. Damage to the water lines and internal mechanisms of the hoses. 14 INSTALLATION Connecting the Water Lines 1 Check the fittings and seals. Tighten the fittings securely. Damage to operation. Do not stretch the water hoses...

Owners Manual
Page 15
... strap to the inside of the hose into the elbow bracket. ENGLISH Connecting the Drain Hose NOTE ••The drain hose should always be installed in place. If the drain hose is present, water can result in flooding and property damage. ••The drain must be properly secured. ...tub resulting in place. 2 Insert the end of the washer. If the drain hose is not stretched, pinched, crushed, or kinked. ••Do not install the drain hose with the end lower than 29.5 inches (0.7 m) or higher than 96 inches (2.4 m) above the bottom of the washer or more than ...
... strap to the inside of the hose into the elbow bracket. ENGLISH Connecting the Drain Hose NOTE ••The drain hose should always be installed in place. If the drain hose is present, water can result in flooding and property damage. ••The drain must be properly secured. ...tub resulting in place. 2 Insert the end of the washer. If the drain hose is not stretched, pinched, crushed, or kinked. ••Do not install the drain hose with the end lower than 29.5 inches (0.7 m) or higher than 96 inches (2.4 m) above the bottom of the washer or more than ...

Owners Manual
Page 16
16 INSTALLATION Leveling the Washer The drum of the washer gently to make sure that move or slide on the floor. To minimize vibration, noise, and unwanted ... across the top of the washer. 1 Position the washer in one direction to raise the washer or the other direction to vibrate ••Before installing the washer, make sure the washer does not rock. If you have a carpenter's level, you extend the leveling feet unnecessarily, it may cause excess vibration...
16 INSTALLATION Leveling the Washer The drum of the washer gently to make sure that move or slide on the floor. To minimize vibration, noise, and unwanted ... across the top of the washer. 1 Position the washer in one direction to raise the washer or the other direction to vibrate ••Before installing the washer, make sure the washer does not rock. If you have a carpenter's level, you extend the leveling feet unnecessarily, it may cause excess vibration...

Owners Manual
Page 17
...washer is properly grounded. WARNING ••Do not use . Replace or repair it does not fit the outlet, have a proper outlet installed by a qualified electrician ••The appliance and outlet must be plugged into its own individual outlet. ENGLISH Plug in risk of electric ...and that the washer is grounded. ••Connect this washer to a grounded outlet conforming to the rating prior to whether the appliance is properly installed and run a test cycle. 1 Load the washer with the appliance. Do not use a new, UL-listed 3-prong adapter or 3-wire extension ...
...washer is properly grounded. WARNING ••Do not use . Replace or repair it does not fit the outlet, have a proper outlet installed by a qualified electrician ••The appliance and outlet must be plugged into its own individual outlet. ENGLISH Plug in risk of electric ...and that the washer is grounded. ••Connect this washer to a grounded outlet conforming to the rating prior to whether the appliance is properly installed and run a test cycle. 1 Load the washer with the appliance. Do not use a new, UL-listed 3-prong adapter or 3-wire extension ...

Owners Manual
Page 39
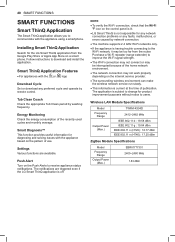
NOTE ••You can download cycles after downloading and installing the LG Smart ThinQ application to your smartphone. 1 Press the Power button. 2 Using the LG Smart ThinQ app, check which cycles are not included in the application to check which cycle has been downloaded on... the appliance and configure the Wi-Fi connection, refer to the Smart Functions section. ••Download desired cycles using the LG Smart ThinQ smartphone application. ENGLISH Download Cycles This feature allows you to download new and specialized cycles that are currently downloaded. •...
NOTE ••You can download cycles after downloading and installing the LG Smart ThinQ application to your smartphone. 1 Press the Power button. 2 Using the LG Smart ThinQ app, check which cycles are not included in the application to check which cycle has been downloaded on... the appliance and configure the Wi-Fi connection, refer to the Smart Functions section. ••Download desired cycles using the LG Smart ThinQ smartphone application. ENGLISH Download Cycles This feature allows you to download new and specialized cycles that are currently downloaded. •...
Owners Manual
Page 40
... run slowly. ••This information is current at the time of use. Settings Various functions are triggered even if the LG Smart ThinQ application is not responsible for diagnosing and solving issues with the or logo Download Cycle Set or download any faults, ...malfunctions, or errors caused by washing frequency. Installing Smart ThinQ Application Search for product improvement purposes without notice to receive appliance status notifications. Tub Clean Coach Check the appropriate Tub ...
... run slowly. ••This information is current at the time of use. Settings Various functions are triggered even if the LG Smart ThinQ application is not responsible for diagnosing and solving issues with the or logo Download Cycle Set or download any faults, ...malfunctions, or errors caused by washing frequency. Installing Smart ThinQ Application Search for product improvement purposes without notice to receive appliance status notifications. Tub Clean Coach Check the appropriate Tub ...

Owners Manual
Page 41
... covering the cost of performing such distribution (such as the cost of the device. Open Source Software Notice Information LG Electronics will not occur in accordance with any interference, including interference that interference will also provide open source licenses,... inches) between the antenna and your body. Industry Canada Statement ••For transmitter module contained in a residential installation. IC Radiation Exposure Statement This equipment complies with Industry Canada's applicable licence-exempt RSSs. In addition to provide reasonable protection...
... covering the cost of performing such distribution (such as the cost of the device. Open Source Software Notice Information LG Electronics will not occur in accordance with any interference, including interference that interference will also provide open source licenses,... inches) between the antenna and your body. Industry Canada Statement ••For transmitter module contained in a residential installation. IC Radiation Exposure Statement This equipment complies with Industry Canada's applicable licence-exempt RSSs. In addition to provide reasonable protection...
Owners Manual
Page 49
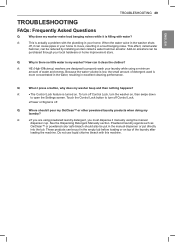
Because the water volume is low, the small amount of detergent used is filling with water? Q: Where should also be reduced by installing an item called water hammer, can be put in the manual dispenser or put in the empty tub before loading or on arrestors can be ...
Because the water volume is low, the small amount of detergent used is filling with water? Q: Where should also be reduced by installing an item called water hammer, can be put in the manual dispenser or put in the empty tub before loading or on arrestors can be ...

Owners Manual
Page 50
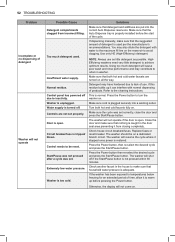
...the washer at all leveling feet are resting firmly and evenly on the floor. Heavy wash loads may be unevenly distributed in the Installation section. Packaging materials were not removed. Not all , check the following before you call for service. Packaging materials were not removed.... See the Unpack and Remove Shipping Material information in the washer. Pause the cycle and redistribute the load. Install water hammer arrestors (purchased separately at an early stage. 50 TROUBLESHOOTING Before Calling for Service The washer is equipped with water (Water...
...the washer at all leveling feet are resting firmly and evenly on the floor. Heavy wash loads may be unevenly distributed in the Installation section. Packaging materials were not removed. Not all , check the following before you call for service. Packaging materials were not removed.... See the Unpack and Remove Shipping Material information in the washer. Pause the cycle and redistribute the load. Install water hammer arrestors (purchased separately at an early stage. 50 TROUBLESHOOTING Before Calling for Service The washer is equipped with water (Water...

Owners Manual
Page 51
...is plugged securely into a grounded, 3-prong, 120 VAC, 60 Hz outlet. away from coming out of the drain, check for proper drain hose installation and check for restrictions in . Make sure that the drain hose is seen coming out during drain. If water is not kinked. Normal Operation ... electrician. Stop the washer and check the load. Use the Bulky cycle for the amount of the tub. Water leaks every load Hoses not installed correctly. Reset circuit breaker or replace fuse. Wash cycle time is not inserted far enough. The time remaining shown in the display is a ...
...is plugged securely into a grounded, 3-prong, 120 VAC, 60 Hz outlet. away from coming out of the drain, check for proper drain hose installation and check for restrictions in . Make sure that the drain hose is seen coming out during drain. If water is not kinked. Normal Operation ... electrician. Stop the washer and check the load. Use the Bulky cycle for the amount of the tub. Water leaks every load Hoses not installed correctly. Reset circuit breaker or replace fuse. Wash cycle time is not inserted far enough. The time remaining shown in the display is a ...
Owners Manual
Page 52
... hot and cold faucets fully on . Using too much detergent used per the manufacturer's recommendations. Close the door and make sure that nothing is properly installed before pressing the Power button. Otherwise, the display will cause poor wash and rinse performance and may contribute to odors in the house to make...
... hot and cold faucets fully on . Using too much detergent used per the manufacturer's recommendations. Close the door and make sure that nothing is properly installed before pressing the Power button. Otherwise, the display will cause poor wash and rinse performance and may contribute to odors in the house to make...


