
Owner's Manual
Page 7
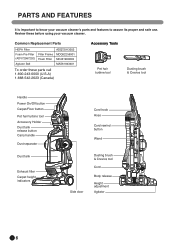
... Dust tank release button Carry handle Dust separator Dust tank Exhaust filter Carpet height indicators Cord hook Hose Cord rewind button Wand Side door Dusting brush & Crevice tool Cord Body release Height adjustment Agitator 6 PARTS AND FEATURES It is important to assure its proper and safe use.
... Dust tank release button Carry handle Dust separator Dust tank Exhaust filter Carpet height indicators Cord hook Hose Cord rewind button Wand Side door Dusting brush & Crevice tool Cord Body release Height adjustment Agitator 6 PARTS AND FEATURES It is important to assure its proper and safe use.
Owner's Manual
Page 19
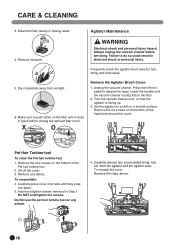
...place before servicing. Do Not use the pet hair turbine tool on a cloth or a smooth surface. Frequently check the agitator brush area for hair, string and lint buildup. 5. Set the agitator on any animal. 4. Remove the four screws on the floor. 2. Do NOT overtighten the screws. CARE & CLEANING 3....Remove moisture. Failure to release the head. Make sure to push down on the bottom of the Pet hair turbine tool. 2. Remove the Agitator Brush Cover: 1. Lower the handle until they snap into place. 5. Remove the six screws on the filter until it locks in electrical shock ...
...place before servicing. Do Not use the pet hair turbine tool on a cloth or a smooth surface. Frequently check the agitator brush area for hair, string and lint buildup. 5. Set the agitator on any animal. 4. Remove the four screws on the floor. 2. Do NOT overtighten the screws. CARE & CLEANING 3....Remove moisture. Failure to release the head. Make sure to push down on the bottom of the Pet hair turbine tool. 2. Remove the Agitator Brush Cover: 1. Lower the handle until they snap into place. 5. Remove the six screws on the filter until it locks in electrical shock ...
Owner's Manual
Page 20
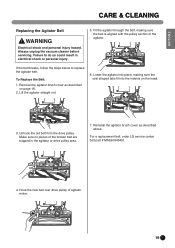
Remove the agitator brush cover as described above. For a replacement belt, order LG service center belt part # MAS61843401. 4. Failure to replace the agitator belt. Fit the agitator through the belt, making sure the oval shaped tabs fit into the indents on page 18. 2. Lower the agitator into place, making sure... the belt is aligned with the pulley section of the agitator. Unhook the old belt from the drive pulley. Reinstall the agitator brush cover as described on the head. 3. Hook the new ...
Remove the agitator brush cover as described above. For a replacement belt, order LG service center belt part # MAS61843401. 4. Failure to replace the agitator belt. Fit the agitator through the belt, making sure the oval shaped tabs fit into the indents on page 18. 2. Lower the agitator into place, making sure... the belt is aligned with the pulley section of the agitator. Unhook the old belt from the drive pulley. Reinstall the agitator brush cover as described on the head. 3. Hook the new ...
Owner's Manual
Page 23
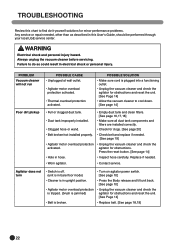
... so could result in electrical shock or personal injury. Press the reset button. [See page 14] • Hole in upright position. • Agitator motor overload protection is tripped. (brush is jammed) • Belt is in hose. • Inspect hose carefully. Always unplug the vacuum cleaner before servicing. TROUBLESHOOTING Review this User's Guide...
... so could result in electrical shock or personal injury. Press the reset button. [See page 14] • Hole in upright position. • Agitator motor overload protection is tripped. (brush is jammed) • Belt is in hose. • Inspect hose carefully. Always unplug the vacuum cleaner before servicing. TROUBLESHOOTING Review this User's Guide...


