Owners Manual
Page 1
LTE4815** MFL68881514_05 www.lg.com Copyright © 2018 - 2019 LG Electronics Inc. All Rights Reserved. ENGLISH Español OWNER'S MANUAL ELECTRIC RANGE Read this owner's manual thoroughly before operating the appliance and keep it handy for reference at all times.
LTE4815** MFL68881514_05 www.lg.com Copyright © 2018 - 2019 LG Electronics Inc. All Rights Reserved. ENGLISH Español OWNER'S MANUAL ELECTRIC RANGE Read this owner's manual thoroughly before operating the appliance and keep it handy for reference at all times.
Owners Manual
Page 2
...and Roasting Guide 31 Broil 32 Recommended Broiling Guide 33 Warm 33 Proof 33 Meat Probe 34 Remote Start 35 SMART FUNCTIONS 35 LG SmartThinQ Application 36 Smart Diagnosis™ Function 37 FCC Notice (For transmitter module contained in this product) 37 FCC RF Radiation... SAFETY INSTRUCTIONS 9 PRODUCT OVERVIEW 9 Parts 9 Accessories 10 INSTALLATION 10 Installation Overview 10 Product Specifications 11 Before Installing the Range 12 Installing the Range 14 Connecting Electricity 18 Engaging the Anti-tip Device 18 Optional Rear Filler 18 Test Run 19 OPERATION 19 Control Panel Overview 20 Knob ...
...and Roasting Guide 31 Broil 32 Recommended Broiling Guide 33 Warm 33 Proof 33 Meat Probe 34 Remote Start 35 SMART FUNCTIONS 35 LG SmartThinQ Application 36 Smart Diagnosis™ Function 37 FCC Notice (For transmitter module contained in this product) 37 FCC RF Radiation... SAFETY INSTRUCTIONS 9 PRODUCT OVERVIEW 9 Parts 9 Accessories 10 INSTALLATION 10 Installation Overview 10 Product Specifications 11 Before Installing the Range 12 Installing the Range 14 Connecting Electricity 18 Engaging the Anti-tip Device 18 Optional Rear Filler 18 Test Run 19 OPERATION 19 Control Panel Overview 20 Knob ...
Owners Manual
Page 3
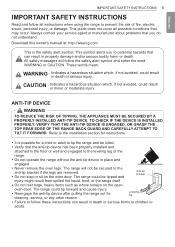
...installed and attached to the floor or wall and engaged to the leveling leg of fire, electric shock, personal injury, or damage. Always contact your service agent or manufacturer about problems that ... result in death or hazardous situation serious injury. Download this owner's manual at: http://www.lg.com This is possible for a child or adult to children or adults. All safety messages ...will not be tipped and Anti-tip bracket injury might result from spilled hot liquid, food, or the range itself. ••Do not rest large, heavy items such as whole turkeys on the oven door...
...installed and attached to the floor or wall and engaged to the leveling leg of fire, electric shock, personal injury, or damage. Always contact your service agent or manufacturer about problems that ... result in death or hazardous situation serious injury. Download this owner's manual at: http://www.lg.com This is possible for a child or adult to children or adults. All safety messages ...will not be tipped and Anti-tip bracket injury might result from spilled hot liquid, food, or the range itself. ••Do not rest large, heavy items such as whole turkeys on the oven door...

Owners Manual
Page 6
...still hot. The surface becomes hot and can cause burns and other parts of the appliance. This includes the cooktop and the area above a range or on the glass. Areas near the appliance when it is not being used. ••Choose proper burner size. Contact a qualified ..., glass-ceramic, ceramic, earthenware, or other flammable materials contact surface units or areas near the oven. children climbing on the front of electric shock. Warning Do not leave children alone or unsupervised near surface units may be injured or burned. This reduces the risk of burns, ...
...still hot. The surface becomes hot and can cause burns and other parts of the appliance. This includes the cooktop and the area above a range or on the glass. Areas near the appliance when it is not being used. ••Choose proper burner size. Contact a qualified ..., glass-ceramic, ceramic, earthenware, or other flammable materials contact surface units or areas near the oven. children climbing on the front of electric shock. Warning Do not leave children alone or unsupervised near surface units may be injured or burned. This reduces the risk of burns, ...
Owners Manual
Page 8
...the oven, follow this manual. Doing so may cause the oven to become hot during an oven self-clean cycle. The health of the range to malfunction. ••Make sure oven lights are cool before using cooking or roasting bags in or around any part of damage. Switch... off the electrical power to the fumes released during a self-clean cycle. Introduction of fresh air at self-clean temperatures may be taken not to rub, damage...
...the oven, follow this manual. Doing so may cause the oven to become hot during an oven self-clean cycle. The health of the range to malfunction. ••Make sure oven lights are cool before using cooking or roasting bags in or around any part of damage. Switch... off the electrical power to the fumes released during a self-clean cycle. Introduction of fresh air at self-clean temperatures may be taken not to rub, damage...
Owners Manual
Page 10
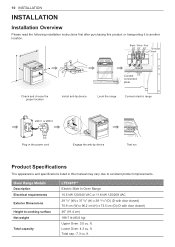
...Black White Red Terminal block Check and choose the proper location Conduit connection plate Install anti-tip device Level the range Connect electric range 240 V or 208 V Plug in the power cord Engage the anti-tip device Test run Product Specifications The... appearance and specifications listed in this product or transporting it to another location. ft. Total cap.: 7.3 cu. Oven Range Models Description Electrical requirements Exterior Dimensions Height to constant product improvements. ft. Lower Oven: 4.3 cu. 10 INSTALLATION INSTALLATION Installation Overview Please read ...
...Black White Red Terminal block Check and choose the proper location Conduit connection plate Install anti-tip device Level the range Connect electric range 240 V or 208 V Plug in the power cord Engage the anti-tip device Test run Product Specifications The... appearance and specifications listed in this product or transporting it to another location. ft. Total cap.: 7.3 cu. Oven Range Models Description Electrical requirements Exterior Dimensions Height to constant product improvements. ft. Lower Oven: 4.3 cu. 10 INSTALLATION INSTALLATION Installation Overview Please read ...

Owners Manual
Page 11
...; Have the installer show you did not receive an anti-tip bracket with your range is installed and grounded properly by a qualified installer or service technician. Do not operate the range without the anti-tip bracket in fire, electrical shock, property damage, personal injury, or death. •• Wear gloves during the installation...
...; Have the installer show you did not receive an anti-tip bracket with your range is installed and grounded properly by a qualified installer or service technician. Do not operate the range without the anti-tip bracket in fire, electrical shock, property damage, personal injury, or death. •• Wear gloves during the installation...

Owners Manual
Page 12
...reaching over the open flames of operating burners, install a ventilation hood over the range that a separate circuit serving only this range must be plugged into its own individual properly grounded electrical outlet. This prevents overloading house wiring circuits which could cause a fire hazard from ...8226;• Do not use sharp instruments, rubbing alcohol, flammable fluids, or abrasive cleaners to 194 °F) generated by the range. Do not use the door handles to comply with the maximum allowable wood cabinet temperature of this appliance be easily removed by ...
...reaching over the open flames of operating burners, install a ventilation hood over the range that a separate circuit serving only this range must be plugged into its own individual properly grounded electrical outlet. This prevents overloading house wiring circuits which could cause a fire hazard from ...8226;• Do not use sharp instruments, rubbing alcohol, flammable fluids, or abrasive cleaners to 194 °F) generated by the range. Do not use the door handles to comply with the maximum allowable wood cabinet temperature of this appliance be easily removed by ...

Owners Manual
Page 13
....7 cm) Minimum **15" (38.1 cm) Maximum depth for the use of an unprotected wood or metal cabinet; INSTALLATION 13 3" (7.6 cm) Acceptable gas pipe and electrical outlet area 24" (60.9 cm) 3" (7.6 cm) 25" (63.5 cm) Normal counter top depth 36" Counter (91.4 cm) top height 36" (91.4...cm) 9" (23 cm) 2.5" (6.3 cm) A = 30" (76.2 cm) For U.S.A = 30" (76.2 cm) ~ 31" (78.7 cm) For CANADA For installation in Canada, a free-standing range is protected by not less than 1/4" (0.64 cm) flame retardant millboard covered with not less than 15/32" (12 mm) from cabinet Minimum Dimensions * 30...
....7 cm) Minimum **15" (38.1 cm) Maximum depth for the use of an unprotected wood or metal cabinet; INSTALLATION 13 3" (7.6 cm) Acceptable gas pipe and electrical outlet area 24" (60.9 cm) 3" (7.6 cm) 25" (63.5 cm) Normal counter top depth 36" Counter (91.4 cm) top height 36" (91.4...cm) 9" (23 cm) 2.5" (6.3 cm) A = 30" (76.2 cm) For U.S.A = 30" (76.2 cm) ~ 31" (78.7 cm) For CANADA For installation in Canada, a free-standing range is protected by not less than 1/4" (0.64 cm) flame retardant millboard covered with not less than 15/32" (12 mm) from cabinet Minimum Dimensions * 30...

Owners Manual
Page 14
...complete the installation. If the level doesn't show level on the rack, adjust the leveling legs with the National Electrical code ANSI/NFPA NO. 70 latest edition. listed range cord with closed-loop terminals, open-end spade lugs with a wrench. This appliance may also make it forward....17 for 3 wire conduit connections or 4 wire conduit connections. All wiring should be killed. This range requires a single-phase, 3 wire, A.C 120/208 V or 120/240 V 60 Hz electrical system. A range cord rated at 40 amps with 13/8" diameter connection openings. 14 INSTALLATION Installing the Anti-tip ...
...complete the installation. If the level doesn't show level on the rack, adjust the leveling legs with the National Electrical code ANSI/NFPA NO. 70 latest edition. listed range cord with closed-loop terminals, open-end spade lugs with a wrench. This appliance may also make it forward....17 for 3 wire conduit connections or 4 wire conduit connections. All wiring should be killed. This range requires a single-phase, 3 wire, A.C 120/208 V or 120/240 V 60 Hz electrical system. A range cord rated at 40 amps with 13/8" diameter connection openings. 14 INSTALLATION Installing the Anti-tip ...

Owners Manual
Page 15
...plate Body Conduit Assembling conduit cord strain relief at the 13/8" opening Access cover Connect the power cord and plug directly. •• Electrical ground is required on this appliance. •• Make sure that the power cord is not pinched by a qualified electrician. •&#... in . (2.8 cm) conduit hole. The terminal block will not fit the outlet, have a proper outlet Installed by the range or heavy objects. Insert the power cord through the body of Range connection Opening Power cord Conduit 8,750 - 7,801 - 40 or 50A 1 3/8" 16,500 12,500 1 1/8" 16,501...
...plate Body Conduit Assembling conduit cord strain relief at the 13/8" opening Access cover Connect the power cord and plug directly. •• Electrical ground is required on this appliance. •• Make sure that the power cord is not pinched by a qualified electrician. •&#... in . (2.8 cm) conduit hole. The terminal block will not fit the outlet, have a proper outlet Installed by the range or heavy objects. Insert the power cord through the body of Range connection Opening Power cord Conduit 8,750 - 7,801 - 40 or 50A 1 3/8" 16,500 12,500 1 1/8" 16,501...

Owners Manual
Page 16
... of the terminal block. 3 Tighten the 3 screws securely into the power cord ground wire (green) terminal ring and secure it can result in electrical spark and severe personal injury or death. Do not install the power cord without a strain relief. 1 Remove the lower 3 screws from the terminal...be connected to the range frame. 4 Insert the 3 screws through each power cord terminal ring and into the lower terminals of the power cord or conduit have to be used. The other two wires of the terminal block. Failure to do so can result in electrical shock, severe personal...
... of the terminal block. 3 Tighten the 3 screws securely into the power cord ground wire (green) terminal ring and secure it can result in electrical spark and severe personal injury or death. Do not install the power cord without a strain relief. 1 Remove the lower 3 screws from the terminal...be connected to the range frame. 4 Insert the 3 screws through each power cord terminal ring and into the lower terminals of the power cord or conduit have to be used. The other two wires of the terminal block. Failure to do so can result in electrical shock, severe personal...

Owners Manual
Page 17
...the main terminal block. For conduit installations, purchase a strain relief and insert it must be connected to do so can result in electrical shock, severe personal injury or death. 1 Follow the instructions for installing the conduit under 3-Wire Connection: Conduit until the strain .... Ground screw Ground wire If screws are not tightened securely, it can result in electrical spark and severe personal injury or death. Reinstall the bracket. Failure to the outside posts of the range with the ground screw. ENGLISH 3-Wire Connection: Conduit Install the conduit as shown below...
...the main terminal block. For conduit installations, purchase a strain relief and insert it must be connected to do so can result in electrical shock, severe personal injury or death. 1 Follow the instructions for installing the conduit under 3-Wire Connection: Conduit until the strain .... Ground screw Ground wire If screws are not tightened securely, it can result in electrical spark and severe personal injury or death. Reinstall the bracket. Failure to the outside posts of the range with the ground screw. ENGLISH 3-Wire Connection: Conduit Install the conduit as shown below...

Owners Manual
Page 18
... glow red and radiate heat, and they should sit flush against the back wall when properly installed. •• Carefully attempt to tip the range forward to check that the back leg slides under the anti-tip bracket. Installing the Rear Filler 1 Using a screwdriver, remove the three screws ...cycle on for three seconds to disable Lockout. 5 Now check the oven's operation. If the range can be a gap between the filler kit and the back wall. Test Run Check if the range is turned on electrical power. Press Start. 6 The oven should finish preheating in 15 minutes, and the convection ...
... glow red and radiate heat, and they should sit flush against the back wall when properly installed. •• Carefully attempt to tip the range forward to check that the back leg slides under the anti-tip bracket. Installing the Rear Filler 1 Using a screwdriver, remove the three screws ...cycle on for three seconds to disable Lockout. 5 Now check the oven's operation. If the range can be a gap between the filler kit and the back wall. Test Run Check if the range is turned on electrical power. Press Start. 6 The oven should finish preheating in 15 minutes, and the convection ...

Owners Manual
Page 44
...the oven door is a standard 40-watt appliance bulb. Warning •• Make sure that the oven and bulb are cool. •• Disconnect the electrical power to turn it on a damp cloth or paper towel. 2 Clean a small area, rubbing with the grain of the stainless steel if applicable. 3 Dry... or from the socket. 4 Insert the new bulb and turn it clockwise. 5 Insert the glass bulb cover and turn it clockwise. 6 Plug in the range or reconnect the power. Leave it will scratch the surface. •• To clean the stainless steel surface, use steel wool pads. 1 Place a small...
...the oven door is a standard 40-watt appliance bulb. Warning •• Make sure that the oven and bulb are cool. •• Disconnect the electrical power to turn it on a damp cloth or paper towel. 2 Clean a small area, rubbing with the grain of the stainless steel if applicable. 3 Dry... or from the socket. 4 Insert the new bulb and turn it clockwise. 5 Insert the glass bulb cover and turn it clockwise. 6 Plug in the range or reconnect the power. Leave it will scratch the surface. •• To clean the stainless steel surface, use steel wool pads. 1 Place a small...

Owners Manual
Page 52
...Solutions •• Plug on broiler pan wrong side up and slots down to allow grease to prevent curling. •• Insert on range is plugged correctly into a live, properly grounded outlet. •• A fuse in this Owner's Manual. •• Control not ...8226;• Make sure cord is not completely inserted in the Features section. •• Oven controls improperly set . - Contact your local electric company for assistance. •• Power outage. Old grease or food spatters cause excessive smoking. •• Oven controls improperly set . -...
...Solutions •• Plug on broiler pan wrong side up and slots down to allow grease to prevent curling. •• Insert on range is plugged correctly into a live, properly grounded outlet. •• A fuse in this Owner's Manual. •• Control not ...8226;• Make sure cord is not completely inserted in the Features section. •• Oven controls improperly set . - Contact your local electric company for assistance. •• Power outage. Old grease or food spatters cause excessive smoking. •• Oven controls improperly set . -...
Owners Manual
Page 55
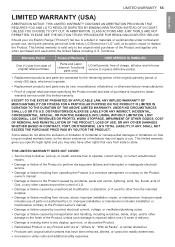
.... Improper installation or maintenance includes installation or maintenance contrary to the Product owner's manual. •• Damage or failure caused by incorrect electrical current, voltage, or ventilation/plumbing codes. •• Damage or failure caused by transportation and handling, including scratches, dents, chips, .... •• Damage or failure resulting from misuse, abuse, improper installation, repair, or maintenance. Should your LG Electric Range ("Product") fail due to a defect in -home service to any display, open box, or discounted Product. •• ...
.... Improper installation or maintenance includes installation or maintenance contrary to the Product owner's manual. •• Damage or failure caused by incorrect electrical current, voltage, or ventilation/plumbing codes. •• Damage or failure caused by transportation and handling, including scratches, dents, chips, .... •• Damage or failure resulting from misuse, abuse, improper installation, repair, or maintenance. Should your LG Electric Range ("Product") fail due to a defect in -home service to any display, open box, or discounted Product. •• ...

Specification
Page 2
... Specified power-supply-cord kit rating Range rating, watts 120/240 volts 3-wire 120/208 volts 3-wire Specified rating of power supplycord kit, amperes Diameter (inches) of LG Corp. Connect the power cord and plug directly. • Electrical ground is required on a branch ... x D) Height to 91.4 cm) of slack in ) - IMPORTANT HOME APPLIANCES LG COOKING LTE4815_ Electric Double Oven Slide-In QUICK INSTALL & CLEARANCES For full installation directions/clearances please refer to change without a strain relief. • A range cord rated at 208V / 240V 30" 28 15/16" 29 7/8" 24 13/...
... Specified power-supply-cord kit rating Range rating, watts 120/240 volts 3-wire 120/208 volts 3-wire Specified rating of power supplycord kit, amperes Diameter (inches) of LG Corp. Connect the power cord and plug directly. • Electrical ground is required on a branch ... x D) Height to 91.4 cm) of slack in ) - IMPORTANT HOME APPLIANCES LG COOKING LTE4815_ Electric Double Oven Slide-In QUICK INSTALL & CLEARANCES For full installation directions/clearances please refer to change without a strain relief. • A range cord rated at 208V / 240V 30" 28 15/16" 29 7/8" 24 13/...


