Owner's Manual
Page 2
... other express warranty is used in the U.S. CUSTOMER ASSISTANCE NUMBERS: To obtain Warranty Coverage: Retain your LG product is applicable to this product. LG Refrigerator / Freezer Warranty Period Product Parts Labor Refrigerator / Freezer 1 year 1 year [In-Home Service (Except Model GR-051)] Sealed System (Compressor, Condenser, Evaporator) 7 years 1 year [In-Home Service (Except...
... other express warranty is used in the U.S. CUSTOMER ASSISTANCE NUMBERS: To obtain Warranty Coverage: Retain your LG product is applicable to this product. LG Refrigerator / Freezer Warranty Period Product Parts Labor Refrigerator / Freezer 1 year 1 year [In-Home Service (Except Model GR-051)] Sealed System (Compressor, Condenser, Evaporator) 7 years 1 year [In-Home Service (Except...
Owner's Manual
Page 6
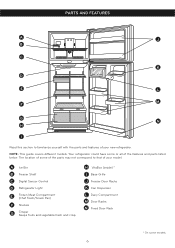
... fruits and vegetable fresh and crisp H VitaBox (inside) * I Read this section to that of the features and parts listed below. NOTE: This guide covers different models. PARTS AND FEATURES A J B C K D E L M F G N H I Base Grille J Freezer Door Racks K Can Dispenser L Dairy Compartment M Door Racks N Fixed Door Rack * On some...
... fruits and vegetable fresh and crisp H VitaBox (inside) * I Read this section to that of the features and parts listed below. NOTE: This guide covers different models. PARTS AND FEATURES A J B C K D E L M F G N H I Base Grille J Freezer Door Racks K Can Dispenser L Dairy Compartment M Door Racks N Fixed Door Rack * On some...

Owner's Manual
Page 7
... F Shelves G Crisper Keeps fruits and vegetable fresh and crisp H VitaBox (inside) * I Read this section to that of your model. The location of some of the parts may not correspond to familiarize yourself with the parts and features of your new refrigerator. NOTE: ...This guide covers different models. PARTS AND FEATURES A B J C K D E L F M G H N I Base Grille J Freezer Door Racks K Can Dispenser L Dairy Compartment M Door Racks N Fixed Door...
... F Shelves G Crisper Keeps fruits and vegetable fresh and crisp H VitaBox (inside) * I Read this section to that of your model. The location of some of the parts may not correspond to familiarize yourself with the parts and features of your new refrigerator. NOTE: ...This guide covers different models. PARTS AND FEATURES A B J C K D E L F M G H N I Base Grille J Freezer Door Racks K Can Dispenser L Dairy Compartment M Door Racks N Fixed Door...
Owner's Manual
Page 8
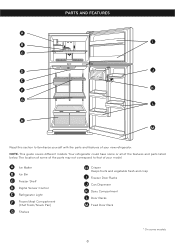
... Keeps fruits and vegetable fresh and crisp I B C D J E F K G L H M Read this section to that of your new refrigerator. Your refrigerator could have some or all of your model. PARTS AND FEATURES A I Freezer Door Racks J Can Dispenser K Dairy Compartment L Door Racks M Fixed Door Rack * On some...
... Keeps fruits and vegetable fresh and crisp I B C D J E F K G L H M Read this section to that of your new refrigerator. Your refrigerator could have some or all of your model. PARTS AND FEATURES A I Freezer Door Racks J Can Dispenser K Dairy Compartment L Door Racks M Fixed Door Rack * On some...
Owner's Manual
Page 9
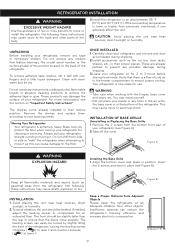
... by slightly tilting the front of the refrigerator, turning the leveling screws clockwise ( ) to raise it and counter-clockwise ( ) to ensure that feature warnings, the model serial number or the technical label of the product located on the back of the refrigerator. REFRIGERATOR INSTALLATION WARNING EXCESSIVE WEIGHT HAZARD Use the assistance...
... by slightly tilting the front of the refrigerator, turning the leveling screws clockwise ( ) to raise it and counter-clockwise ( ) to ensure that feature warnings, the model serial number or the technical label of the product located on the back of the refrigerator. REFRIGERATOR INSTALLATION WARNING EXCESSIVE WEIGHT HAZARD Use the assistance...
Owner's Manual
Page 14
... (stop) (See Figure 16), then loosen the other side of the door, keeping the same orientation (See Fig. 17). It is not used on all models. Line up screw holes and mount on left side of door bottom with three bolts (Fig. 15). Fig. 19 Door Closer (Stop) 14 Fig. 17... to door (Fig. 18). Turn door upright. You will need this part. • Take Door Closer/stop ) is now ready for the Bottom Hinge. The model you have may not include this hole for reattaching. Fig. 15 • Place Hinge Pin Insert into the left side of the bracket, tighten Hinge...
... (stop) (See Figure 16), then loosen the other side of the door, keeping the same orientation (See Fig. 17). It is not used on all models. Line up screw holes and mount on left side of door bottom with three bolts (Fig. 15). Fig. 19 Door Closer (Stop) 14 Fig. 17... to door (Fig. 18). Turn door upright. You will need this part. • Take Door Closer/stop ) is now ready for the Bottom Hinge. The model you have may not include this hole for reattaching. Fig. 15 • Place Hinge Pin Insert into the left side of the bracket, tighten Hinge...
Owner's Manual
Page 19
... of unfrozen foods that the shelf is required keep bottles in the freezer compartment, they will save you . 1 Storage times can vary depending on the model you have condensed. Freezing IMPORTANT: Do not keep in mind to locate them from breaking. If moving or relocating the shelves they are made out...
... of unfrozen foods that the shelf is required keep bottles in the freezer compartment, they will save you . 1 Storage times can vary depending on the model you have condensed. Freezing IMPORTANT: Do not keep in mind to locate them from breaking. If moving or relocating the shelves they are made out...
Owner's Manual
Page 20
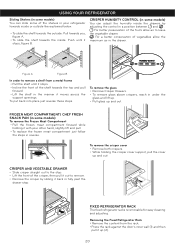
...easy cleaning and adjusting. For better preservation of the fruits allow the maximum air in the drawer. USING YOUR REFRIGERATOR Sliding Shelves (in some models) You can adjust the humidity inside : Push until it stops. • Incline the front of the shelf towards the inside the drawers by... the Fixed Refrigerator Rack • Remove the content from a metal frame • Pull the shelf until it stops, figure B. CRISPER HUMIDITY CONTROL (in some models) You can slide some of the crisper, then pull it up (2). 20 Figure A Figure B In order to remove a shelf from the rack. •...
...easy cleaning and adjusting. For better preservation of the fruits allow the maximum air in the drawer. USING YOUR REFRIGERATOR Sliding Shelves (in some models) You can adjust the humidity inside : Push until it stops. • Incline the front of the shelf towards the inside the drawers by... the Fixed Refrigerator Rack • Remove the content from a metal frame • Pull the shelf until it stops, figure B. CRISPER HUMIDITY CONTROL (in some models) You can slide some of the crisper, then pull it up (2). 20 Figure A Figure B In order to remove a shelf from the rack. •...

Owner's Manual
Page 21
...Doing so may result in damage to 3. To remove ice cubes • Twist the tray. Do not bend the ice tray. DAIRY COMPARTMENT (in some models) • To remove the dairy compartment, simply lift it and pull straight out (1). • To replace the dairy compartment, slide it in above the... the door's inner wall. • Press the rack until it in water before removing ice cubes. 12 21 USING YOUR REFRIGERATOR CAN DISPENSER (in some models) • To remove the can dispenser, simply lift it and pull 2 straight out (1). • To replace the can be difficult to remove ice cubes...
...Doing so may result in damage to 3. To remove ice cubes • Twist the tray. Do not bend the ice tray. DAIRY COMPARTMENT (in some models) • To remove the dairy compartment, simply lift it and pull straight out (1). • To replace the dairy compartment, slide it in above the... the door's inner wall. • Press the rack until it in water before removing ice cubes. 12 21 USING YOUR REFRIGERATOR CAN DISPENSER (in some models) • To remove the can dispenser, simply lift it and pull 2 straight out (1). • To replace the can be difficult to remove ice cubes...
Owner's Manual
Page 23
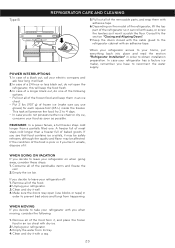
... case your refrigerator has a factory ice maker, remember you decide to reconnect the water supply. In case of a black out, call your refrigerator on the model of the refrigerator, lift the top part of baked goods. WHEN GOING ON VACATION If you have to leave your electric company and ask how...
... case your refrigerator has a factory ice maker, remember you decide to reconnect the water supply. In case of a black out, call your refrigerator on the model of the refrigerator, lift the top part of baked goods. WHEN GOING ON VACATION If you have to leave your electric company and ask how...

Owner's Manual
Page 24
...the pressure of the water, which the door opens, and other using conditions (amount of your ice maker type. It's normal that some models. OPERATING INSTRUCTIONS After turning on the temperature of water to make ice immediately. The bigger the amount that releases the ice cubes. Throw away...place for various days. If room temperature is at freezing point, have a specialized technician drain the flow of water from the inner pipes (certain models) to the O (off position the buzz will turn on , the bigger the size of water going into the refrigerator. Make sure that ...
...the pressure of the water, which the door opens, and other using conditions (amount of your ice maker type. It's normal that some models. OPERATING INSTRUCTIONS After turning on the temperature of water to make ice immediately. The bigger the amount that releases the ice cubes. Throw away...place for various days. If room temperature is at freezing point, have a specialized technician drain the flow of water from the inner pipes (certain models) to the O (off position the buzz will turn on , the bigger the size of water going into the refrigerator. Make sure that ...
Owner's Manual
Page 25
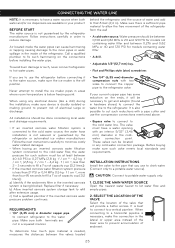
... in order to potable water supply only. 1. Water pressure should be between 0,138 and 0,82 MPa or 20 and 120 PSI for models not containing water filter and between 0,276 and 0,82 MPa or 40 and 120 PSI for such system must have a water source when... capacity cup [0,2 liters]): a) Identify if the sediments filter in the coldwater connection point. Call a qualified plumber to the cold-water flow, the water pressure for models containing water filter. • A drill. • Adjustable 1/2"(12,7 mm) key. • Flat and Phillips style (star) screwdriver. When connecting to a ...
... in order to potable water supply only. 1. Water pressure should be between 0,138 and 0,82 MPa or 20 and 120 PSI for models not containing water filter and between 0,276 and 0,82 MPa or 40 and 120 PSI for such system must have a water source when... capacity cup [0,2 liters]): a) Identify if the sediments filter in the coldwater connection point. Call a qualified plumber to the cold-water flow, the water pressure for models containing water filter. • A drill. • Adjustable 1/2"(12,7 mm) key. • Flat and Phillips style (star) screwdriver. When connecting to a ...

Owner's Manual
Page 29
IT LOOKS LIKE THE COMPRESSOR MOTOR STAYS ON TOO LONG • The replaced refrigerator was an older model. • The room temperature is hotter than usual. • The water will not close . Clean the pipes of the refrigerator, it warms it up. THERE&#...
IT LOOKS LIKE THE COMPRESSOR MOTOR STAYS ON TOO LONG • The replaced refrigerator was an older model. • The room temperature is hotter than usual. • The water will not close . Clean the pipes of the refrigerator, it warms it up. THERE&#...


