
Owners Manual
Page 1
'S Piece read the o_rating instructions ,_d safety precautions carefully _d thoroughly before [r_s,ta]_gina, nd op,eratingi your room air conditioner DEVENTANA va/luable may proper air order to prevent isuse ,or improper for any damages itioner.
'S Piece read the o_rating instructions ,_d safety precautions carefully _d thoroughly before [r_s,ta]_gina, nd op,eratingi your room air conditioner DEVENTANA va/luable may proper air order to prevent isuse ,or improper for any damages itioner.

Owners Manual
Page 2
find many ans/wers to ensure th;_t they do not play w_h the air conditioner • Whe_ the power cord is not linl_endedl for warranty issues_ ,o READ THIS MANUAL Inside yoiu w_! Youll {ind many help{ul hirY!:so,n h_ to use by young children or invalids without supervision • Young children should be _rvis_ to , c,omm(m problems in the cl-_rt of tr_blesho_ing t#s. installation work shall be pe#otmee tn _corda#ce with the National Eie_tri_ Co_e [by authoriz_ pe_nnel only _si_g o_ly g_uine t_lacement parts, . FOR YOUR RECORDS Write the model and serial numbers here: Mode...
find many ans/wers to ensure th;_t they do not play w_h the air conditioner • Whe_ the power cord is not linl_endedl for warranty issues_ ,o READ THIS MANUAL Inside yoiu w_! Youll {ind many help{ul hirY!:so,n h_ to use by young children or invalids without supervision • Young children should be _rvis_ to , c,omm(m problems in the cl-_rt of tr_blesho_ing t#s. installation work shall be pe#otmee tn _corda#ce with the National Eie_tri_ Co_e [by authoriz_ pe_nnel only _si_g o_ly g_uine t_lacement parts, . FOR YOUR RECORDS Write the model and serial numbers here: Mode...

Owners Manual
Page 3
The seriousness. B,e su re not to ,do,, Be sure to ignoring instruction will _,u_ electric shock or fire due _ heat generation. • It may _use failure and ellectric shock. • Sharp _ges may cau_ injury. • It may cause exp!_bn or fire, Owner_ Manual 3 properties only:) ii Meanings of injury or d_age to. To prevent injury toi the user o,r other people _d prope_y damage, the bHowiing instru_ct[ons must be followed, [] Incorrect ,opemti,on due to follow the instruction, [] Installation • _he_¢ise, _ may _use a fire o.r ele_rica_ sh_k. • 01therwi_, ...
The seriousness. B,e su re not to ,do,, Be sure to ignoring instruction will _,u_ electric shock or fire due _ heat generation. • It may _use failure and ellectric shock. • Sharp _ges may cau_ injury. • It may cause exp!_bn or fire, Owner_ Manual 3 properties only:) ii Meanings of injury or d_age to. To prevent injury toi the user o,r other people _d prope_y damage, the bHowiing instru_ct[ons must be followed, [] Incorrect ,opemti,on due to follow the instruction, [] Installation • _he_¢ise, _ may _use a fire o.r ele_rica_ sh_k. • 01therwi_, ...

Owners Manual
Page 4
An oxygen shortage may occur, 4 Room Air Conditioner ,, Pre,_nt accide_,aJ stoup and the possibility of machine or electric shock_ • The appearance ,ofthe air cond_ioner may detedor_,e, ch_ge color, or devebp surface f_aws_ , _e_ise it may cause fire and el_tric shock a_ent, , Othe_i_, it will cause electric sh_k or fire •,_herMse, it may _use a fire due to heat gener_ion_ or electrica_ sh_k, • it may cause fire and ele_ric shocL • it may el_tric_ shod,, and failure. . !I Operation • it will cause f_lure of injury,
An oxygen shortage may occur, 4 Room Air Conditioner ,, Pre,_nt accide_,aJ stoup and the possibility of machine or electric shock_ • The appearance ,ofthe air cond_ioner may detedor_,e, ch_ge color, or devebp surface f_aws_ , _e_ise it may cause fire and el_tric shock a_ent, , Othe_i_, it will cause electric sh_k or fire •,_herMse, it may _use a fire due to heat gener_ion_ or electrica_ sh_k, • it may cause fire and ele_ric shocL • it may el_tric_ shod,, and failure. . !I Operation • it will cause f_lure of injury,

Owners Manual
Page 5
Owner_ Manual 5 SafetyPr_utions • _ will cause e_tric shock or fire due to he_ generation, • litwiB cause electric shock or fire., • It will _u_ electric shock. • ff may cause eledric sh_k and _mage • Qlherwise, it: may cau_ explo¢ion_ and a fire, • They are, sharp and m_ cause injury, il Installation • Otherwi_, it may cause dispute with the neighbors. • Otherwise, it may cause vibration or water [le_age.
Owner_ Manual 5 SafetyPr_utions • _ will cause e_tric shock or fire due to he_ generation, • litwiB cause electric shock or fire., • It will _u_ electric shock. • ff may cause eledric sh_k and _mage • Qlherwise, it: may cau_ explo¢ion_ and a fire, • They are, sharp and m_ cause injury, il Installation • Otherwi_, it may cause dispute with the neighbors. • Otherwise, it may cause vibration or water [le_age.

Owners Manual
Page 6
Othe_ise, it cont _ns ,containments and will cause failure • it may do h_m to your heakh. • Othe_ise, _ may _use an injury through dropping o,f the unit ,or fallling down., • Operation wffhout ti_ers will make you sick. • _tmay _use injury: - SafetyPrecautions [] Operation • ff _y cause injury,, • it may cause product failure. • The appearance of Me air _nditioner may deteriorate, change color_ or develop surface fl._ws, • lit may cause pe_onal injury. 6 Room Air Conditioner
Othe_ise, it cont _ns ,containments and will cause failure • it may do h_m to your heakh. • Othe_ise, _ may _use an injury through dropping o,f the unit ,or fallling down., • Operation wffhout ti_ers will make you sick. • _tmay _use injury: - SafetyPrecautions [] Operation • ff _y cause injury,, • it may cause product failure. • The appearance of Me air _nditioner may deteriorate, change color_ or develop surface fl._ws, • lit may cause pe_onal injury. 6 Room Air Conditioner

Owners Manual
Page 7
Plug in the power plug properly. 3. There is damaged, replace it with stoves ,or other heating devices. 3 Do not use this air conditioner for non-specified special purposes (e.g. Owner_ Manual 7 i' 2. Such usage could b,e i_ hazardous to your authorized service dealer. The fan rotates at a very high speed during operation. Do not use water to clean inside the air conditioner. For repair and maintenance, contact your health, Do not expose occupants, pets, or plants to direct airflow for extended periods of time. 2i_Due to the possibility of oxygen deficiency, ventilate the ...
Plug in the power plug properly. 3. There is damaged, replace it with stoves ,or other heating devices. 3 Do not use this air conditioner for non-specified special purposes (e.g. Owner_ Manual 7 i' 2. Such usage could b,e i_ hazardous to your authorized service dealer. The fan rotates at a very high speed during operation. Do not use water to clean inside the air conditioner. For repair and maintenance, contact your health, Do not expose occupants, pets, or plants to direct airflow for extended periods of time. 2i_Due to the possibility of oxygen deficiency, ventilate the ...
Owners Manual
Page 8
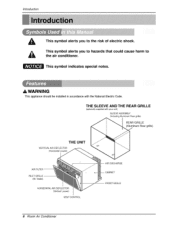
AIR DISCHARGE CABINET FRONT GRILLE 8 Room Air Conditioner introduction This symbol alerts you to hazards that could cause harm to the risk of electric shock,. This symbol indicates, sp_ial notes. This symbol alerts you to , the air conditioner. This _pI[ance should _ ins_Hed in acco,rd_ce with the National Electric _,de, THE SLEEVE AND THE REAR GIRILLiE (,op_on_ly s_ied w;tlf_your un_) SLEEVE ASSEMIBLY (#_c_udingAk_mi_um Real 9_le) REAR GRILLE (Aluminum Rear gdHe) THE UNIT VERTICAL AiR DEFLECTOR (Horizonla/[oo_ve_l AiR FILTER IN_T GRILLE ,(AirIntake) HORIZONTALAIR DEFECTOR (...
AIR DISCHARGE CABINET FRONT GRILLE 8 Room Air Conditioner introduction This symbol alerts you to hazards that could cause harm to the risk of electric shock,. This symbol indicates, sp_ial notes. This symbol alerts you to , the air conditioner. This _pI[ance should _ ins_Hed in acco,rd_ce with the National Electric _,de, THE SLEEVE AND THE REAR GIRILLiE (,op_on_ly s_ied w;tlf_your un_) SLEEVE ASSEMIBLY (#_c_udingAk_mi_um Real 9_le) REAR GRILLE (Aluminum Rear gdHe) THE UNIT VERTICAL AiR DEFLECTOR (Horizonla/[oo_ve_l AiR FILTER IN_T GRILLE ,(AirIntake) HORIZONTALAIR DEFECTOR (...

Owners Manual
Page 9
The device, sho,uld be ma_ in the event the shietds b_ome ex_s._, Avo,id shock hazard, this ,device trips, the cause it to be dif_mnt according to cause cancer, and birth defects or other reproductive harm, Wash ha_qds after handling. _'_ not _emov'e, modify or immerse this p/u_3, If this unit can not user serviced opening the tamer #es.istant. AI_wiring sho,u_ be tested on a periodic b_is by shields, 'which monitor leakage current These shields are not grounded. A CAUTION The conduictors inside _is cord are surrounded by first pressing the TEST b_ton and then the RESET button,,...
The device, sho,uld be ma_ in the event the shietds b_ome ex_s._, Avo,id shock hazard, this ,device trips, the cause it to be dif_mnt according to cause cancer, and birth defects or other reproductive harm, Wash ha_qds after handling. _'_ not _emov'e, modify or immerse this p/u_3, If this unit can not user serviced opening the tamer #es.istant. AI_wiring sho,u_ be tested on a periodic b_is by shields, 'which monitor leakage current These shields are not grounded. A CAUTION The conduictors inside _is cord are surrounded by first pressing the TEST b_ton and then the RESET button,,...

Owners Manual
Page 10
A CAUTION DO NOT CUT OR REMOVE THE THIRD (GROUND) PRONG FROM THE POWER PLUG. : A_chingl the adapter ground |ermina| to the wall recept_le cover screw does not ground the alPP|mnce unle_ the cover screw is _tal, and not insubt_, and the wall tentacle is equipped with a three-prong (grounding) piug. SITUATIONS WHEN THE APPL|ANCE WILL BE DISCONNECTED OFTEN, Do not: use an adapter plug in the receptacle to assure a proper poladty connection. Use this with a broken adapter plug_ B. Disconnect the power ,_rd from most _ocal hardware stores. Llnpiugging t:he power cord frequently can ...
A CAUTION DO NOT CUT OR REMOVE THE THIRD (GROUND) PRONG FROM THE POWER PLUG. : A_chingl the adapter ground |ermina| to the wall recept_le cover screw does not ground the alPP|mnce unle_ the cover screw is _tal, and not insubt_, and the wall tentacle is equipped with a three-prong (grounding) piug. SITUATIONS WHEN THE APPL|ANCE WILL BE DISCONNECTED OFTEN, Do not: use an adapter plug in the receptacle to assure a proper poladty connection. Use this with a broken adapter plug_ B. Disconnect the power ,_rd from most _ocal hardware stores. Llnpiugging t:he power cord frequently can ...

Owners Manual
Page 11
All! models _e equip_d with your unit), you should measure its dimensions. Wear prote_ive gthloevsehsawrphemneetvael rfilni_sind9 forornctaarrnydinrgetahrecouinlsit...AVOID •. REQUIRED TOOLS; • Tight: Fitting gloves • St.enda_rdscrewdriver , Phillips screwdriver • Pliers • Sharp knife, • 3./8oincho_n end wrench or adjustaMe wrench ., !/44rich hex socket and ratchet • T_e treasure ,, El_tdc ddll ,1/4-inch driUbit Owne. The ca_ton is the best way to store unit during installation. To prevent i_jury or strain, use inn adapter p,[ug, if...
All! models _e equip_d with your unit), you should measure its dimensions. Wear prote_ive gthloevsehsawrphemneetvael rfilni_sind9 forornctaarrnydinrgetahrecouinlsit...AVOID •. REQUIRED TOOLS; • Tight: Fitting gloves • St.enda_rdscrewdriver , Phillips screwdriver • Pliers • Sharp knife, • 3./8oincho_n end wrench or adjustaMe wrench ., !/44rich hex socket and ratchet • T_e treasure ,, El_tdc ddll ,1/4-inch driUbit Owne. The ca_ton is the best way to store unit during installation. To prevent i_jury or strain, use inn adapter p,[ug, if...

Owners Manual
Page 12
if you wan'L G_d installation w_h _ecial attention to the proper p_it_,on base of wall sbeve. Prepare the wall sleeve for installlation of the unit wil_ lessen the chance thi_ service will be noed_. _EMS IN iNSTALLATION HARDWARE You may nolt ne_ all parts in the kit, Di_a_d unused _arts rrEM Ve_ical insulation std_ Around Insulation Stri_ Horizontal insulation Str_ _o_t B_ck Baffle Shim ]"rim Frame Washer Screw Nuts(Plastic), Grille Rear 23:%2 x l S..8x 1_.,_ 2 11_sa6 x 1 xS_s 2 2 4 4 i HOWTO INSTALL _ th_entJufynit t[htoemexthisetinglistw_all_!soi.ewe.v_ b_fore [ns_Hing ...
if you wan'L G_d installation w_h _ecial attention to the proper p_it_,on base of wall sbeve. Prepare the wall sleeve for installlation of the unit wil_ lessen the chance thi_ service will be noed_. _EMS IN iNSTALLATION HARDWARE You may nolt ne_ all parts in the kit, Di_a_d unused _arts rrEM Ve_ical insulation std_ Around Insulation Stri_ Horizontal insulation Str_ _o_t B_ck Baffle Shim ]"rim Frame Washer Screw Nuts(Plastic), Grille Rear 23:%2 x l S..8x 1_.,_ 2 11_sa6 x 1 xS_s 2 2 4 4 i HOWTO INSTALL _ th_entJufynit t[htoemexthisetinglistw_all_!soi.ewe.v_ b_fore [ns_Hing ...

Owners Manual
Page 13
as_mble trim, snap the t_ of _e sleeve and a_e pressing into the square holes o_ the rear flanges. Remove the backing from the kit Cut the plastic griIle to 25-!/2 '° wide and 151/4 ° high, P_ace the plastic grille to the inside of the sl_ve as shown b,e_ow. Slide trim over the front el the air conditioner until trim is , • Make sure air conditioner ,does no_ f_i during remo_L • If unff d_s not olpetate after insta!lation che_, to step 3. s8 x _5,s2and a_ach that to the insi_ of the s[leeve as shown below. ii_iiiii_iii_i_i_iiiiiiiiii!iiiiiiiii!...
as_mble trim, snap the t_ of _e sleeve and a_e pressing into the square holes o_ the rear flanges. Remove the backing from the kit Cut the plastic griIle to 25-!/2 '° wide and 151/4 ° high, P_ace the plastic grille to the inside of the sl_ve as shown b,e_ow. Slide trim over the front el the air conditioner until trim is , • Make sure air conditioner ,does no_ f_i during remo_L • If unff d_s not olpetate after insta!lation che_, to step 3. s8 x _5,s2and a_ach that to the insi_ of the s[leeve as shown below. ii_iiiii_iii_i_i_iiiiiiiiii!iiiiiiiii!...

Owners Manual
Page 14
shown in the table be_o,w. of the wail sleeve to 60 ° angle as. Depth_D_o' f the exi_ing Length "A" wallsleeve (inches) 3/4 1 3/4 19-_/_ if the walil slieeve does not ha_ a rear F_G. 12 9rilile or Iouvered panel, install the p_astic gdlle from the inside #ont ,of the sleeve as shown _1_, Remove the backing from the Around Insulation strip 67% x 1_,,_x _ and attach that fo _e inside of the wall sleeve, there are insta[f_ from the kit. ff the _pth of your existing wall slee_ is re_mmended_ Rear Lo_vers I 7 !,bt D Remove the backing from the Vertical ...
shown in the table be_o,w. of the wail sleeve to 60 ° angle as. Depth_D_o' f the exi_ing Length "A" wallsleeve (inches) 3/4 1 3/4 19-_/_ if the walil slieeve does not ha_ a rear F_G. 12 9rilile or Iouvered panel, install the p_astic gdlle from the inside #ont ,of the sleeve as shown _1_, Remove the backing from the Around Insulation strip 67% x 1_,,_x _ and attach that fo _e inside of the wall sleeve, there are insta[f_ from the kit. ff the _pth of your existing wall slee_ is re_mmended_ Rear Lo_vers I 7 !,bt D Remove the backing from the Vertical ...

Owners Manual
Page 15
coils. * Make sure air condRionerdoes not fal_duriag removal * If uait _es not operate after insta!lationcheck, to be procedure. use proper liRingand moving un_. as sh_vn FIG 15. installation Owne, r _s MaRiua[ 15 Sleeve _ Install the n_ unit into slots of the su_,ort Mocks Wall Wall-- PROCEDURE B as describ_ in Step & ,, Air _ndition,ers cover_ in this manual po_ an excessiveHight hazard,T_ or more people are need_ 1o moveand in_aiil the unit. Slide the baffle into the w.all s_eove. _ Prsosce_mubrele, trAim..
coils. * Make sure air condRionerdoes not fal_duriag removal * If uait _es not operate after insta!lationcheck, to be procedure. use proper liRingand moving un_. as sh_vn FIG 15. installation Owne, r _s MaRiua[ 15 Sleeve _ Install the n_ unit into slots of the su_,ort Mocks Wall Wall-- PROCEDURE B as describ_ in Step & ,, Air _ndition,ers cover_ in this manual po_ an excessiveHight hazard,T_ or more people are need_ 1o moveand in_aiil the unit. Slide the baffle into the w.all s_eove. _ Prsosce_mubrele, trAim..

Owners Manual
Page 16
instalia#on PROCEDURE C _ R_iro_ the louvers at the rear flange. 8_ HG. Remove the ba_.ing from the Horizontal _nsulatioin strip 23h:32 x 138 x 13,_ and attach that t,o the inside of the slee.te ,as shown _low. if the walil sleeve d_s not have a rear 9rilile or ]ouvered pane], install the plastic gdlle fm,m the kit. t9 [1the _pth of you_ existing sleeve is , r_ommen_d, 7_ Rea_Louvers (Top View) Remove the ba,_ing from the A_ound Ins,ulatioin strip 59_h,_2x: 1% x 1% and attach that to Length 'W' in the FIG 16 The u_ of pliers is less than or equal to 18", sk_ to step 7. ...
instalia#on PROCEDURE C _ R_iro_ the louvers at the rear flange. 8_ HG. Remove the ba_.ing from the Horizontal _nsulatioin strip 23h:32 x 138 x 13,_ and attach that t,o the inside of the slee.te ,as shown _low. if the walil sleeve d_s not have a rear 9rilile or ]ouvered pane], install the plastic gdlle fm,m the kit. t9 [1the _pth of you_ existing sleeve is , r_ommen_d, 7_ Rea_Louvers (Top View) Remove the ba,_ing from the A_ound Ins,ulatioin strip 59_h,_2x: 1% x 1% and attach that to Length 'W' in the FIG 16 The u_ of pliers is less than or equal to 18", sk_ to step 7. ...

Owners Manual
Page 17
The plastic gri]fe reduces the amount of hot air discharge that tecirculates through the unit: FIG. 24 _ Install the new unit into the wall slee_Je _ Psresceemdbu!r,ee tArim, as shown below in Fig, 23° The higher portion of shim is to be FIG,,2:3 D Remove the metal rear grille and rep.lace it with 'the plastic rear grille to be pliaced in front of the rib, on front and rear coils, • Make sure air cond_ionerdoes not fali during rem0vaL • If unit _es not operateafter installationcheck, to impro,,® unit energy efticiency. PROCEDURE C liil To achieve rearward slo_ [or ...
The plastic gri]fe reduces the amount of hot air discharge that tecirculates through the unit: FIG. 24 _ Install the new unit into the wall slee_Je _ Psresceemdbu!r,ee tArim, as shown below in Fig, 23° The higher portion of shim is to be FIG,,2:3 D Remove the metal rear grille and rep.lace it with 'the plastic rear grille to be pliaced in front of the rib, on front and rear coils, • Make sure air cond_ionerdoes not fali during rem0vaL • If unit _es not operateafter installationcheck, to impro,,® unit energy efticiency. PROCEDURE C liil To achieve rearward slo_ [or ...
Owners Manual
Page 18
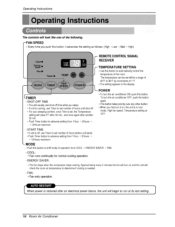
START TiME * If unit is off use Time__oset: num_ * Push Timer _on to det,e_minief cecil% is ne_ed - COOL: , F_ runs continuaJlly for normal cooling o_ration - FAN: • F_-only operation,, afl_ an ,electrical _wer faflure_ the unit will begin to automati_Hy control the tem_rature d the room. Use this b_n to run at Rs last setti_ 18 Room ALr Conditioner This buttontakesFiorityover _qy,othebr utton - Thefan _b[>._w_n t_ .comFesso_t b_ c_iag Ap#=oximatel.yevery3 miinutost_ 'fanwill _rn on of the fottowi_, ,--FAN SPEED , Every time you push this _J_On_oshi_ me® d operation ...
START TiME * If unit is off use Time__oset: num_ * Push Timer _on to det,e_minief cecil% is ne_ed - COOL: , F_ runs continuaJlly for normal cooling o_ration - FAN: • F_-only operation,, afl_ an ,electrical _wer faflure_ the unit will begin to automati_Hy control the tem_rature d the room. Use this b_n to run at Rs last setti_ 18 Room ALr Conditioner This buttontakesFiorityover _qy,othebr utton - Thefan _b[>._w_n t_ .comFesso_t b_ c_iag Ap#=oximatel.yevery3 miinutost_ 'fanwill _rn on of the fottowi_, ,--FAN SPEED , Every time you push this _J_On_oshi_ me® d operation ...

Owners Manual
Page 19
ENERGY SAVER: • The fan stops when the compressor stops coo_ing,Approximalely eveq,,3 minutes the fan will turn on , the unit is in the display FAN SPEED • Every time you sleep. • if unit is needed. SHUT,-OFFT_ME • You will usu_iy use shut-off time whiie you pf_shthis bu_on it adv_s (High--* Low-_ Med-_ High} the setting as follows TIMER - Auto Resta_ _nthe event at a power failure, the unit will run a the previous setting once power returns. When you firs1 t_m it on and the unit w_lloh_k the room air temperature to determine if cooling is ...
ENERGY SAVER: • The fan stops when the compressor stops coo_ing,Approximalely eveq,,3 minutes the fan will turn on , the unit is in the display FAN SPEED • Every time you sleep. • if unit is needed. SHUT,-OFFT_ME • You will usu_iy use shut-off time whiie you pf_shthis bu_on it adv_s (High--* Low-_ Med-_ High} the setting as follows TIMER - Auto Resta_ _nthe event at a power failure, the unit will run a the previous setting once power returns. When you firs1 t_m it on and the unit w_lloh_k the room air temperature to determine if cooling is ...

Owners Manual
Page 20
Re-attach the cover. ,. The !,eve_of vertical louver is adjured Iby moving the horizontal louver. 20 Room Air Conditioner I PULL OPEN / PUSH CLUE i ii i_i The dire_ion of air can be in the CLOSE position in order to m_ntain the best cooling condit_,ons, 'When fresh _r is neces_ry in the r_m, set the ven'_ation le/er to the OPEN _sition The damper is opened and room air is adjusted by adjusting the horizontal louver and the ve_ic_ buver. • TAL A, TION * VERTICAL ,A TION CONTROL The ho,rizonta] _r direction is I_ed in the right and [eft side of the .airdischarge. Insert ...
Re-attach the cover. ,. The !,eve_of vertical louver is adjured Iby moving the horizontal louver. 20 Room Air Conditioner I PULL OPEN / PUSH CLUE i ii i_i The dire_ion of air can be in the CLOSE position in order to m_ntain the best cooling condit_,ons, 'When fresh _r is neces_ry in the r_m, set the ven'_ation le/er to the OPEN _sition The damper is opened and room air is adjusted by adjusting the horizontal louver and the ve_ic_ buver. • TAL A, TION * VERTICAL ,A TION CONTROL The ho,rizonta] _r direction is I_ed in the right and [eft side of the .airdischarge. Insert ...