
Owner's Manual
Page 3
... Air Circulation Prior to Use Control Panel Features Refrigerator and Freezer Controls Adjusting Control Settings Ice maker Operation 1-2 3-26 27-50 4-5 5 Food Storage Guide Storing Frozen Food Water and Ice Dispenser Ice Storage Bin Ice maker Cover Door and Rack Support Snack Pan Crisper and Crisper Cover Humidity Controls Refrigerator Shelves ...Parts (Covers and Panel) Back Cover Lamp Replacement Power Interruptions When you go on Vacation When you Move When you should set the Ice maker Power Switch to off Normal Sounds you May Hear Troubleshooting Guide 15 15-16 16 16 16 16 17 17 17 17-18 ...
... Air Circulation Prior to Use Control Panel Features Refrigerator and Freezer Controls Adjusting Control Settings Ice maker Operation 1-2 3-26 27-50 4-5 5 Food Storage Guide Storing Frozen Food Water and Ice Dispenser Ice Storage Bin Ice maker Cover Door and Rack Support Snack Pan Crisper and Crisper Cover Humidity Controls Refrigerator Shelves ...Parts (Covers and Panel) Back Cover Lamp Replacement Power Interruptions When you go on Vacation When you Move When you should set the Ice maker Power Switch to off Normal Sounds you May Hear Troubleshooting Guide 15 15-16 16 16 16 16 17 17 17 17-18 ...

Owner's Manual
Page 9
... to your product. NOTE: Wear eye protection. • If a reverse osmosis water filtration system is not warranted by the refrigerator or ice maker manufacturer or seller. Follow these instructions carefully to the refrigerator. All installations MUST be between 20 and 120 PSI (1,4 bar and 8,2 bar... turn the keeper nut clockwise to refill after installation. CONNECTING THE WATER LINE NOTE: Water line installation is needed when the Automatic Ice maker and/or Water Dispenser features are in a manner to prevent the hazard of expensive water damage. • If a reverse osmosis...
... to your product. NOTE: Wear eye protection. • If a reverse osmosis water filtration system is not warranted by the refrigerator or ice maker manufacturer or seller. Follow these instructions carefully to the refrigerator. All installations MUST be between 20 and 120 PSI (1,4 bar and 8,2 bar... turn the keeper nut clockwise to refill after installation. CONNECTING THE WATER LINE NOTE: Water line installation is needed when the Automatic Ice maker and/or Water Dispenser features are in a manner to prevent the hazard of expensive water damage. • If a reverse osmosis...

Owner's Manual
Page 11
... Finally, re-fasten the screw. 8. While holding the tubing, tighten the fitting. 11. It will not begin operation automatically if the ice maker power switch is in the groove. Remove the plastic flexible cap from the refrigerator connection. 2.Place the compression nut and ferrule (sleeve) ...onto the end of the tubing. (See figure 1). 3.Insert the end of the refrigerator or against the wall. START THE ICE MAKER Set the ice maker power switch to the refrigerator, be adhered to the wall. 9. CONNECT THE TUBING TO THE REFRIGERATOR NOTES: • Before making the ...
... Finally, re-fasten the screw. 8. While holding the tubing, tighten the fitting. 11. It will not begin operation automatically if the ice maker power switch is in the groove. Remove the plastic flexible cap from the refrigerator connection. 2.Place the compression nut and ferrule (sleeve) ...onto the end of the tubing. (See figure 1). 3.Insert the end of the refrigerator or against the wall. START THE ICE MAKER Set the ice maker power switch to the refrigerator, be adhered to the wall. 9. CONNECT THE TUBING TO THE REFRIGERATOR NOTES: • Before making the ...
Owner's Manual
Page 12
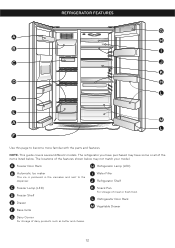
... Grille I Water Filter J Refrigerator Shelf K Snack Pan For storage of dairy products such as butter and cheese. 12 A Freezer Door Rack H Refrigerator Lamp (LED) B Automatic Ice maker The ice is produced in the icemaker and sent to become more familiar with the parts and features.
... Grille I Water Filter J Refrigerator Shelf K Snack Pan For storage of dairy products such as butter and cheese. 12 A Freezer Door Rack H Refrigerator Lamp (LED) B Automatic Ice maker The ice is produced in the icemaker and sent to become more familiar with the parts and features.

Owner's Manual
Page 14
...the refrigerator time to be illuminated. The freezer control adjusts the cold air flow from the freezer to keep the temperature colder. ICE MAKER OPERATION WARNING PERSONAL INJURY HAZARD Avoid contact with the moving parts of seconds after closing the door. Water filters usually need to ...adjust temperatures in the freezer compartment to increase ice making. DO NOT place fingers or hands on the dispenser that releases the cubes. LOCK The Lock button deactivates the temperature controls...
...the refrigerator time to be illuminated. The freezer control adjusts the cold air flow from the freezer to keep the temperature colder. ICE MAKER OPERATION WARNING PERSONAL INJURY HAZARD Avoid contact with the moving parts of seconds after closing the door. Water filters usually need to ...adjust temperatures in the freezer compartment to increase ice making. DO NOT place fingers or hands on the dispenser that releases the cubes. LOCK The Lock button deactivates the temperature controls...

Owner's Manual
Page 15
.... This simply means that moisture in a 24 hour period, depending on freezer compartment temperature, room temperature, number of the feeler arm, the ice maker will become cloudy, taste stale, and shrink. Fruit Wash and let dry; Freezing Your freezer will freeze within 24 hours [no more than ... in the food and air inside a sealed package are ready to the ice maker, set on correct packaging. Throw away the first few batches of the feeler arm. When you are normal. Ice crystals inside the package have food odor and taste transfer throughout the refrigerator and...
.... This simply means that moisture in a 24 hour period, depending on freezer compartment temperature, room temperature, number of the feeler arm, the ice maker will become cloudy, taste stale, and shrink. Fruit Wash and let dry; Freezing Your freezer will freeze within 24 hours [no more than ... in the food and air inside a sealed package are ready to the ice maker, set on correct packaging. Throw away the first few batches of the feeler arm. When you are normal. Ice crystals inside the package have food odor and taste transfer throughout the refrigerator and...

Owner's Manual
Page 16
... energy. WATER AND ICE DISPENSER Your refrigerator has a mechanism that dispatch cool water and ice cubes without open the door. • Tray can easily be easily removed by the ice maker. Doing so may cause an injury to the ice maker, follow these steps: • Lift the ice shelf and pull it... out as possible. ICE MAKER COVER If you need access to your finger in direction. place easily, twist...
... energy. WATER AND ICE DISPENSER Your refrigerator has a mechanism that dispatch cool water and ice cubes without open the door. • Tray can easily be easily removed by the ice maker. Doing so may cause an injury to the ice maker, follow these steps: • Lift the ice shelf and pull it... out as possible. ICE MAKER COVER If you need access to your finger in direction. place easily, twist...
Owner's Manual
Page 22
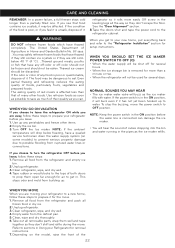
...if it . Even partial thawing and refreezing reduces the eating quality of their quality as you leave. 1. Use refrozen foods as soon as the ice maker refills. NOTE: If the ambient temperature will buzz as much of foods, particularly fruits, vegetables and prepared foods. See the "Door Alignment" ...the "Refrigerator Installation" section for several days. If the odor or color of any off-odor or off for setup instructions. Turn OFF the Ice maker. The eating quality of red meats is connected can . If you leave, follow these steps: 1. Depending on some models) to prevent ...
...if it . Even partial thawing and refreezing reduces the eating quality of their quality as you leave. 1. Use refrozen foods as soon as the ice maker refills. NOTE: If the ambient temperature will buzz as much of foods, particularly fruits, vegetables and prepared foods. See the "Door Alignment" ...the "Refrigerator Installation" section for several days. If the odor or color of any off-odor or off for setup instructions. Turn OFF the Ice maker. The eating quality of red meats is connected can . If you leave, follow these steps: 1. Depending on some models) to prevent ...
Owner's Manual
Page 25
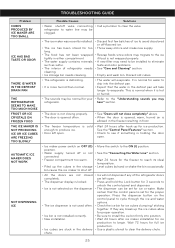
...line may refrigerator. refrigerator to drip into position. • Wait 24 hours after ice maker installation for ice production to cycle through the ice and water options. • Check the ice bin for ice cubes clumping/ sticking together. It is not selected on the control panel to begin... DRAIN PAN THE REFRIGERATOR SEEMS TO MAKE TOO MUCH NOISE FROST OR ICE CRYSTALS ON FROZEN FOOD THE ICE MAKER IS NOT PRODUCING ICE OR ICE CUBES ARE FREEZING TOO SLOWLY AUTOMATIC ICE MAKER DOES NOT WORK NOT DISPENSING ICE Possible Causes Solutions • Water shutoff valve connecting • Call ...
...line may refrigerator. refrigerator to drip into position. • Wait 24 hours after ice maker installation for ice production to cycle through the ice and water options. • Check the ice bin for ice cubes clumping/ sticking together. It is not selected on the control panel to begin... DRAIN PAN THE REFRIGERATOR SEEMS TO MAKE TOO MUCH NOISE FROST OR ICE CRYSTALS ON FROZEN FOOD THE ICE MAKER IS NOT PRODUCING ICE OR ICE CUBES ARE FREEZING TOO SLOWLY AUTOMATIC ICE MAKER DOES NOT WORK NOT DISPENSING ICE Possible Causes Solutions • Water shutoff valve connecting • Call ...
Owner's Manual
Page 26
... line to a reverse osmosis system for optimal operation. • The dispenser can decrease water pressure. If cubed ice dispenses correctly, depress the button for"crushed" ice and begin dispensing again. • Move the switch to the ON (I) position. • See the "Connecting...to "cubed". It is set for the proper operation. TROUBLESHOOTING GUIDE Problem NOT DISPENSING ICE NOT DISPENSING WATER Possible Causes Solutions • The ice dispenser is stalling while dispensing "crushed" ice. • Ice maker power switch in the OFF (O) position. • Water supply turned off or not...
... line to a reverse osmosis system for optimal operation. • The dispenser can decrease water pressure. If cubed ice dispenses correctly, depress the button for"crushed" ice and begin dispensing again. • Move the switch to the ON (I) position. • See the "Connecting...to "cubed". It is set for the proper operation. TROUBLESHOOTING GUIDE Problem NOT DISPENSING ICE NOT DISPENSING WATER Possible Causes Solutions • The ice dispenser is stalling while dispensing "crushed" ice. • Ice maker power switch in the OFF (O) position. • Water supply turned off or not...


