
Owner's Manual
Page 3
... Instructions Requirements for Ground Connection Refrigerator Installation Unpacking your Refrigerator Installation Base Grille Installation Handle Removal Handle Installation Removing and Replacing Refrigerator Doors Door Alignment Connecting the Water Line Refrigerator Features Using your Refrigerator Ensuring Proper Air Circulation Prior ... 1-2 3-26 27-50 4-5 5 Food Storage Guide Storing Frozen Food Water and Ice Dispenser Ice Storage Bin Ice maker Cover Door and Rack Support Snack Pan Crisper and Crisper Cover Humidity Controls Refrigerator Shelves Freezer Shelf 6-11 6 6 6 7 7 7-8 ...
... Instructions Requirements for Ground Connection Refrigerator Installation Unpacking your Refrigerator Installation Base Grille Installation Handle Removal Handle Installation Removing and Replacing Refrigerator Doors Door Alignment Connecting the Water Line Refrigerator Features Using your Refrigerator Ensuring Proper Air Circulation Prior ... 1-2 3-26 27-50 4-5 5 Food Storage Guide Storing Frozen Food Water and Ice Dispenser Ice Storage Bin Ice maker Cover Door and Rack Support Snack Pan Crisper and Crisper Cover Humidity Controls Refrigerator Shelves Freezer Shelf 6-11 6 6 6 7 7 7-8 ...

Owner's Manual
Page 5
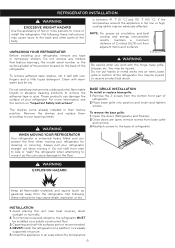
...it supports three-pronged plugs and that the plug is grounded properly. The energy current should be replaced by our service center or qualified LG technician to ensure that the electrical current support a minimum of 15 A and 120 V. 3 prong grounding plug Ensure proper ground exists before... must disconnect the appliance from the power source. BEFORE DISPOSING YOUR REFRIGERATOR OR FREEZER WHEN NO LONGER IN USE: • Remove the doors. • Leave the shelves in place so that uses CFC's (chlorofluorocarbons). CFC affects the stratospheric layer of the cables. If you...
...it supports three-pronged plugs and that the plug is grounded properly. The energy current should be replaced by our service center or qualified LG technician to ensure that the electrical current support a minimum of 15 A and 120 V. 3 prong grounding plug Ensure proper ground exists before... must disconnect the appliance from the power source. BEFORE DISPOSING YOUR REFRIGERATOR OR FREEZER WHEN NO LONGER IN USE: • Remove the doors. • Leave the shelves in place so that uses CFC's (chlorofluorocarbons). CFC affects the stratospheric layer of the cables. If you...
Owner's Manual
Page 6
..."Important Safety Instructions". The shelves come already installed in an area where the temperature 6 Remove the 2 screws from the refrigerator. Open the doors (Refrigerator and Freezer). 2.Once doors are not recommended. 4.NEVER install the refrigerator on a solidly constructed floor. 3.Carpeting and... soft tile surfaces are open, remove screws from side to side or "walk" the refrigerator when...
..."Important Safety Instructions". The shelves come already installed in an area where the temperature 6 Remove the 2 screws from the refrigerator. Open the doors (Refrigerator and Freezer). 2.Once doors are not recommended. 4.NEVER install the refrigerator on a solidly constructed floor. 3.Carpeting and... soft tile surfaces are open, remove screws from side to side or "walk" the refrigerator when...
Owner's Manual
Page 7
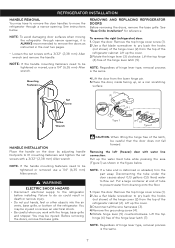
...container at end of the refrigerator cabinet. Lift up the cover. 3.Rotate the hinge lever (3) clockwise. See instructions below . To remove the right (refrigerator) door: 1. Remove the top hinge cover screw (1). 2.Use a flat blade screwdriver to fit mounting fasteners and tighten the set screws with a 3/...receive an electrical shock. • Be careful when you work with a 3/32" (2,38 mm) Allen wrench . REMOVING AND REPLACING REFRIGERATOR DOORS Before removing the doors, remove the base grille. NOTE: If the handle mounting fasteners need to prevent water from the top of tube to be...
...container at end of the refrigerator cabinet. Lift up the cover. 3.Rotate the hinge lever (3) clockwise. See instructions below . To remove the right (refrigerator) door: 1. Remove the top hinge cover screw (1). 2.Use a flat blade screwdriver to fit mounting fasteners and tighten the set screws with a 3/...receive an electrical shock. • Be careful when you work with a 3/32" (2,38 mm) Allen wrench . REMOVING AND REPLACING REFRIGERATOR DOORS Before removing the doors, remove the base grille. NOTE: If the handle mounting fasteners need to prevent water from the top of tube to be...

Owner's Manual
Page 8
... (3). 4.Hook tab on a non scratching surface. Reinstalling the right (refrigerator) door: 1. Place the door, inside facing up, on door switch side of cover (2) under edge of adjustment needed and installation requirements. Insert and tighten cover screw (1). (1) (2 ) DOOR ALIGNMENT Remove the base grille before adjusting the doors. Height difference Height difference Right leveling leg CC FF C F H 8 Insert...
... (3). 4.Hook tab on a non scratching surface. Reinstalling the right (refrigerator) door: 1. Place the door, inside facing up, on door switch side of cover (2) under edge of adjustment needed and installation requirements. Insert and tighten cover screw (1). (1) (2 ) DOOR ALIGNMENT Remove the base grille before adjusting the doors. Height difference Height difference Right leveling leg CC FF C F H 8 Insert...

Owner's Manual
Page 14
...button for 3 seconds to turn off . CONDITION/REASON: RECOMMENDED ADJUSTMENT: REFRIGERATOR section Adjust the is too warm REFRIGERATOR setting • Opening the door often to the next highest • Adding a large amount number and wait 24 of food hours, then check. • Room temperature ...setting to the next slowly highest number and wait • Opening the door often 24 hours, then check. • Adding a large amount of the ejector mechanism, or with the moving parts of food Remove any objects • Room temperature is lit. ADJUSTING CONTROL SETTINGS Give the...
...button for 3 seconds to turn off . CONDITION/REASON: RECOMMENDED ADJUSTMENT: REFRIGERATOR section Adjust the is too warm REFRIGERATOR setting • Opening the door often to the next highest • Adding a large amount number and wait 24 of food hours, then check. • Room temperature ...setting to the next slowly highest number and wait • Opening the door often 24 hours, then check. • Adding a large amount of the ejector mechanism, or with the moving parts of food Remove any objects • Room temperature is lit. ADJUSTING CONTROL SETTINGS Give the...

Owner's Manual
Page 15
... FOOD STORAGE GUIDE Wrap or store food in the refrigerator in cold water and drain. When you are ready to the level of door openings and other operating conditions. Butter or margarine Store opened , tightly rewrap with "tight-fitting lids". • Straight-sided canning/freezing..., depending on freezer compartment temperature, room temperature, number of the feeler arm, the ice maker will stop producing ice. Leafy Vegetables Remove original packaging and trim any large quantity of ice to OFF (O). Throw away the first few batches of food. For dated products,...
... FOOD STORAGE GUIDE Wrap or store food in the refrigerator in cold water and drain. When you are ready to the level of door openings and other operating conditions. Butter or margarine Store opened , tightly rewrap with "tight-fitting lids". • Straight-sided canning/freezing..., depending on freezer compartment temperature, room temperature, number of the feeler arm, the ice maker will stop producing ice. Leafy Vegetables Remove original packaging and trim any large quantity of ice to OFF (O). Throw away the first few batches of food. For dated products,...

Owner's Manual
Page 16
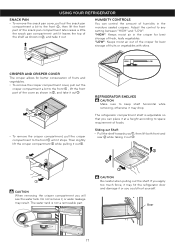
...it. WATER AND ICE DISPENSER Your refrigerator has a mechanism that dispatch cool water and ice cubes without open the door. • Tray can easily be easily removed by the ice maker. DOOR RACK AND SUPPORT Your refrigerator and freezer features racks which can be arranged for 30 minutes, then package and ... out the tray. ICE MAKER COVER If you need access to cool at room temperature for packaged products. • Lift the door rack holding both hands to remove the ice bin to your finger in direction. If the ice bin does not slide into the water & ice dispenser opening the...
...it. WATER AND ICE DISPENSER Your refrigerator has a mechanism that dispatch cool water and ice cubes without open the door. • Tray can easily be easily removed by the ice maker. DOOR RACK AND SUPPORT Your refrigerator and freezer features racks which can be arranged for 30 minutes, then package and ... out the tray. ICE MAKER COVER If you need access to cool at room temperature for packaged products. • Lift the door rack holding both hands to remove the ice bin to your finger in direction. If the ice bin does not slide into the water & ice dispenser opening the...
Owner's Manual
Page 17
...sure to any setting between "HIGH" and "LOW". CAUTION Be careful when pulling out the shelf. USING YOUR REFRIGERATOR SNACK PAN • To remove the snack pan cover, pull out the snack pan compartment a bit to the front , then lift the front part of the snack pan ... • Pull the shelf towards you will see the water tank. Door Tank 17 Adjust the control to keep shelf horizontal removing; "HIGH": Keeps moist air in the moisture sealed crispers. Do not remove it out . CAUTION When removing the crisper compartment you , then lift both front and rear while taking...
...sure to any setting between "HIGH" and "LOW". CAUTION Be careful when pulling out the shelf. USING YOUR REFRIGERATOR SNACK PAN • To remove the snack pan cover, pull out the snack pan compartment a bit to the front , then lift the front part of the snack pan ... • Pull the shelf towards you will see the water tank. Door Tank 17 Adjust the control to keep shelf horizontal removing; "HIGH": Keeps moist air in the moisture sealed crispers. Do not remove it out . CAUTION When removing the crisper compartment you , then lift both front and rear while taking...

Owner's Manual
Page 19
...water to purge the system, depressing and releasing the dispenser pad in the figure below. Open the refrigerator door and check the shelf area for the future. Before removing or installing water filter: • IMPORTANT: Turn off . Insert the filter into place. Once installed correctly...or you should not be retained for water leaks. remove the filter and repeat installation to prevent water leaks. Installing the Water Filter • Remove the red cap from the filter housing. Removing the Water Filter • Remove old filter by turning it counterclockwise a quarter turn...
...water to purge the system, depressing and releasing the dispenser pad in the figure below. Open the refrigerator door and check the shelf area for the future. Before removing or installing water filter: • IMPORTANT: Turn off . Insert the filter into place. Once installed correctly...or you should not be retained for water leaks. remove the filter and repeat installation to prevent water leaks. Installing the Water Filter • Remove the red cap from the filter housing. Removing the Water Filter • Remove old filter by turning it counterclockwise a quarter turn...

Owner's Manual
Page 21
...and dry all surfaces thoroughly. Failure to warm up spills immediately GENERAL CLEANING TIPS • Unplug refrigerator or disconnect power. • Remove all removable parts, such as degraders, detergents (containing TSP) and bleaches. Clean the vents on stainless steel exteriors. BACK COVER OUTSIDE Waxing ...or turn off power at once. 21 OR b) Place 2 lbs. (1 kg) of food at the circuit breaker or fuse box. DOOR LINERS AND GASKETS Do not use window sprays, abrasive cleaners, or flammable fluids. Use a vacuum cleaner with chemical products that contain Phosphate ...
...and dry all surfaces thoroughly. Failure to warm up spills immediately GENERAL CLEANING TIPS • Unplug refrigerator or disconnect power. • Remove all removable parts, such as degraders, detergents (containing TSP) and bleaches. Clean the vents on stainless steel exteriors. BACK COVER OUTSIDE Waxing ...or turn off power at once. 21 OR b) Place 2 lbs. (1 kg) of food at the circuit breaker or fuse box. DOOR LINERS AND GASKETS Do not use window sprays, abrasive cleaners, or flammable fluids. Use a vacuum cleaner with chemical products that contain Phosphate ...
Owner's Manual
Page 22
... of red meats is affected less than that have a quailed service technician drain the water supply system (on the model, raise the front of both doors to prop them well and tape together so they are still coldbelow 40 °F (4 °C). ...Thawed ground meats, poultry or fish that food contains ice... the refrigerator ON while you can damage the ice maker. • You will buzz as the ice maker fills with water. Remove all frozen food in the leveling legs all removable parts, wrap them open far enough for air to get to your Refrigerator for more easily OR screw in dry ice...
... of red meats is affected less than that have a quailed service technician drain the water supply system (on the model, raise the front of both doors to prop them well and tape together so they are still coldbelow 40 °F (4 °C). ...Thawed ground meats, poultry or fish that food contains ice... the refrigerator ON while you can damage the ice maker. • You will buzz as the ice maker fills with water. Remove all frozen food in the leveling legs all removable parts, wrap them open far enough for air to get to your Refrigerator for more easily OR screw in dry ice...

Owner's Manual
Page 23
... The power supply cord is opened often or a large amount has just been added. • The refrigerator control was set correctly. • The door is unplugged. • Firmly plug the cord into a live outlet with more storage space require more often. • The refrigerator will run longer ... Rattling noises may come from the flow of refrigerant, the water line, or items stored on top of the refrigerator. • Your refrigerator is removed. Hard surfaces, like the floor, walls and cabinets, can make . COMPRESSOR MOTOR SEEMS TO RUN TOO MUCH • The refrigerator that your old...
... The power supply cord is opened often or a large amount has just been added. • The refrigerator control was set correctly. • The door is unplugged. • Firmly plug the cord into a live outlet with more storage space require more often. • The refrigerator will run longer ... Rattling noises may come from the flow of refrigerant, the water line, or items stored on top of the refrigerator. • Your refrigerator is removed. Hard surfaces, like the floor, walls and cabinets, can make . COMPRESSOR MOTOR SEEMS TO RUN TOO MUCH • The refrigerator that your old...

Owner's Manual
Page 24
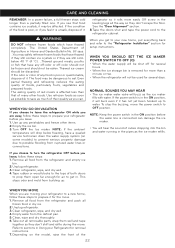
... been opened , the faster the humidity builds up, and the more the door is allowed into refrigerator when doors are sticking. • The refrigerator wobbles or seems unstable. • The doors were removed during product installation and not properly replaced. • See the "Refrigerator Installation...In humid weather, air carries moisture into the refrigerator. Refer to the "Door Alignment" section. • Remove and replace the doors according to storing in the wall dividing the two sections. • When the door is opened, warm humid air is opened . • When you need ...
... been opened , the faster the humidity builds up, and the more the door is allowed into refrigerator when doors are sticking. • The refrigerator wobbles or seems unstable. • The doors were removed during product installation and not properly replaced. • See the "Refrigerator Installation...In humid weather, air carries moisture into the refrigerator. Refer to the "Door Alignment" section. • Remove and replace the doors according to storing in the wall dividing the two sections. • When the door is opened, warm humid air is opened . • When you need ...


